Wednesday, November 7, 2018

Blender 2.80

The development version now runs on Blender 2.80. Or at least it runs on the version of Blender 2.80 that I downloaded a few days ago. There are still some issues, but most features seems to work as they do in Blender 2.79.

The most obvious difference is that the DAZ tab has moved from the T-shelf on the left of the viewport to the N-shelf on the right side. Not sure why add-ons cannot define tabs in the Tools shelf anymore, but so it is. Here is the same character imported into Blender 2.79 and Blender 2.80:

Blender 2.79


Blender 2.80
The development version can be downloaded from https://bitbucket.org/Diffeomorphic/import-daz.

The same changes have also been implemented on two of my other add-ons:
MakeWalk: https://bitbucket.org/Diffeomorphic/makewalk
MHX 2 importer: https://bitbucket.org/Diffeomorphic/mhx2-makehuman-exchange
Those add-ons are not really supported anymore, but at least the basic features now work under Blender 2.80.

Tuesday, October 16, 2018

Stable version 1.3.1

Originally I planned to wait with the next release until after Blender 2.80 was available. However, since the development version is so much better than version 1.3, especially when it comes to materials, I decided to make a new stable release, version 1.3.1. It can be downloaded from https://www.dropbox.com/s/0tfwk7v82116nt3/import-daz-v1.3.1-20181016.zip

The progress on materials, which I have already written about here, are due to many helpful bug reports by users engetudouiti and Alessandro Padovani. As I myself have a very limited understanding of Iray materials, and am not very good at Cycles either, these improvements could not have happened without their help.

The documentation has not been updated since version 1.3. The current user interface differs slightly from the one described in the documentation, but hopefully this should not cause serious problems. When you import a Daz file, the materials section in the import options now looks like this:
For opaque materials there are two options, depending on whether we want to use the principled node or not. For refractive materials there are three more options: the Guess option is good for eyes, and the Custom Shader is a quite complex node setup that should mimic refractive Iray materials very closely. Finally, the Environment checkbox allows us to import environment maps from Daz Studio. This is useful if you want to import complete Daz scenes, less so if you use Daz Studio as a character generator.

When the add-on is enabled, there is a warning message in the terminal: "Warning: This script was written Blender version 2.80.0 and might not function (correctly), though it is enabled". This is normal and nothing to worry about. The goal is that the future version 1.4 should run on both Blender 2.79 and 2.80, and as a first step in this direction the Blender version has been changed to 2.80.


Thursday, July 19, 2018

scimeter.org

Bee reports about a new tool for arXiv users that she helped to create: Scimeter. Having been stuck for a decade and not really on speaking terms with the arXiv moderators, I haven't thought much about physics for the last decade, but here is the cloud that it produces for my arXiv papers:

 
 Couldn't have made it better myself.

Monday, July 16, 2018

Shells and Layered Images

In Daz Studio, a shell is a mesh with zero vertices that is used to add features to the materials of the base mesh. It can be used e.g. for makeup, tattoos and wounds. Shells are also used by Genesis 8 genitals to add color and effects without having to modify the torso material.

Importing the shells directly into Blender makes no sense, because they are empty meshes that don't show up in renders. Instead the Daz Importer uses the information in the shell materials to modify the materials of the base mesh. Here is an example where two bruises have been added to the face and one bruise has been added to the lips:
 The principled face material looks like this:
 The bruise textures are added to the face material inside the node group:
 This node group contains some redundant nodes, which hopefully will go away soon.

 A different way to add layers is to use the Layered Image Editor (LIE) in Daz Studio. Here we have added three small textures to the face texture.
After importing to Blender, the face looks like this. There was also added an extra texture to the lips material.
And here is the node group that computes the diffuse texture. The textures are placed using mapping nodes.
 

Monday, July 2, 2018

Stripped runtime system

In version 1.3 of the Daz importer the face bones drivers use Custom Driver Functions. This represents a major improvement compared to the methods used in earlier versions, because
  1. There no limit to the number of driving properties.
  2. Driver functions can be combined with other drivers.
  3. Performance is much better than with handlers.
However, there is a caveat. The add-on must always be enabled, because the drivers use the function evalMorph, which is defined by the add-on. This is not really a problem as long as you stay on the same computer, but if you send your blend file to another machine which does not have the Daz importer installed, the missing driver function will destroy the face pose completely. A typical situation where this problem may arise is if you send the blend files away to a render farm.


If you look in the DOS/terminal window, you find a lot of error messages of the form

Error in Driver: The following Python expression failed:
        'evalMorphs(self, 2, "Rot")'

Traceback (most recent call last):
  File "<bpy driver>", line 1, in <module>
NameError: name 'evalMorphs' is not defined


Thus clearly the problem is that the drivers for the face bones call the function evalMorphs, which is missing because it defined by the non-available import-daz add-on.

To solve this problem, the definition of evalMorphs and some necessary supporting code has been duplicated in the file runtime_stripped.py, located in the folder with the same name under the import_daz directory. Since this addition is very recent, you need to download the latest development version of the add-on.

To use this file when the import-daz add-on is disabled, follow these steps:

In the Scripting context, select Open to open a text file.

Navigate to the file import-daz/runtime_stripped/runtime_stripped.py.

First enable the Register checkbox, and then press the Run Script button. Finally save the blend file.

Open the blend file again. Since it is the last file saved, it should be found at the top of the Open Recent... menu item.

And now the ugly face is replaced by a smile.

At least this works in this example. It is not clear to me if it will still work if you do batch rendering from a terminal, or if you have do some extra steps as well.

Saturday, June 2, 2018

Material progress

With release 1.3 the Daz importer feels almost complete. I have started to use it for my own personal projects, and there is little that I want to change. However, there is one area that is still problematic: materials. This is not so surprising, because my understanding of Blender materials is poor and of Daz materials is almost non-existent.

Fortunately, recently Daz master Alessandro Padovani has stepped in with a number of bug reports that clarified a number of issues:
  • Daz textures are automatically multiplied with the color. In Blender, this multiplication has to be carried out explicitly.
  • Daz colors are sRGB whereas Blender uses a linear color space. This does not affect textures, which are automatically converted, but it changes pure colors.
  • Depending on the shader, specular maps are put in different channels: glossy color, glossy layered weight, specular color, etc.
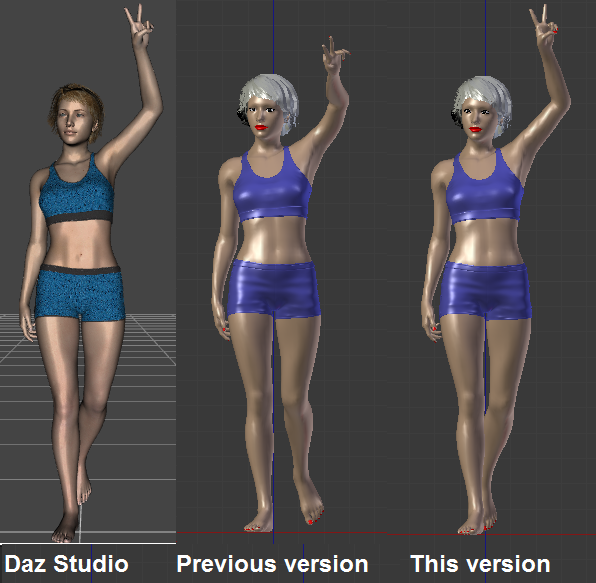
However, the most important improvement is in the treatment of bump maps. The following picture illustrates the difference between stable 1.3 and the current development version for a Genesis 8 character, provided that the principled shader is used.


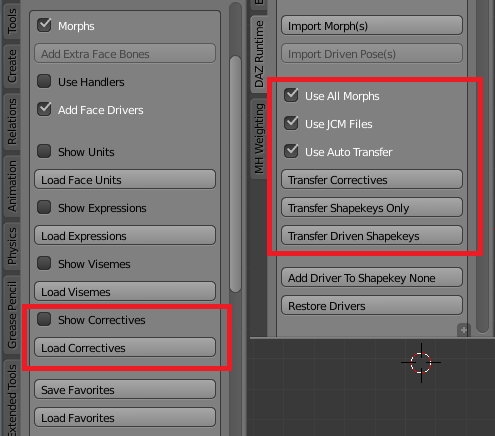
In Blender, the bump node depends on two parameters: strength and distance. In Iray, there is no distance parameter, so in 1.3 I assumed that it was 1 Daz unit, i.e. 1 cm. However, Alessandro figured out that the correct bump distance in Iray is 0.5 mm. In other Daz shaders such as 3Delight, the bump distance (or more exactly, bump max and min values) is explicitly available, and is typically 1 or 2 mm. To eliminate the worst artefacts, version 1.3 had two import options with which one could change the bump strength and subsurface distance, which also affects the bumpiness. Since bump maps are now imported correctly, these options have been removed.

In plain Cycles, without the principled shader, the situation was not so bad, as show in the picture below. However, this was really due to cheating. To avoid the extreme bumpiness, in version 1.3 the bump map only affected the diffuse channel, but not SSS or translucency. In the development version, the bump map affects all three channels, but the skin still looks ok due to the reduced bump distance. This trick was not possible with the principled shader, because it only has one Normal input which affects both base color and SSS.


Another difference is that the transparency option has disappeared in the development version. This was originally introduced for debug purposes, because I did not understand how to handle refraction correctly. In the current version, the refraction channel in Daz is mapped to a Refraction node in Cycles, and to the Transmission input in the principled node if that is enabled. There remains an option to mix the result with a Transparency node, because sometimes the pure result tends to be not so good.

Here is an eye rendered in plain Cycles with the Mix Transparancy Factor set to 0.0, 0.5 and 1.0, respectively.

And here is the same eye, but loaded with Principled Shader enabled.

Friday, April 27, 2018

Stable version 1.3

Finally, stable version 1.3 has been released.

Documentation: https://diffeomorphic.blogspot.se/p/daz-importer-version-13.html
Download: https://www.dropbox.com/s/6q9gf2fw24p3ash/import-daz-v1.3-20180425.zip

Changes from previous version:

The add-on was developed on Windows 7. It has not been tested on Mac because I don't have access to any, but it does work under Linux. Hence earlier Mac problems due to case-sensitive file names should be solved.

Sunday, April 15, 2018

Linux

DAZ Studio is available for PC and Mac, but since I don't have access to any Mac the code has only been tested under Windows; more precisely, Windows 7. From user comments I have understood that there are problems to run the DAZ Importer under Mac, mainly because file paths are case-sensitive on Mac (?) but not on Windows.

As I said, I have no Mac to test on, but I do have a dual-boot machine with Windows and Linux. Linux is not really an interesting os for the DAZ importer, since DAZ Studio is not available on it, but it provides a testing ground for what happens with  a case-sensitive file system. In fact, somebody provided code for fixing problems with case sensitivity long ago (apologies for forgetting who), but the patch caused some obscure problems on Windows so I disabled it.

In the most recent unstable versions, the patch has been reinstated and I have managed to import DAZ files from my Windows hard drive under Linux. On Linux, it is crucial that the option Case-Sensitive Paths is enabled; it is found in the General section of the Settings panel. This option should be automatically enabled on Linux and Mac, and disabled on Windows, but because of some earlier confusion the default settings were switched. This bug is now corrected, but make sure that the settings are as in the figure below:


Here the same character has been imported and rendered under Windows and Linux. The lighting conditions and Blender versions are also different (2.79a vs 2.78), but the conclusion is that the add-on now works under Linux, at least for many characters.


Since the DAZ Importer seems to work under both Windows and Linux, it will hopefully work on Mac as well.


Friday, April 6, 2018

Custom driver functions

In Genesis 3 and 8 characters, facial expressions are implemented as poses of the face rig. To be able to easily set a face pose, the expressions are driven by rig properties displayed in the Daz Runtime tab in the T panel. E.g., the bone lUpperMiddle may be driven by a scripted expression like

(-16*A-32*B+4*C-13*D-23*E-20*F-7*G+9*H+22*I-5*J-10*K-7*L+5*M+1*N+8*O-10*P-13*Q-24*R-46*S-10*T-37*U+8*V-10*W-13*X+13*Y+0*Z+1*a+50*b-39*c-21*d-29*e+9*f+7*g-45*h-9*i-40*j)/1000

where A-j are driver variables, one for each rig property. In this case the data path of the A variable is ["DzVEE"], so A is the value of the rig property DzVEE, corresponding to the viseme EE. The problem is that in Blender the length of scripted expression is limited to 256 characters. If we load many face units, expressions and visemes, this limit is easily exceeded.

To circumvent this problem, about a year ago I introduced handlers, which are functions that are called every time the scene is updated. Instead of directly driving the bone locations by rig properties, the rig properties drive a number of intermediate bone properties, and the bone locations are then updated by the handlers. The advantage of this method is that each intermediate property is only driven by part of the original rig properties, so the length of the scripted expressions can be kept under the 256 character limit.

However, handlers introduce new problems of their own. It does not seem possible to combine handlers with other drivers, because the handlers are not drivers. This becomes a problem e.g. for eyelids, which are driven both by the eye rotation and by face units such as Eye Close. But the most severe problem with handlers is that they slow down the viewport. All handlers are called each time a scene is updated, which is very time consuming.

Following a suggestion by Alec Vallintine I have introduced yet another way to drive bone locations: using custom driver functions. This method seems to solve all the problems with the previous two methods:
  1. There no limit to the number of driving properties.
  2. Driver functions can be combined with other drivers.
  3. Performance is much better than with handlers.
Since a few days ago, drivers for facial expressions are implemented using this new method.

Friday, March 30, 2018

Recent progress

The Load Pose button loads a pose from a file to the active character. However, it is not so simple as to just rotate bones with the rotations in the file, because bones in Blender are oriented differently from in Daz Studio. The reason is that for a Blender bone the local Y axis points in the bone direction, whereas nodes in Daz Studio can be oriented in any way.

For a long time I thought that I knew how to transfer Daz rotations to Blender, because my algorithm worked flawlessly for characters up to Genesis 3. Alas, when Genesis 8 came along last year, the algorithm did not work correctly. I don't know why it worked for Genesis 1-3, but I suspect that the bone axes coincide with the global coordinate system for those characters, and my old algorithm worked in that case.


Anyway, the algorithm has now been updated, and the picture above shows the difference. Clearly the new version agrees better with Daz Studio than the previous one.

Once we have the correct correspondence between Daz and Blender poses, it becomes possible to translate bone drivers. This is useful for corrective shapekeys, known as Joint Corrective Morphs or JCM's in Daz Studio. A JCM is typically driven by a single Euler angle in Daz Studio, but due to the different bone orientations this corresponds to a mix of all three Euler angles in Blender.


To easily load JCM's for a character, simply press the new Load Correctives button in the Morphs section. If you enable Show Correctives, a list of available correctives open up, and you can select which morphs to load. If the active character is of type Genesis 3 and 8, a long list of shapekeys are loaded, driven by bone rotations. Apparently there are no JCM's for the older character types.


This picture illustrates the difference. The difference is not huge, but corrective shapekeys make deformation better.

Corrective shapekeys make deformation better for the character mesh, but the clothes don't have any. This can be fixed by transferring the shapekeys from the human to her clothes. With the clothes selected and the character mesh active, press the Transfer Correctives button. The deformation clearly improves.


There are several buttons for morph transfer:
  • Transfer Correctives: Transfer shapekeys with bone drivers and their drivers.
  • Transfer Shapekeys Only: Transfer only shapekeys, don't make drivers.
  • Transfer Driven Shapekeys: Transfer shapekeys with property drivers and their drivers.
There are also some options that control how the morphs are transferred:
  • Use All Morphs: Transfer all shapekeys from the active mesh. The alternative is to only transfer the active shapekey.
  • Use JCM Files: Some vendors have made custom JCM files for their clothes. If such files are found, use them if this option is enabled.
  • Use Auto Transfer: If no custom JCM file is found, automatically transfer shapekeys. This is both slower and less good than with custom JCM files.
Everything is very new and may change without notice