The DAZ Importer fully supports three shaders: Iray Uber, 4-Layer Uber PBR MDL, and PBRSkin. Other shaders are only partially supported or not at all. Sometimes the result with an unsupported shader can be improved by applying the Iray Uber shader in DAZ Studio, but there are no guarantees. Normally we have to tweak the nodes in Blender to obtain the effect we want. However, to do so we often need textures that only affect the unsupported channels. In the last version of the DAZ Importer we can import such textures, even if they are not used by any nodes in Blender.
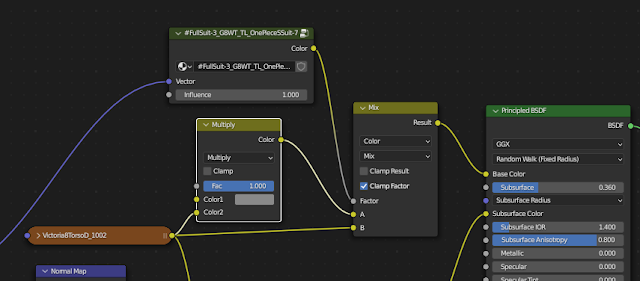
Now there are new texture nodes at the right side of the node tree, together with an empty node group to indicate which channels the textures are assigned to.The next step is to make the skin look tanned. To this end we launch the Material Editor so we can edit all skin materials at once.The simplest way is to turn down the value of the base color of the principled node.The character is now tanned, but over the entire body; still no tan lines.Next we go into the node editor for the Torso material. The node group to the left will be used as a mask. The other node group, whose only purpose is to display the affected channels, can be deleted to clean up the node tree.
 Here are the nodes that affect the base color: the original texture and the multiply node that creates the tan effect.
  Add a mix node that mixes the tanned skin and the original skin, using the tan lines texture as the mixing factor.
The other materials still contain unused textures and node groups. To remove them and keep the node trees tidy we can use Advanced Setup > Materials > Prune Node Trees with Keep Unused Textures disabled.


