Shells, also know as geometry shells or geoshells, add color and other properties to the materials of a character. A single shell seldom causes problems, but if we mix multiple shells they can interact with each other in undesired ways. This post describes some shell problems and how to fix them.
Here we have a female character with geograft genitals and nipples, together with the corresponding shells that add color to the geografts. The genitals and the outer parts of the nipples are paler than the surrounding skin because the two shells influence more materials than they should.
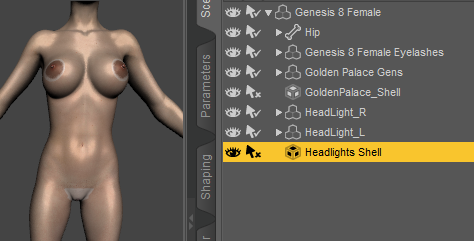
Select the Headlights Shell and go to the Parameters tab. In the Shell section, select Surfaces. The shell is enabled on the Torso and Nipples materials, which is correct. However, it is also enabled on the genitals materials, which doesn't make sense. Turn off the Headlights Shell on the five Golden Palace materials.
Then select the Golden Palace Shell and turn off the two nipples materials. The shells now only affect the materials that they should, and the pale areas are gone.
Next we add another shell for Tears Makeup. The headlights and genitals turn pale again. To fix this we select the tears shell and turn it off for the nipple and genitals materials.
Finally we add a shell to make the body look as if it is oiled, and the nipples and genitals turn pale yet again. However, this time we cannot disable the shell for the geograft materials, because we want the geografts to look oily as well. If we turn off the shell for those materials, the nipples and genitals would be surrounded by a dry area in an otherwise oiled body, which would look very strange.
I don't know how to solve this problem in DAZ Studio, so we leave it to the Blender side.
Here we have imported the character into Blender. The nipples are surrounded by pale rings that come from the oily shell. The genitals are also pale.
If the nipples are solid white, it means that some other shell is also active. Perhaps you forgot to turn off the tears shell on the nipple materials.
In the shader nodes editor, select the left nipple material (called Nipples-2). To the right of the node tree, just before the material output node, there are node groups that correspond to the material shells in DAZ Studio. The Oiled Full Body node has a node group call
Oiled Full Body_GP_Torso-1. Replace this node group with the node group for the torso, i.e.
Oiled Full Body_Torso-5.
Repeat the procedure for all genitals and nipples materials.
The pale areas are now gone.
The tears makeup is a bit pale compared to DAZ Studio. We can darken the mascara by increasing the Influence slider. Or if the lady isn't sad all the time, we can turn off the dripping mascara by setting the influence to zero.
We can increase the oilyness in the same way, or make the skin look dry
by turning down the oily shell influence to zero. However, this becomes
quite cumbersome since there are many materials that have the oily shell
group, and the change has to be made to all of them. Fortunately, there
is a way to change the influence for all materials at once.
When a mesh with shell groups is selected, there is a new panel called Visibility. The Set Shell Visibility button opens a dialog with a list of all shells and their influence. We see that influence of the Tears makeup shell is three, due to the change that we made above. We can now change the value of the Oiled Full Body slider to increase or decrease the influence of the shell for all materials at once.