A geometry shell in Daz Studio is a kind of virtual mesh. It is a clone of a base mesh, but unlike instances you can change its material settings and some other properties. The most common use is to add color to the base mesh. There is no corresponding data type in Blender. Since in many cases a geoshell is just a container for something that modifies the materials, the Daz Importer converts geoshells into node groups in the corresponding materials. This usually works well if we just add a single geoshell, but if the same character has several geoshells the Daz Importer can be confused. Recently I have therefore added some tools to fix problems with multiple geoshells.
Our character has two types of geografts: nipples (HeadLight) and genitals (Golden Palace), each with an associated shell. There is also a third shell that covers the body in blood.
In Blender we have some problems. The body is covered with blood correctly, but the geografts are white. (Good for avoiding internet censorship, though)
Let us select the genitals and look at the node tree of the torso material, GP_Torso-1. Just before the output nodes, there are three node groups which correspond to the three shells in Daz Studio. The shell nodes are named: Shell name _ Material name, so we easily identify both the shell that it corresponds to and in which material the node appears. The shell nodes are ordered according to Mesh Offset, which lets you control which shell appears on top.
One problem is the HeadLights shell to the left. It should only affect the nipples meshes, but not the genitals. To fix that, we can simply delete the node and reconnected the incoming and outgoing links. This is not difficult but rather tedious, since the genitals mesh has five different materials, and the HeadLights node must be deleted in each.
To facilitate this task, there are two new buttons in the Setup > Materials section: Remove Shells and Replace Shells. But first we Merge Materials, which reduces the number of genitals materials from five to three without changing anything else.
When we press Remove Shells a dialog appears with all shell nodes in all materials in the active mesh. We want to delete the three Headlights nodes which shouldn't be present in the genitals materials.
Filter the selection with "head" and select all. The HeadLights nodes are now gone from all genitals materials.
Unfortunately, the genitals are still rendered white. We also have a problem with the Blood node to the right. The Blood geoshell is associated with the body mesh, and gives pure white when extended to geografts. Hence we want to replace the node tree in the geograft node group
SYABME Blood 01 Full Body G8F_GP_Torso-1
with the corresponding body node tree
SYABME Blood 01 Full Body G8F_Torso-4
Again, this is straightforward but tedious to do directly in Blender; just select the desired node tree from the drop-down list. For convenience, there is a tool to do it for all materials at once.
Press Replace Shells. A dialog appears with all shells and the corresponding node trees. We want to replace the three last node trees with the node tree for the body torso.
Like this. Confirm the dialog. The node tree for the blood node is changed; even the label at the banner is changed.
We must now repeat the procedure for the nipple meshes. This time it is the Golden Palace shells that must be removed. The Blood node tree should all be set to the node tree in the body torso material. After these steps, all white areas are gone and the geografts are covered in blood, too.
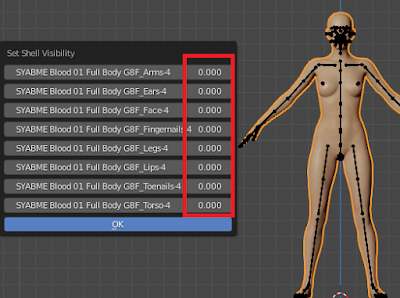
Another new tool is Set Shell Visibility in the Visibility panel. A dialog appears with all shell nodes and the correspond visibilities:
We can turn off all blood by changing the visibility to zero. In this way we can use the same character both before a fight (unbloodied) and after it (bloodied).
Normally visibility is either zero or one, or perhaps a number inbetween, but there is nothing that prevents us to go outside this range to achieve special effects.