Monday, June 28, 2021

Voluminosity and Material Editor

The Daz Importer creates somewhat non-standard skin materials in order to make them as faithful to Daz Studio as possible. In particular, the BSDF method uses translucency and voluminosity nodes the match the translucency in Iray

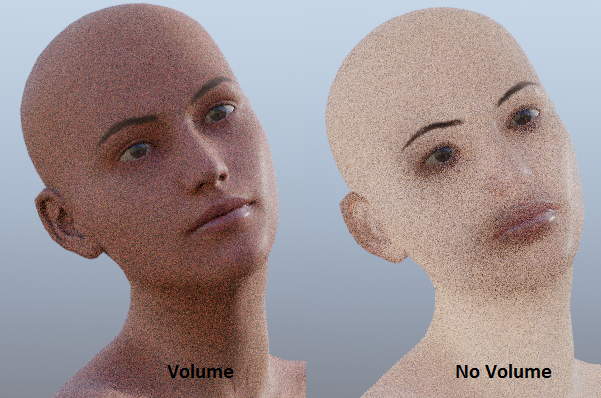
This setup is quite non-standard for Blender skins, and may lead to longer render times, but in some cases it is necessary. The picture below shows Victoria 8, rendered in Blender with and without the voluminosity node.

However, it is quite easy to modify the skin to the right to something good-looking, using the material editor. Before importing the character, we need to turn off the Volume option in the global settings dialog, so the voluminosity nodes are not generated.
Modifying the node trees manually is quite cumbersome, because Daz skin consists of many materials, and we need to make changes consistently over all skin materials. Instead we can use the material editor, which has been improved recently. Start it by pressing Launch Material Editor in the Setup > Materials section. Before doing so, select the material that the editor uses as a blueprint. In this case we choose the Face-1 material.
At the top of the editor window we select the materials that will be affected by the changes. Clearly we only want to tweak the skin, lip and nail materials, and leave the eye and mouth materials unchanged. We can select the individual materials, but it is more convenient to use the Skin-Lips-Nails button to do this. The active material Face-1 is shown below the list of affected materials.
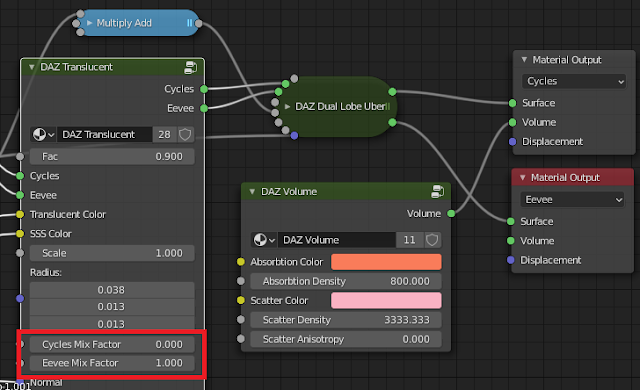
We then open the Translucency group, and change the Cycles Mix Factor to 1.0 and the SSS color to a light grey.
The mix factors determine whether the DAZ Translucent group uses translucency or sub-surface scattering, or a mixture of both. 0.0 means pure translucency, which works well together with the volume nodes, and 1.0 means pure SSS. Since we didn't generate any volume nodes, the Cycles Mix Factor is set to 1.0, i.e. pure SSS.
Finally we hit the Update Materials button. The result is not bad for a first attempt, considering that we only changed two parameters.
If we go back into the shader editor, we can see how the updates affect the node trees.
The Update Materials button does not close the material editor, so if we are not happy with the result we can continue to tweak the parameters. Here we changed the SSS color to a slightly reddish tone.

Saturday, June 19, 2021

Winders Update

A winder is a control bone that bends multiple parallel bones by the same amount. It is used in the MHX rig for fingers (a single finger bone bends all three finger links) and for the spine (the back bone bends three or four spine bones). It can also be useful in other contexts, e.g. for male genitals or for ponytails, as was discussed in a previous blog post

Winders are also useful for rigged hair, but here we often need to create several winders, one for each chain of links. Previously that was rather cumbersome, because the Add Winder tool had to be run for each chain, with the root of the chain active. With the latest update, several  bones can be selected at once, and the tool automatically figures out which bones are the chain roots.

Select the bones that we want to make winders for. This is usually quite easy, because the Merge Rigs tool puts non-standard bones on a separate layer. Press the Add Winders button.
The option box lets us select the bone layer where the winders live.
We can now quickly pose the hair with the winders.
The winder pose results in a quite complex pose for the original deform bones, which would be tedious to create by hand. However, the individual bones can still be posed on top of the winder pose, if we want to refine the pose.

Monday, June 7, 2021

Add-On Updater Removed

 For some time the Daz Importer has used the Blender add-on updater from CGCookie to let users automatically update the add-on to new versions. However, there are some problems with this.

  1. The add-on updater is not my code and I don't feel comfortable to include code which I don't understand.
  2. The Daz Importer consists of python files (.py), JSON files (.json) and Daz Studio scripts (.dsa). Python and Daz Studio files are updated correctly, but JSON files are not. This could be because I didn't configure the add-on updater correctly, or because the updater uses JSON files internally and therefore treats them differently from other files. In any event some files were not updated correctly.
  3. Including the add-on updater is not strictly legal, since it is licensed under GPL and Daz Importer uses a more liberal BSD-type license. It would not be a big deal for me to change the Daz Importer License to GPL, but since the add-on is intended to work as a bridge between commercial and open-source software, I prefer a license that works nicely with both.
  4. It does not work with Blender 2.93.

The last problem was reported some time ago. Exactly what goes wrong is not clear to me, since my main computer cannot start Blender 2.93 due to some missing dll. But in view of the other problems with the add-on updater, I have decided to remove it completely now when Blender 2.93 is officially released. It has also been removed from the stable version 1.5.1.

Friday, May 21, 2021

On Raw and Final Slider Values

In both DAZ Studio and in Blender morphs are controlled with sliders, but those sliders don't behave in the same way. In DAZ Studio a slider can change another slider, but the latter can also be changed independently. Something similar does not really exist in Blender; either the slider is driven by something else, and in that case it cannot be changed at all from the viewport, or the slider is not driven and cannot be modified by another slider.

However, there is a way to make sliders behave almost as they do in DAZ Studio, using an extremely clever trick devised by frequent commenter engetuduouti. This method uses two Blender properties for each DAZ slider: the "raw" value which can be manipulated in Blender, and the "final" value which reproduces the slider value in DAZ Studio. Unfortunately, understanding how these raw and final sliders work is quite unintuitive, but hopefully the present post can bring some clarity.
In order to see the final values, we must enable Show Final Morph Values in the Global Settings.We will also change the Slider Limits to Custom, which will allow us to use negative values for the raw sliders; the Final Limits should be left at DAZ.

We will consider the three standard face morphs which close the eyes. In DAZ Studio, we set Eyes Closed Left to 50%. Aiko's left eye is now half-closed.
In Blender we do the same thing (something has happened to the morph names, they should be the same as in DAZ Studio). The EyesClosedL slider is set to 0.5. However, it is the final values next to the sliders that matter for the morph; the final values show the values of the sliders in DAZ Studio. In this case the raw and final values are the same, but they will differ below.
In DAZ Studio, we now drag the Eyes Closed slider to 50%. That automatically increases the left and right sliders with 50%, to 100% and 50%, respectively. Note that in this step only the Eyes closed slider was moved.
In Blender we do the same things and increase the EyesClosed slider to 0.5. The other sliders are unchanged, at 0.5 and 0.0, respectively. However, we see that the final values to the right have been changed and agree with the slider values in DAZ Studio. Also we see that the pose is correct.
Finally we move the left and right sliders, so Aiko's left eye is fully open and her right eye is closed. So the left slider is decreased by 100% to 0%, and the right one is increased by 50% to 100%. The combined slider is not touched and remains at 50%.

Now we do the same thing in Blender. The left slider is decreased by 1.0, from 0.5 to -0.5, and the right one is increased by 0.5, from 0.0 to 0.5. The final values and the face pose are the same as in DAZ Studio, but the connection to the raw sliders is not so intuitive.

We can summarized the three steps above by the increments:

  1. Left increased 50%.
  2. Combined increased 50%.
  3. Left decreased 100%, right increased 50%.
Monday, May 17, 2021

Favorite Morphs and Easy Import

Update 2021-05-21: 

The concept has been renamed from Morph Preset to Favorite Morphs, because a morph preset denotes something completely different in DAZ Studio: a combination of morphs that give a certain expression. The names of the buttons has thus been changed to Save Favorite Morphs and Load Favorite Morphs, and the Easy Import option is called Use Favorite Morphs. 

In fact, morphs presets in the DAZ Studio sense can be saved with the Save Pose Preset, and can then be used both in DAZ Studio and in Blender.
 

Original post:

It is now possible to store a collection of morphs as a morph preset, which can be reused for other characters of the same type. A preset consists of any combination of standard and custom morphs for a genesis character, plus custom morphs for associated geografts and clothes.
Morph presets are normally stored in a directory specified in the global settings.
To create a morph preset, we import a character of the Genesis generation that we want to make the preset for. The character must also have any geografts and clothes that we want to include in the preset.
The buttons for saving and loading morph presets are found in the Morphs section of the Setup panel.
Select the parent rig and press Save Preset. A file selector opens up in the directory specified in the global settings. Choose a name for the preset and save the file.
Now load a different character, which however belongs to the same Genesis generation. Select the rig and press Load Morph Preset, and select the preset file that we just created. All morphs are loaded to the new character.

Morph presets are of somewhat useful by themselves, but their main use is in combination with Easy Import. Morphs must be loaded while bone names and meshes are still intact. This means that morphs must be loaded before geografts and lashes are merged with the main character mesh, and before the armature is converted to some more animator-friendly rig like MHX or Rigify. The used to limit the usefulness of Easy Import, because only standard morphs could be loaded at the right time. If we wanted to load custom morphs, the last steps had to be done manually, after the custom morphs were loaded.

With morph presets, this is no longer a limitation.
In the Easy Import options, enable Use Morph Preset. The checkboxes for standard morphs disappear, and instead a field appears were we can specify the morph preset file. The file is relative to the global morph preset directory, unless an absolute file path is specified.

We can now enable Transfer Shapekeys, Merge Geografts and Merge Lashes, knowing that these operations will be performed after all morphs have been imported. We can also choose a rig type which changes bone names like Rigify.

And now a animation-ready character is loaded with all the morphs in the morph preset.

Friday, April 30, 2021

MHX Runtime System Has Moved

The MHX runtime system has been moved to a separate add-on. There are several reasons for this:

  1. Both the Daz Importer and the BVH retargeter add-ons are aware of MHX. This meant that both add-ons used large amounts of code that were essentially the same, although slightly different. Maintaining two versions of the code was becoming unmanageable.
  2. Some features that are useful for DAZ characters were only available in the BVH version, like FK/IK switch for animations.
  3. Users that don't use the MHX rig don't need to install the MHX runtime system. It is just dead weight.
  4. The Daz Importer tab contains too many panels, especially if you load many different types of morphs.

The code that generates the MHX rig is still part of the Daz Importer. There is a clear analogue to Rigify here; the code that rigifies a DAZ armature is part of the Daz Importer, but the Rigify runtime system is not.

I intended to make the documentation more complete before making a public announcement, but recently I have been working on MHX, and don't want to duplicate that work in the old system.

The main documentation page for the MHX RTS is http://diffeomorphic.blogspot.com/p/mhx-runtime-system.html. The repository itself is located at https://bitbucket.org/Diffeomorphic/mhx_rts.

Friday, April 23, 2021

Save Pose Preset

 Yesterday I described a method to import animations back into DAZ Studio. However, it was quite complex, involving changing global settings to values that were designed for debugging, and still didn't work well in many cases. The main culprit was the idea to export the animation as a BVH file. The BVH format is old and has lots of quirks and cannot capture all aspects of DAZ and Blender rigs. Besides, a BVH pipeline depends on the quality of Blender's BVH exporter and DAZ's BVH importer, neither of which is under my control.

It is a fact of life that something is always lost in translation, and the more translations you make the more is lost. So using an intermediate format like BVH means two translations: from Blender to BVH, and from BVH to DAZ Studio, and both may involve data loss. Better to go directly from Blender native to DAZ native. This is the idea behind the new method to send animations from Blender to DAZ Studio.
Import an animation to a Genesis character in Blender (imported with standard settings, and not with any debug options turned on). The animation must be stored as an action, even if we only want to export a single pose. Press the new Save Pose Preset button.
A file selector appears. Save the file to a directory that will be visible in DAZ Studio, i.e. to a subdirectory of one of the DAZ root paths. The options specify the first and last frame being exported, and the frame rate (frames per second).
In DAZ Studio, the new file should appear in the content library. You may have to refresh the folder first by right-clicking on it.
And now Aiko is dancing away in DAZ Studio.