Fortunately, user engetudouiti came up with a clever trick for loading morphs to a merged character, using the plugin's ability to transfer shapekeys between meshes. This feature was originally intended for transferring corrective shapekeys from a character to her clothes, but here we use it backwards, and transfer shapekeys from a smaller mesh to the merged character.
Here is the recipe:
1. Import the character again on a new layer.
2. Delete all objects on this layer, except for those that you want to import morphs to.
3. Parent these meshes to the original armature. This step is necessary only if you use rig properties to drive the shapekeys, because the drivers look for the parents.
4. Import the morph to the new character or anatomy. This can now be done because it has the correct number of vertices.
5. Select the vertices of the merged mesh that are affected by the morphs.
6. With the merged character selected and the mesh with morphs active, press Transfer Other Shapekeys in the Morphs section.
7. Make sure that Selected Verts Only and Ignore Rigidity Groups are selected.
8. Delete the mesh with morphs.
The selection in step 5 is necessary because we transfer shapekeys from a small mesh to a bigger one, and we don't want vertices outside the small mesh's domain to be affected. Unfortunately, this step requires some manual work. This could have been avoided if you had created vertex groups containing the graft information before merging the meshes. If not, you must make the selection manually.
Here is how you would create the vertex groups:
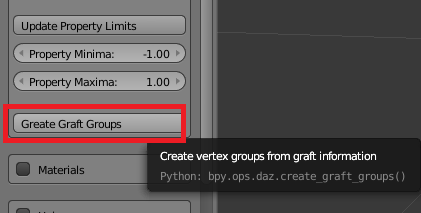
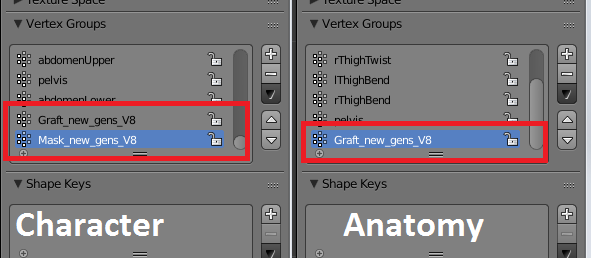
With the character selected and the anatomy active, press Create Graft Groups in the Morphs section of the Advanced Setup panel. This creates two vertex groups for the character mesh: Graft_xxx and Mask_xxx, and one vertex group for the anatomy: Graft_xxx. Here xxx is the name of the anatomy mesh (not the object). After the anatomy has been merged with the character, the Graft_xxx vertex group consists of the vertices at the boundary of the anatomy. The vertices inside the boundary are those that should be affected by the morph and hence selected when the morphs are transferred.