Daz textures are often very large and detailed, which leads to high memory consumption during rendering, and often one can reduce their size without affecting the final render quality very much. Some time ago I implemented a stand-alone tool for resizing textures, and wrote about it here.
Update: Installing OpenCV is no longer necessary, because the DAZ Importer now uses a call to Blender's API to resize textures.
However, running a python program from the terminal window is inconvenient, so I never used that tool very often. To make resizing textures more usable, the tool can now be run from within Blender.
Actually, the resize tool can not be executed entirely within Blender, because it uses OpenCV which is not included with Blender python. Instead the add-on makes a system call to python, running the tool as a stand-alone script under the hood. This means that in order to use the resize tool, python 3 and OpenCV must be installed on your system.
For Python 3, I use Anaconda, which can be downloaded from here. Installing OpenCV was a bit tricky and unfortunately I don't remember how I did it, but there are many instructions on the web, e.g. this one. The rest of this post assumes that your system has python 3 and OpenCV installed.
When the scene has been imported into Blender, save the blend file. At the top of the Materials section, Save Local Textures and save the blend file again. This copies the textures to a local folder where you can modify them. You don't want to mess up the original textures that belong to Daz Studio.
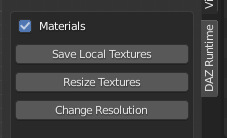
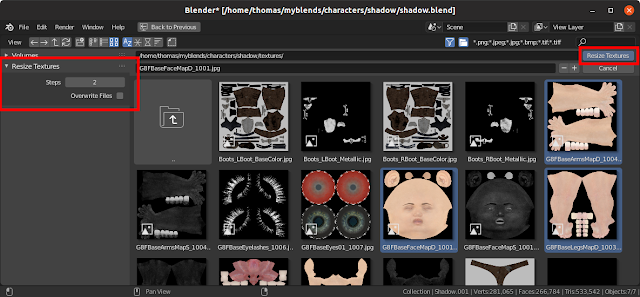
No press Resize Textures. A file selector opens in the local textures folder that you just created.
There are two options:
- Steps: The number of steps that the image size is reduced. Each step reduces the linear size with a factor of two, so the number of pixels is reduced by a factor of four.
- Overwrite Files: Whether the original images be overwritten or not. If we choose not to overwrite, new lower-resolution images are created but the original files are kept. The new files are named by adding "-resN" to the file name, where N is the number of steps. Note that the naming convention has changed compared to the stable version 1.4.
Finally, select the images that you want to resize and press Resize Textures. In my experience it is easy to forget to select images, so if nothing happens check that you have select some images.
After Resize Textures has been pressed, we can follow the progress in the terminal window. First the standalone script creates the downscaled textures. Since we choose to resize the textures two steps and the original textures are 4096 x 4096, the new textures have the size 1024 x 1024.
After that the original textures are replaced by the resize ones in all materials of the selected meshes.
To actually resize the textures within Blender requires python 3 and OpenCV to be installed. However, if you have created the resized textures yourself with some other tool, you can replace the original textures with the lower-resolution ones with the Change Resolution button. It does not make a system call so no external dependencies are needed.
Of course the resized textures must exist. If the original file is called
foo.jpg, the file name of the textures resized N steps is
foo-resN.jpg. If no such file is found, the original texture is kept.
When you press Change Resolution, a popup menu appears which allows you to choose the number of resize steps. Zero steps means the original image.
Here is a comparison of different resolutions.
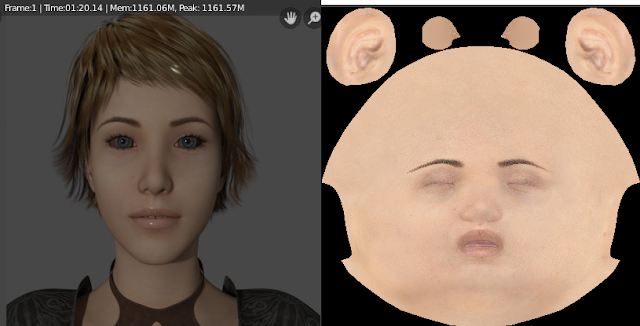 |
| Original resolution, 4096 x 4096. Memory use 1161M. |
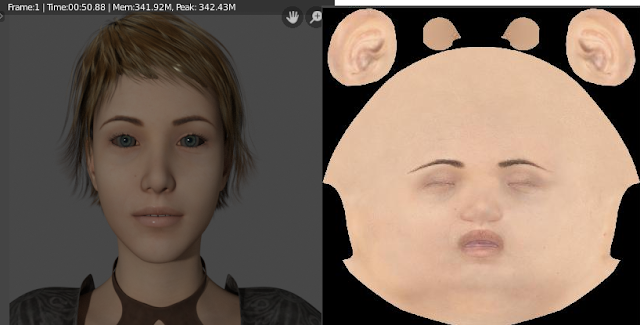 |
| Resized 2 steps, 1024 x 1024. Memory use 342M |
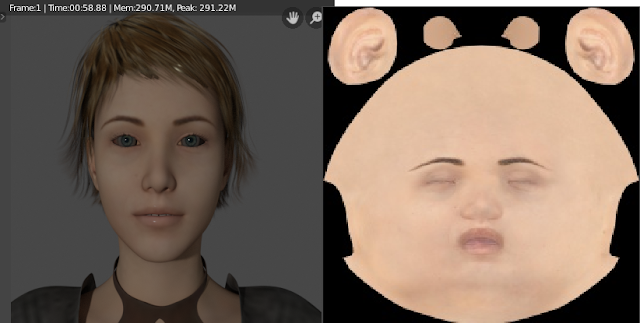 |
| Resized 4 steps, 256 x 256. Memory use 291M. |
 |
| Resized 8 steps, 16 x 16. Memory use 288M. |
Very little is lost when the original textures are reduced two steps, but the memory consumption during rendering falls by a factor 3.4. Reducing the resolution further does not improve memory usage very much, but the render quality drops dramatically; especially the alpha channel of the hair shows problems.


