For a while the DAZ Importer has been able to export pose presets back to DAZ Studio, see the post Save pose preset. However, this was limited to ordinary pose presets, which only work on a single figure in DAZ Studio. Following a request by Rakete, the functionality of this tool has now been expanded to also generate hierarchical pose presets,
Let us consider this character. In DAZ Studio, we added the Genesis 8.1 Female Face Controls from the Developer Kit. In Blender we merge the rigs together and loaded the FACS morphs. Finally we posed both the character and the face controls in order to make a facial expression.
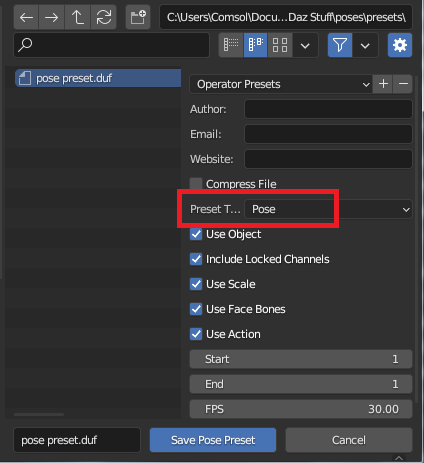
Now let us export the pose as a pose preset. Press the Save Pose Preset button in the Posing panel. A file selector appears. Save the preset in a directory that can be accessed from DAZ Studio, leaving the Preset Type at the default value Pose.
In DAZ Studio, select the figure and load the pose preset. The body is posed but the face is not, because the pose is only loaded to the figure itself, not to its children, e.g. the Face Control figure.
Now do the same thing again, but set Preset Type to Hierarchical instead.
In DAZ Studio, the hierarchical preset is loaded to the entire node hierarchy, both the main figure and its subfigures.
Instead of using the Face Control bones, we could create an expression using the FACS sliders.
This time we set the Preset Type to Pose And Morph.
Note that this tool does not distinguish between shaping and posing morphs; in Blender, all morphs are treated in the same way.
In DAZ Studio, we need to zero the face control pose, because the new preset will only pose the main figure bones.
When we load the mixed pose-morph preset in DAZ Studio, both the bone pose and the morph values are loaded.
Hierarchical pose presets are quite sensitive to the bone hierarchy.
Therefore it is not possible to use the MHX or Rigify rigs to generate
hierarchical presets, because those rigs have a completely different
bone hierarchy. However, it is possible to use the Simple IK rig.
Even if it is not possible to use the MHX or Rigify rigs directly, we can still use them to control the original DAZ rig. To do so, enable the Keep DAZ Rig option when the MHX rig is generated.
This gives us two separate rigs: the control rig Genesis 8.1 Female_MHX, which has the MHX controls, and the deform rig Genesis 8.1 Female.
Pose the control rig. We can create an ordinary pose presets directly from the mhx rig (so keeping the DAZ rig was unnecessary in this case).
The pose preset can be loaded in DAZ Studio, but the face expression is of course missing.
To create a hierarchical pose preset, select the deform rig and press Mute Control Rig. The deform rig is now detached from the control rig, and the pose is baked to the deform bones, including the face control bones.
Once we have exported the preset, the Unmute Control Rig button returns control to the control rig.
Since the active object is now a DAZ rig, we can save a hierarchical pose preset.
And this preset poses the entire hierarchy in DAZ Studio.