Thursday, December 30, 2021

Using Old Morphs in Version 1.6.1

In version 1.6.0 of the DAZ Importer the new morph system was introduced. It is not compatible with the old morph system from version 1.5.1, but old characters could still be used in version 1.6.0 because code necessary to deal with old morphs was kept. However, in the current development version, which will eventually become 1.6.1, support for the old morphs has been dropped. So morphs made for characters in version 1.5.1 do not work in the current version. Fortunately, there is a way to fix this, using stripped runtime system that was included in the 1.6.0 release.

Here we have created a character in version 1.5.1 ( the last version compatible with Blender 2.79) of the DAZ Importer, and loaded some morphs.
If we append the character into a new Blender file and run the latest version of the DAZ Importer, the morphs do not work. The sliders show up in the Morph panel, but nothing happens if we change them.
To fix this, go to the Scripting tab and open the stripped runtime system which was included in the 1.6.0 release. We need to load the file runtime_stripped_28x.py in the runtime_stripped folder.
Register the script in the Text menu, save the blend file and reload it. This is important because the script does not take effect until the file is reloaded.
And now the old morphs work.

There is an important limitation to this approach. The old and new morph systems do not work together, so the old morphs will stop working if you load new ones in version 1.6.1. If you want to add morphs, you need to go back to version 1.5.1 and load the morphs there.

Before the old morph system was introduced, there was an even older morph system. There was a conversion utility, which was described in the announcement, but I haven't tested to use it.

Wednesday, December 15, 2021

Custom JCMs and Adjusters

Recently some problems with loading custom JCMs (Joint Corrective Morphs) were reported. It turned out that the code contained a hack to avoid problems with reloading JCMs, and that piece of code didn't work well. The problem should be resolved in the latest development version, but looking into this made me better understand how custom JCMs work and how they are related to the corresponding FBMs (Full Body Morphs).

First we import Aiko into Blender with Mesh Fitting set to DBZ File.

Import the standard JCMs (Import JCMs button) and bend the left elbow. The corrective shapekeys are driven by the bone rotation as expected. However, these shapekeys where made for the basic Genesis 8 Female, and we get better deformation if we import the JCMs that were designed specifically for Aiko.
For this we use the Import Custom Morphs tool. In the file selector, use "pjcm" as the filter to limit the selection to the JCMs (more precisely to the pJCMs, eJCMs are not imported), and import everything.
And we see that the Aiko-specific shapekeys are also driven by the bone rotations.

However, there is a catch. The final shapekey values are multiplied with the strength of the Aiko FBM (Full Body Morph). If the Aiko FBM is not imported, which it wasn't since we only imported the pJCMs, behind the scenes the FBM strength is set to 1, and everything is fine. But let's see what happens if we import the Aiko morphs.

So we import the Aiko FBM and FHM, and suddenly the Aiko corrective shapekeys are set to zero.
What happens was that by importing the Aiko FBM, we created a new property that multiplies the strength of the JCMs, and since that property was set to zero, the JCMs are zero too.
So if Aiko 8 Body = 0, the left forearm JCMs are zero too, even if the elbow is bent.
If we set Aiko 8 Body = 1, the non-zero JCM values reappear.
Alas, we can not set the Aiko FBM and FHM to one, because the Aiko morphs were already baked into the mesh when it was loaded with Mesh Fitting set to DBZ File, and thus the Aiko morphs are applied twice.

The way to decouple the JCM strength from the FBM strength is to use adjusters. Let us go back and import the Aiko JCMs again, but this time we enable the Use Adjusters option.
Now a new slider called Adjust Custom/aiko appears at the to of the aiko category. This property replaces the FBM value as a JCM multiplier. So if Adjust Custom/aiko = 1.0, the Aiko JCMs have the right values even if the Aiko FBM = 0.
If we reduce the value of the adjuster, the morph values are reduced accordingly. This can be used if you have mixed character. If you create a character which is 30% Aiko and 70% Victoria, say, you can import both the Aiko and Victoria custom JCMs, and set Adjust Custom/aiko = 0.3 and Adjust Custom/victoria = 0.7, to get the JCM mix which is right for that character.

Sunday, December 12, 2021

Better Decals

A decal is projected from an empty (the projector) onto a mesh. In an earlier post we discussed a tool for adding decals to DAZ meshes. However, there were some shortcomings which made the decal tool rather unusable:
  1. The decal were also projected on surfaces that are facing away from the empty.
  2. Decals could not cross material boundaries, forcing us to some very convoluted constructions.
  3. Only images with an alpha channel were supported, but not jpeg images with masks.
  4. There was no indication in which direction the decal was projected.

Recently Alessandro Padovani and Xin made me revisit the decal tool, with some nice improvements.

Select the mesh and press Advanced Setup > Materials > Make Decal. A file selector opens.

First we can select the materials that the decal will be added too. We can select one or several materials. The buttons at the top work in the same way as in the material editor or the UDIM tool. The remaining options are:

  • Channel: The channel that the decal should be added to, e.g.
    • Diffuse Color
    • Principled Base Color
    • Bump
  • Reuse Empty: If selected, an existing empty in the scene is used to project the decal, otherwise a new empty is created. If the decal affects multiple channels, enable this after the first channel has been loaded.
  • Empty: A list of available empties. If None is selected, a new empty is created.
  • Use Mask: Use a separate mask image for transparency. If disabled the image's alpha channel is used instead.
  • Decal Mask: Path to the mask file. A file selector for the mask is below the Make Decal button.
  • Blend Type: How the decal is blended with the base texture (Mix, Multiply, etc.). The default is Mix.
An empty with the shape of a flattened cube is created at the origin. The extent of the cube is approximately the region where the decal lives. Move, scale and rotate the empty until the decal looks as desired.

 
Next we want to add a second decal, which is a jpeg file. Since jpeg images don't have an alpha channel, we need to add a separate mask image. Before pressing Make Decal, set the Decal Mask below it, using the folder icon. In the file selector that opens, select the heart-mask.jpg file.

Now press Make Decal again and enable Use Mask. A new field with the previously selected mask file appears. Now select the heart.jpg file.

There are now two nodes that modify the diffuse texture. The node groups have the same label, but they are really different node groups because different empties control the location of the decal.

 Position the second decal in the same way as the first.

To make a decal cross a material boundary, it must be assigned to both materials. The Skin button selects the skin materials, i.e. the torso, face, arms and legs materials in this case. We select the jpeg version of the heart, but if we set the blend type to Multiply the white background will not show up.

Position the decal on the shoulder where the torso and arm materials meet. Note how the problems we encountered in the previous post do not arise anymore.

Finally we import a star decal. Only the arms material is selected, and we enable Reuse Empty. In the list of available empties, select the one that we created last.

The star decal immediately appears on the shoulder. Note that the tip of the star is cut off, since it was only assigned to the arms material. This is a rather artificial example. Normally we reuse an empty if we load related decals to different channels, e.g. diffuse and bump.

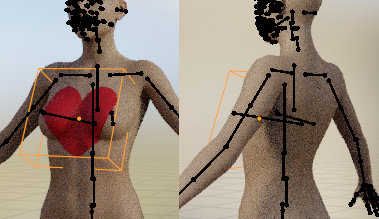
The shape of the cube gives a visual cue about the extent of the decal. If the cube is scaled in the local Z direction, i.e. it is made deeper, the decal may show up on the other side of the mesh as well, as in the picture below.

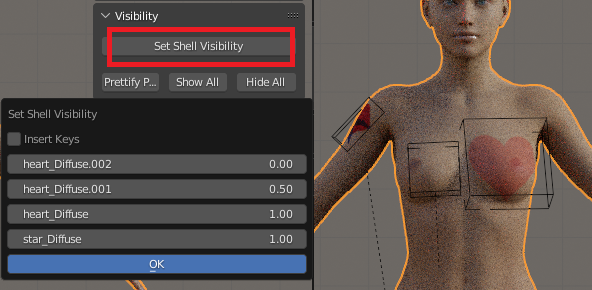
We can control the visibility of the decals with the Set Shell Visibility tool which appears in the Visibility panel when the mesh is the active object. In the popup dialog there is an entry for each decal. The same tool also controls the visibility of the shell nodes. The Insert Keys option allows us to animate the decal visibility.

Finally we vertex parent the decal empties to the mesh, so they move with the mesh when it is posed.

And here the mesh is posed with the decals in place.


Wednesday, December 1, 2021

Morph Suffixes

It may happen that different morphs have the same name., e.g. if the morphs affect different geografts. DAZ Studio distinguishes between such morphs because the morph files are located in different folders, but in Blender the morphs are driven by the same armature, and loading a morph for the second geograft overwrites the morph for the first. To distinguish between such morphs we can load the morphs with a suffix.

The Import Custom Morphs tool has a new option: Use Suffix. It can take on three values:

  • None: Don't add morph suffixes. This is the default.
  • Geografts: Add the geograft name as a morph suffix.
  • All: Add a suffix to all morphs.

Our character has the Headlights geograft by Meipe, and we want to import the Areola Inflate morph to both the left and right headlight. Select each target mesh in turn and import the morph, with Use Suffix set to Geograft.
We now have two different morphs affecting the two geografts. If we had loaded the morphs with Use Suffix = None, the morph for HeadLight_R would have overwritten that for HeadLight_L, and we would only have a single morph called Areola Inflate.
The Import Pose tool has an option which specifies which geograft is affected by the morphs in the shape preset file. If Affect Geograft is set to the default value (-), the morphs are loaded without a suffix as usual.
If we load morphs with Use Suffix = All, suffixes are added to all morphs. This can be used if you want to reload morphs without overwriting the old ones for some reason. A new option appears where you specify the suffix.
Here some morphs are imported with Suffix = foo.

Suffixes can also be added to the standard morphs. Here the Geograft setting is not useful, since geografts don't have standard morphs, but the All setting adds a user-specified suffix to all morphs.
Finally we can also add suffixes to favorite morphs using Easy Import.

Sunday, November 7, 2021

Morphing Armatures and Rendering

Recently we introduced support for ERC morphs, which not only affect shapekeys and bone poses, but also change the armature in edit mode. By adding a handler we could update the armature morphs on each frame change, allowing ERC morphs to be animated. However, Surody discovered a serious flaw with this: automatic armature morphing only works in the viewport but not when rendering animations. The following image illustrates what can happen.

Apparently the problem arises because rendering and scene update run on different threads. The Blender documentation says the following.

Note on Altering Data

Altering data from handlers should be done carefully. While rendering the frame_change_pre and frame_change_post handlers are called from one thread and the viewport updates from a different thread. If the handler changes data that is accessed by the viewport, this can cause a crash of Blender. In such cases, lock the interface (Render → Lock Interface or bpy.types.RenderSettings.use_lock_interface) before starting a render.


So the suggestion is that we should enable Render > Lock interface. That does not work, however, because Blender throws an error when we try to enter edit mode, and nothing is rendered at all.

To circumvent this problem, a new button has been introduced in the Utilities panel: Render Frames. This tool renders the active frame range as a sequence of still images, and updates the armature morphs before rendering each frame. There is also an analogous tool for doing OpenGL rendering. All render settings are found in the usual places. There is an option whether we want to morph all armatures in the scene, or only the selected ones.

And now the rendered images look much better.

Warning: Adding automatic armature morphing as described in the previous post is risky, since it works in the viewport but not during render. Therefore, this possibility will probably be removed in the future.

Sunday, October 10, 2021

Scripting for version 1.6

It was more than a year since I last wrote about scripting the DAZ Importer, and some things have changed since then. In particular, the scripting interface now uses snake case like the official Blender API. In contrast, the DAZ Importer source code uses camel case. This was an unfortunate choice but it is too late to change that.

In particular, this means that

import_daz.setSelection(list_of_filepaths)

is replaced by

import_daz.set_selection(list_of_filepaths)

Apart from that change, most of the examples in the previous post should work without changes. A description of the available functions and operators are found in

All functions intended for external scripting are defined in the file api.py, so you could also look in that file.

I added a new repository with some sample scripts. It has a dual purpose: to provide some examples how you can script the DAZ Importer, and also to act as a test suite for future releases. The sample scripts are found in

https://bitbucket.org/Diffeomorphic/daz-importer-scripts/


Monday, September 27, 2021

Morphing Armatures

Update:

Surody discovered that automatic armature morphing does not work when rendering animations. To circumvent this problem, a new tool for rendering a sequence of frames has been introduced, see Morphing Armatures and Rendering.

Original post:

In DAZ Studio it is possible to create morphs that change both the character mesh and armature, so called ERC (Enhanced Remote Control) morphs. In Blender that would correspond to morphs that change the rest pose of an armature, but that is not supported by Blender. In the past such ERC morphs have been ignored, but with the latest commit of the DAZ Importer they can be dealt with.


In order for ERC morphs to be loaded, the global setting ERC Morphs option must be enabled, otherwise morphing armatures will not work. In most cases it is not necessary to morph armatures, and by disabling this option we can eliminate some overhead.

Assume that we want to animate how dr Jekyll is transformed into mr Hyde. Here we have three frames from that sequence, with the Hyde morph at 0%, 50%, and 100% respectively. The mesh is transformed nicely, but the armature does not follow suit.
There is a new tool that takes care of that. After the value for the Hyde morph has been set, press the Morph Armature button in the Morphs panel.
The armature now jumps into place. Here is mr Hyde at 50% and 100% with his morphed armature. The bone lengths do not change even though the distance between the bones has increased, but that does not really matter. What matters is that the bone heads, i.e. the pivot points, are at the right location. We see that the lCarpal4 bone does not move for some reason, probably because it has been misspelled.

That the pivot points are located correctly is important when the character is posed. Observe the right shoulder in the picture above.

It is inconvenient to have to press the Morph Armature button for each frame change, and you may wonder if there is a way to automate that. The answer is yes, but the procedure is somewhat awkward. However, it is awkward on purpose, for two reasons.

  • Morphing armatures is a quite expensive operation, which we don't want to enable by accident. E.g., the frame rate for the Jekyll-to-Hyde sequence dropped from 54 fps to 8 fps when auto-morphing armatures was enabled.
  • Auto-morphing relies on application handlers, which would not be defined if the DAZ Importer is disabled, or if the blend file is moved to another computer, e.g. at a render farm.

To make auto-morphing work even when the DAZ Importer is disabled, we have to load the file morph_armature.py into the text editor and register it, in the same way as the stripped runtime system was loaded in previous releases of the DAZ Importer.

To enable auto-morphing in a single session:

  1. Open the file morph_armature.py in a text editor window. It is located in the runtime subfolder.
  2. Run the script by pressing the right-pointing triangle button (Run Script).

To make it persistent, so auto-morphing is enabled automatically every time the blend file is opened. This is what you want to do if you send the file to a render farm.

  1. Open the file morph_armature.py.
  2. Enable the Text > Register checkbox.
  3. Save the blend file.
  4. Reopen the blend file.

When automorphing is enabled, only selected armatures are morphed. This can be used to control which armatures are morphed, although deselecting an armature does not change performance very much. The handler toggles into edit mode once for each frame change and updates the rest pose of all selected armatures. Typically going in and out of edit mode is the expensive operation, and that is only done once independent on the number of armatures.

Here we see the difference between the armature being selected or not.

Saturday, August 28, 2021

DAZ Importer 1.6.0 Released

 This release consists of four separate parts:

  • DAZ Importer, a Blender add-on for importing native DAZ Studio files (*.duf, *.dsf) into Blender. It also contains some tools to make the assets more animation friendly. 
  • MHX Runtime System, a Blender add-on for posing the MHX rig.
  • DAZ HD Morphs, a Blender add-on by Xin for importing HD meshes and morphs into Blender.
  • Diffeo HD Exporter, a DAZ Studio plugin by Donald Dade to export HD scenes to Blender.
 
Download version 1.6.0 from:
 
Main documentation page: 
 
This release is compatible with Blender 2.80 and later. The last version compatible with Blender 2.79 was version 1.5.1.
 
Major new features in this release:
  • New morphing system using intermediate properties which correctly reproduce morphs in DAZ Studio. How to implement this was explained to me by Engetudouiti.
  • New morphing system using simple expressions instead of slow python scripts, as suggested by Xin. This improves performance, in particular on GPUs. It also makes it possible to use expressions on systems where the DAZ Importer is not enabled, e.g. render farms, making the stripped runtime system of previous releases obsolete.
  • Easy Import makes it possible to import a character and make it animation-ready in a single step, as suggested by Alessandro Padovani.
  • Correct FK-IK snapping for the MHX rig, following suggestions by Engetudouiti.
  • Tools for dealing with MHX animations, not just single poses.
  • Improved user interface for the MHX rig.
  • A tool for converting HD morphs to normal or displacement maps (the DAZ HD Morphs add-on by Xin), and tools for importing these maps into Blender and drive them with the morph strength.
  • A tool for fast export of HD meshes from DAZ Studio (Diffeo HD Exporter by Donald Dade).
  • Basic support for simulations.
  • Many bug-fixes and minor improvements.
This release will probably be the final one when it comes to new features. Version 1.0 of the DAZ Importer was released in 2016, but I looked into importing native DAZ files as early as 2011, so the add-on is already ten years old. It has grown into a much more ambitious project than I ever expected, and is quite enough for my own needs. I will continue to fix bugs and adapt the code to new releases of Blender and DAZ Studio, though.

Sunday, August 22, 2021

ERC Morphs and FACS

Enhanced Remote Control (ERC) consists of a number of methods for remotely controlling various channels in DAZ Studio. It can be viewed as generalized morphs, which in practice come in three types:

  1. Shapekeys that change the mesh.
  2. Bone translations, rotations and scale transformations that affect the meshes.
  3. Changes to the bones' pivot point without affecting the meshes.

The first type corresponds to driven shapekeys in Blender, and the second to drivers for the bones' location, rotation and scale channels. However, the third type has no counterpart in Blender. It would correspond to morphs that modify the head and tail of bones in edit mode, but in Blender this is impossible. 

Old-fashioned morphs for Genesis 3 and 8 consist mainly of bone poses of the second type, accompanied by additional shapekeys, and they work well in Blender. (Even more old-fashioned morphs for Genesis 1 and 2 are pure shapekeys.) However, the FACS morphs for Genesis 8.1 mostly consist of shapekeys together with changes in the pivot points, i.e. a combination of type 1 and 3, although some morphs rotate bones where rotation is necessary (eyes, eyelids, jaw and tongue). This can lead to problems in some cases, in particular with tongue morphs.

To the left we have the FACS Tongue Out morph. A shapekey moves the tongue mesh out of the mouth, but the tongue bones do not follow. In DAZ Studio the bones are also moved without affecting the mesh further. That would correspond to the change in edit mode to the right. However, these changes are ignored by the plugin, since it is impossible to drive the rest pose location in Blender.
 
This problem does not affect the mesh as long as we only combine this morph with other morphs that also work with shapekeys. However, if we combine it with morphs that rotate the bones, we may have problems.
Here we have such a case, where Tongue Out is combined with Tongue Right and Tongue Tip Bend. The two latter morphs rotate the tongue, and their influence it too big because the pivot points remain too far back. Note that the FACS morphs have non-zero final values, to the right, even though the sliders are zero. This is because another morph drives the FACS morphs.
We can compensate by increasing the Tongue Tip Bend slider. That increases the final value of this morph (i.e. it decreases the magnitude of the final value), and the tongue no longer intersects the skin.