Friday, December 23, 2022

Combining Multiple Geografts and Shells

Shells, also know as geometry shells or geoshells, add color and other properties to the materials of a character. A single shell seldom causes problems, but if we mix multiple shells they can interact with each other in undesired ways. This post describes some shell problems and how to fix them.

Here we have a female character with geograft genitals and nipples, together with the corresponding shells that add color to the geografts. The genitals and the outer parts of the nipples are paler than the surrounding skin because the two shells influence more materials than they should.

Select the Headlights Shell and go to the Parameters tab. In the Shell section, select Surfaces. The shell is enabled on the Torso and Nipples materials, which is correct. However, it is also enabled on the genitals materials, which doesn't make sense. Turn off the Headlights Shell on the five Golden Palace materials.

Then select the Golden Palace Shell and turn off the two nipples materials. The shells now only affect the materials that they should, and the pale areas are gone.

Next we add another shell for Tears Makeup. The headlights and genitals turn pale again. To fix this we select the tears shell and turn it off for the nipple and genitals materials.

Finally we add a shell to make the body look as if it is oiled, and the nipples and genitals turn pale yet again. However, this time we cannot disable the shell for the geograft materials, because we want the geografts to look oily as well. If we turn off the shell for those materials, the nipples and genitals would be surrounded by a dry area in an otherwise oiled body, which would look very strange.

I don't know how to solve this problem in DAZ Studio, so we leave it to the Blender side.

Here we have imported the character into Blender. The nipples are surrounded by pale rings that come from the oily shell. The genitals are also pale.

If the nipples are solid white, it means that some other shell is also active. Perhaps you forgot to turn off the tears shell on the nipple materials.

In the shader nodes editor, select the left nipple material (called Nipples-2). To the right of the node tree, just before the material output node, there are node groups that correspond to the material shells in DAZ Studio. The Oiled Full Body node has a node group call Oiled Full Body_GP_Torso-1. Replace this node group with the node group for the torso, i.e. Oiled Full Body_Torso-5.

Repeat the procedure for all genitals and nipples materials.

The pale areas are now gone.
The tears makeup is a bit pale compared to DAZ Studio. We can darken the mascara by increasing the Influence slider. Or if the lady isn't sad all the time, we can turn off the dripping mascara by setting the influence to zero.

We can increase the oilyness in the same way, or make the skin look dry by turning down the oily shell influence to zero. However, this becomes quite cumbersome since there are many materials that have the oily shell group, and the change has to be made to all of them. Fortunately, there is a way to change the influence for all materials at once.

When a mesh with shell groups is selected, there is a new panel called Visibility. The Set Shell Visibility button opens a dialog with a list of all shells and their influence. We see that influence of the Tears makeup shell is three, due to the change that we made above. We can now change the value of the Oiled Full Body slider to increase or decrease the influence of the shell for all materials at once.


Friday, November 25, 2022

Safely Installing a New Version

When you install a new version of the DAZ Importer it is necessary to remove old versions first and make a clean install, otherwise old files may remain and cause errors when installing the add-on. The problem arises when the new version has either removed or added files. E.g., version 1.6.2 removed globvars.py and added store.py, so those files may cause problems unless you install the add-on cleanly.

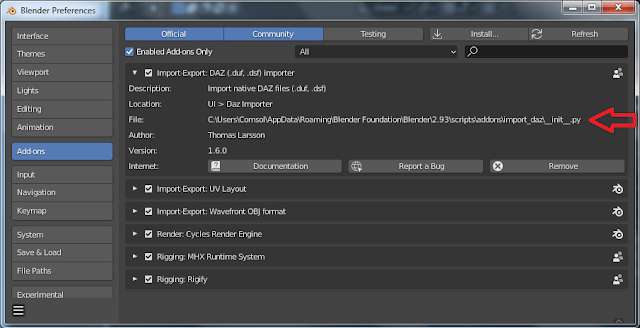
Open the Blender preferences window and go to the Addons section. The File: entry shows where the add-ons are installed. In my case the directory is

C:\Users\Comsol\AppData\Roaming\Blender Foundation\2.93\scripts\addons.

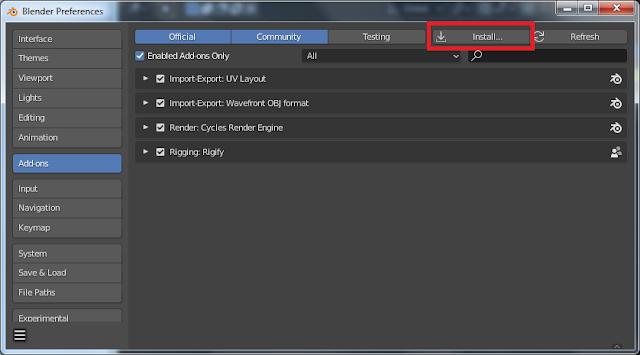
Disable the DAZ Importer and MHX RTS add-ons. To install the new version from a zip file, the natural next step would be to press the Install button and to navigate to the zip file which contains the new version.

 However, this does not work unless the old and new versions contain exactly the same files! The exact error message seems to vary, in my case I got the following message and the new versions were not installed:

Traceback (most recent call last):
  File "d:\home\blenders\blender-2.93\2.93\scripts\startup\bl_operators\userpref.py", line 668, in execute
    file_to_extract.extractall(path_addons)
  File "d:\home\blenders\blender-2.93\2.93\python\lib\zipfile.py", line 1633, in extractall
    self._extract_member(zipinfo, path, pwd)
  File "d:\home\blenders\blender-2.93\2.93\python\lib\zipfile.py", line 1687, in _extract_member
    open(targetpath, "wb") as target:
PermissionError: [Errno 13] Permission denied: 'C:\\Users\\Comsol\\AppData\\Roaming\\Blender Foundation\\Blender\\2.93\\scripts\\addons\\mhx_rts\\animation.py'

Instead we must take make some extra steps to ensure that the new version can be added cleanly. First quit Blender.

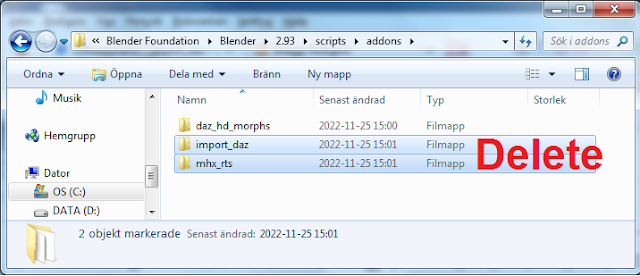
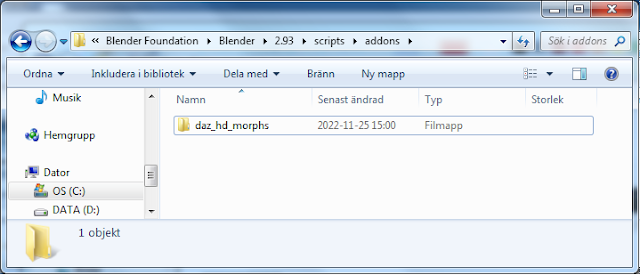
In Windows, navigate to the location of the add-ons recorded above. Delete all folders that will be reinstalled, i.e. import_daz and mhx_rts. It is not necessary to remove the daz_hd_morphs folder, because Xin's HD morph plugin is no longer bundled with the DAZ Importer.

Now the old folders are deleted and we can proceed to make a clean install.

Restart Blender and open the Preferences window. Now we can safely press the Install button.

Select the zip file containing the latest version of the add-ons.
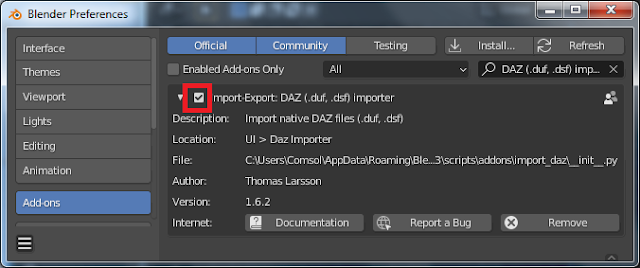
Now the new versions should not cause problems anymore. The release contains two add-ons, so the first one shows up. Enable the DAZ Importer.

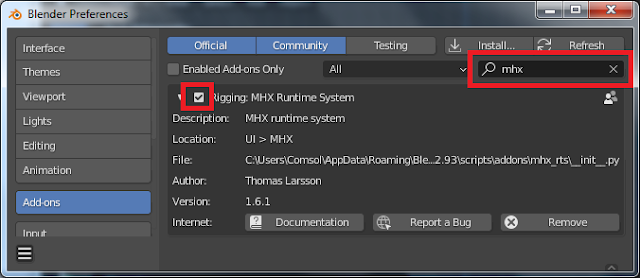
Then type "mhx" in the search field and enable the MHX Runtime System if you want to.


Summary

  1. Disable the add-ons.
  2. Quit Blender.
  3. Erase the old add-ons from disk.
  4. Start Blender.
  5. Install the new add-ons from the zip file.
  6. Enable the add-ons.

Sunday, November 20, 2022

Version 1.6.2 of DAZ Importer and MHX Runtime System Released

Almost a year has past since stable version 1.6.1 was released, and it is now seriously outdated. Today the new stable version 1.6.2 is released. This is merely a snapshot of the current state of the development version. Apart from lots of bug-fixes, the new version has support from Genesis 9. It can be downloaded from

https://www.dropbox.com/s/yq8g3biao9xuf3i/import_daz_mhx_rts_v1_6_2.zip 

The documentation has not been updated for this release. In a few months I will hopefully release version 1.7 with updated documentation. In the same time the documentation will move to the Bitbucket wikis associated with the add-ons. The new documentation locations will be

https://bitbucket.org/Diffeomorphic/import_daz/wiki/Home

Work on the wikis has commenced but it is still at a very early stage.

Midnight Arrow suggested to move the documentation into a wiki to make it searchable. It is not clear to me if relocating to Bitbucket will achieve this goal, but it has several other advantages that are important to myself:

  • Easier to achieve a consistent look and feel.
  • Faster editing.
  • Better backup since the wiki is a git repo.

Also, putting the documentation at the same place as the code feels natural. There is little point in reinventing the wheel when somebody else already has done it.

Tuesday, November 1, 2022

Checking Mesh Size in DAZ Studio

Some DAZ meshes have way too many vertices. Dealing with such huge meshes can be very time-consuming, and I personally avoid the biggest meshes. However, it not so easy to judge the size of a mesh in DAZ Studio. My own method has been to export the character to Blender. If exporting takes a long time, the scene contains some large mesh. Then I replace the large mesh, which usually is the hair, with something else.

However, it is a waste of time to wait a minute for the export script to finish, when all I want to do is to check the mesh sizes. Now there is a new script which displays the mesh sizes without actually doing anything else. The script is call Mesh Stat and is located in the Diffeomorphic script folder.

If you run the Setup Menus script Mesh Statistics becomes a new entry in the File menu.
My scene consists of a Genesis 8 Female with the Basic Wear outfit and Toulouse hair. The script displays a message box with a list of the meshes in the scene. For each mesh the number of vertices, edges, faces, and polylines are shown. The Export To Blender script will only export the base meshes, whereas the Export HD To Blender script exports both the HD and base meshes.

We see that the Toulouse hair has 35228 vertices. Exporting the scene to Blender took 2.308 seconds.

Now I replaced the Toulouse hair with Monica hair. It has 206277 vertices, i.e. almost six times as many as Toulouse hair, and the export time increased to 6.564 seconds. Still quite manageable.

Then I replaced the hair again, this time to Joy hair. It is a polyline hair, so the number of edges and faces is zero, whereas the number of polylines is 75758. But what is important is that the number of vertices is a whopping 1269892, i.e. 36 times bigger than Toulouse hair. As a consequence, the export time increases to 38.381 seconds.

In short, the Mesh Statistics script is a quick way to check the size of the meshes in your scene, and avoid the worst time thiefs.

Tuesday, October 18, 2022

Preferred Root Directory

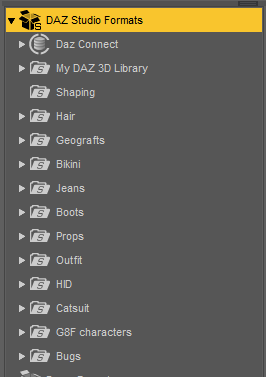
Recently I have rearranged my DAZ Studio database. I used to put all assets in the same base directory, but that made DAZ Studio very sluggish as the size of the database grew. The reason seems to be that DAZ Studio scans the entire database before opening a new file, which can take a very long time when the database is large. To improve performance I split the DAZ database into many small pieces, and only enable the base directories that I need for a given project.This makes DAZ Studio react much quicker.

Here are my active base directories.


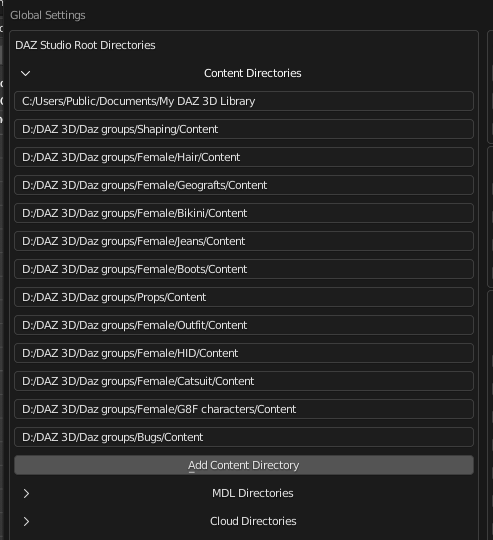
Then I save a json file with the root paths that are relevant for this particular project, using the Save Root Paths entry in the File menu. The same script can also be found in the Scripts folder.
After using the Load Root Paths button in the global settings dialog, we have the same root paths in Blender

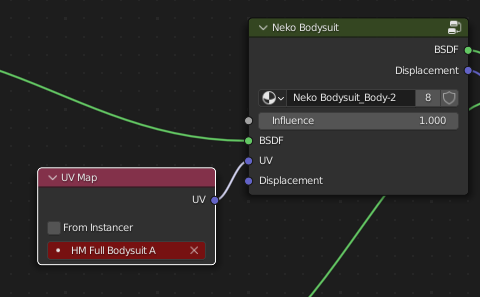
However, what is somewhat inconvenient with many root paths is that some file selectors open up in the wrong directory. Here we have imported a character with a geometry shell, but for some reason the shell UVs were not imported. This happens sometimes, if the name of the UV set differs from the name of the file where it is defined. In that case the corresponding UV Map node signals an error by becoming red.
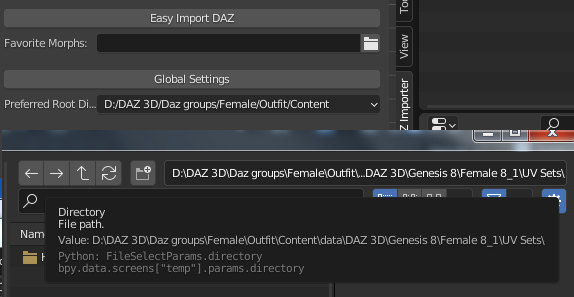
To fix this we use the Load UV Set tool in the Advanced Setup > Materials section. The file selector starts in the directory where is expects to find UV sets. However, the problem is that in this case it starts in the wrong directory. The file selector starts in a subdirectory of  C:\Users\Public\Documents\My DAZ 3D Library, which is the first root path. But in our case we know that the geometry shell is located under D:\DAZ 3D\Daz groups\Female\Outfit. We can of course navigate to the right directory, but that is quite a nuisance because it involves many mouse clicks.
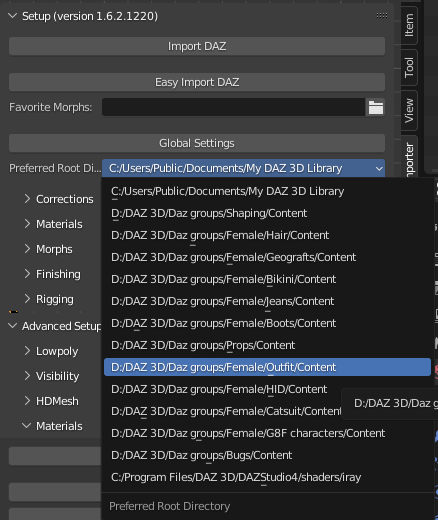
The new way to make the file selector open in the right directory is to set the Preferred Root Directory. This is an drop-down menu located in the Setup menu, right below the Global Settings button. Simply select the right root directory from the drop-down list.
When we now invoke the Load UVs button, it opens up in the right directory.

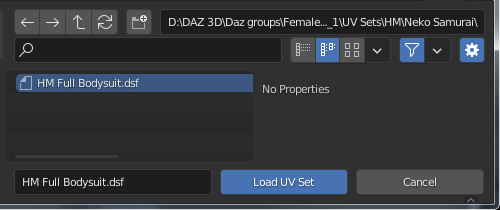
And the desired DAZ file with the UVs is just a few mouse clicks away.
The new UV map is loaded and the UV Map node turns black, indicating that everything is fine. We now see why the add-on did not find the shell UVs: the name of the UV map contains an extra "A" at the end not present in the name of the file where it is defined.
The preferred root directory also works with other tools that start in a special directory, e.g. Import Custom Morphs.

Wednesday, August 10, 2022

Import Expression and the Scanned Morph Database

Update August 26, 2022

There has been some improvements since this post was originally written. First of all, the name of the button has changed; it is now called Import Expression rather than Import Morph. This reflects the typical usage: you typically import an expression from a directory called Expressions, and a pose from a directory called Poses. However, both Import Pose and Import Expression can import both poses and expressions.

There are now two buttons in the Morphs section:

Scan Morph Database works as before, and the new Check Database For Updates checks if you have installed any new morphs since the last time the database was scanned.
We can either choose to check all characters, or the active mesh, or specify which databases we need to check.
We get a list of characters where new morphs have been installed since the last scan.
As mentioned above, the import tool has been renamed to Import Expressions
  • Affect Bones: If enabled, poses are imported as well as morphs. 
  • Clear Morphs
  • Use Scanned Database:
  • Check For Updates: Check if the database for the active character needs to be rescanned because new morphs have been installed. Can be disabled if you know that the database is up-to-date.
  • Load Missing Morphs
  • Category: Loaded custom morphs are put in this category. Defaults to Loaded.
  • Make All Bones Posable: If any loaded morphs has made bones driven.
  • Affect Geografts:
  • Auto Keying: Automatically insert keyframes at the current frame.
And the expression is loaded.


Original post:

Morphs lead to problems. On the one hand we want to load lots of them, so they are available when we need them. On the other hand we run into serious performance problems when many morphs are loaded. It takes a long time to load many morphs, and a character with many loaded morphs becomes very sluggish when we animate. Also the user interface lacks visual cues (how do the morphs BEF01, BEF02, etc look?), and in the end we had probably forgotten to load the morph we needed anyway.

Why there is a performance problem is not a mystery. All drivers have to be recalculated every time the viewport is updated, and there are a lot of drivers if many morphs are loaded. It can be avoided with the Disable Drivers button, but that can only be done while we pose the character, not when we tweak the morphs.

But it doesn't have to be that way. Many custom morphs are simply combinations of basic morphs, either the face units or the FACS morphs, so it should be enough to load those. In the latest development version we can do just that.

The first step is to scan the entire DAZ Studio database and store the morph information for later use. The button that does this is called Scan Morph Database and is located in the Setup > Morphs panel. Since scanning the database can take a lot of time, only files related to the active mesh are scanned by default.

However, if we disable Scan Active Mesh, we can specify which characters to scan.

Scanning the database can take a long time, but fortunately it only has to be done once. Or every time new morphs have been installed on your system. Take a cup of coffee while the computer works.
When the scanning process is completed we import morphs with the new Import Morph button in the Posing panel.

Select the expression in the file selector.

And the expression is loaded. Keyframes are created if Auto Keying is enabled.

Note that the expression is always loaded at 100%. There is no slider that we can adjust if we want to reduce the strength of the morph, but if we loaded the morph with Auto Keying enabled we can achieve similar results by scaling the F-curves.

Since there now is a separate tool for loading morphs, the Load Pose tool no longer affects morphs by default. Instead we load poses and expressions in two separate steps. This is normally not a big deal since they are usually defined in separate files anyway.

And here is a combination of a pose and an expression.