In DAZ Studio, add a character and give her hair and some clothes. Also shape the character to the desired shape.
Save the scene as a DSON User File (*.duf), which is DAZ Studio's internal format.
We will call her Aiko, so we choose the file name aiko.duf. Also rename the character in DAZ Studio. This is important because this name will appear in Blender, and we don't want all our characters to be called Genesis 8 Female.
The .duf file contains information about the character shape in the form of morphs, but I have not fully understood how this is implemented, and in particular not how clothes are fitted to morphed characters. Instead of trying to reproduce the final vertex and bone locations inside Blender, these basic data are exported by a custom script to a .dbz file, which is then used in Blender to recreate the final meshes.
First make sure that the DAZ Studio plug-in is installed, following the instructions
here. From the File menu, select Export To Blender.
Export a .dbz file with the same name as the .duf file, and located in the same directory. Since Aiko lives in the file aiko.duf, the file name becomes aiko.dbz. If you just save the .duf file, the right file name should be suggested automatically.
After a little while we receive a message that the file has been saved. This concludes what we must do on the DAZ Studio side.
In earlier versions the information was transferred using Wavefront (.obj) or Collada (.dae) files instead. However, these standard formats have some problems, and it is no longer possible to use these pipelines in version 1.3 and later.
Special considerations for Poser, Genesis and Genesis 2 figures
The DAZ Importer can not import Poser files directly, but we can load a Poser file into DAZ Studio and save it as a duf file, which the DAZ Importer can import. However, Poser figures use a different weighting method, which does not work well in Blender. The first two generations of Genesis characters have similar problems, since they use TriAx weighting rather than standard vertex weighting. We should therefore convert all Poser, Genesis and Genesis 2 figures to general weights before saving the scene.
Select all figures in the scene and select Edit > Figure > Rigging > Convert TriAx Weight to General Weight. Then save the scene as usual and Export To Blender to create a dbz file.
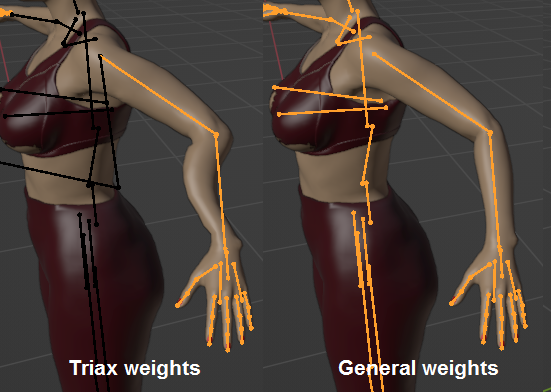
If the character was saved with TriAx weights the DAZ Importer still attempts to convert the weights to vertex groups, but the conversion only works well if all bones are closely aligned with the main coordinate axes. This is the case for the rest pose, but it may be different if the character is posed. The picture above shows the lShldr and lForeArm vertex groups with the original TriAx weights, and after conversion to general weights in DAZ Studio.
Posing the character with TriAx weights does not work well.