After the import_daz add-on has been enabled, we can import the duf file into Blender. The simplest way to import the file is to press the Import DAZ File button at the top of the Setup menu in the DAZ tab, which is located in the UI shelf to the right of the viewport. This is where it is located in Blender 2.80 and beyond. In the Blender 2.7x series, the panel is found in the Tools shelf to the left of the viewport.
An alternative way is to go to File > Import > DAZ Native (.duf, .dsf). Since we almost always need to do further work on the character in the Setup panel after it has been imported, I prefer to use the button.
Either way, a file selector window appears. Navigate to the file aiko.duf which we saved in DAZ Studio, select it and press Import DAZ File. Alternatively, we can select the preview icon.
Before importing the scene, we must consider the import options to the left.
- Unit Scale: Conversion factor between DAZ Studio and Blender units. Defaults to 0.01 which converts from centimeters to meters.
- Mesh Fitting: Method used for fitting meshes to morphs.
- Unmorphed Shared: No mesh fitting and meshes are shared between objects. All shaping is ignored.This is useful to save space e.g. for environments with bushes and trees sharing the same foliage, which can be realized as many instances of a single mesh.
- Unmorphed Unique: No mesh fitting and each objects has a unique instance of the mesh. All shaping is ignored. This is useful e.g. for a room with many posters and paintings which have the same underlying mesh but different textures.
- DBZ (JSON) File: Fit characters and clothes using basic data in the .dbz file that was exported from DAZ Studio. This is the preferred method to fit character meshes and therefore the default option. It also works with .json files from earlier versions of the Daz importer.
- Viewport Color: The viewport colors assigned to materials. Since the viewport color never appears in renders, this only affects the viewport appearance, not rendered images.
- Skin: The viewport color assigned to skin materials.
- Clothes: The viewport color assigned to other materials.
- Material Method: Type of material node tree.
- BSDF: Full Iray materials (Cycles only).
- Principled: Node tree with a principled node (Eevee and Cycles).
- Internal: Blender internal rendered (Blender 2.7x only)
- Rotation Locks: Add rotation locks to bones as in DAZ Studio.
- Rotation Limits: Add rotation limits to bones as in DAZ Studio.
- Custom Shapes: Add custom shapes to bones. Only for the main character armatures.
- Inverse Kinematics: Add simple IK (inverse kinematics) to the armature. Only for the main character armatures (default off). Only available if Rotation Limits are on.
- Pole Targets: Add pole targets to the simple IK rig. Only available if Inverse Kinematics is on.
There are more options in the Global Settings panel which affect how the scene is imported, in particular in the Materials section. However, normally those settings rarely change.
Press the Import DAZ File button, and after a short time Aiko and the camera are loaded into Blender. We see that the viewport color does not affect the rendered image.
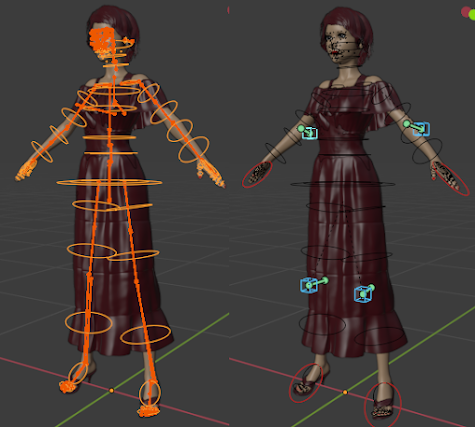
The illustration below shows the effect of importing Aiko with Custom
Shapes (left). Note that only the main character rig gets the custom
shapes. The clothes armatures are normally merged with the main rig
immediately after the scene has been imported, so the bones without
custom shapes disappear.
To the right we have imported Aiko with Inverse Kinematics and Pole Targets enabled. The IK effectors (hands and feet) are red, and the pole targets (elbows and knees) are blue boxes.
Unit Scale
This parameter converts between DAZ Studio and Blender units. The units used by DAZ Studio are centimeters. The default value of Unit Scale = 0.01 thus corresponds to setting the units to meters in Blender. Here are some common values for this parameter.
Centimeters: Unit Scale = 1.0, 1 B.U. = 1 cm.
Decimeters: Unit Scale = 0.1, 1 B.U. = 1 dm.
Meters: Unit Scale = 0.01, 1 B.U. = 1 m.
Inches: Unit Scale = 0.3937, 1 B.U. = 2.54 cm.
Mesh Fitting
The Mesh Fitting options are better explained using another scene with two characters.
Here are two characters in DAZ Studio. The gorilla and the mafioso are both based on the original Genesis character, so the underlying mesh is the same. The result in Blender is very different depending on how meshes are fitted.
With the two Unmorphed options (Unmorphed Shared and Unmorphed Unique), the Genesis character is loaded without any modification. In the first case the characters also have the same gorilla texture because they share the same mesh, and in the second case the unique meshes have different textures. With DBZ (Json) File fitting, the result looks very similar to DAZ Studio.
Material Method
This option controls how the plugin generates materials. The BSDF method creates a complicated node tree which attempts to mimic IRAY materials as closely as possible in Cycles, even for characters with complex materials such as Victoria 8. The material can also be rendered in Eevee, but the results may be less faithful.
The Principled method is centered around the principled node. It usually works better with Eevee and render times may be shorter. Cycles can also render such materials, but the result may not be identical to what you get in DAZ Studio.
Here are the corresponding node trees for the Face material.
| Node tree generated with the BSDF method |
| Node tree generated with the Principled method |
The default value of the material method depends on the active render engine: BSDF if the engine is Cycles, and Principled if the engine is Eevee.
In Blender 2.7x, there is a third material method, Internal. It generates materials for the Blender internal renderer and can thus not be used with Cycles.
Rotation Locks and Limits
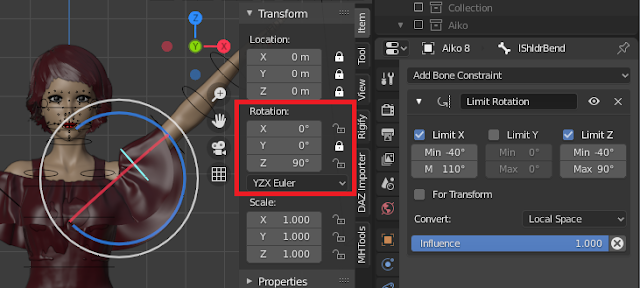
In DAZ Studio, the rotation of most bones is locked around some axes and limited around others. If the Rotation Locks and Rotation Limits options are enabled, the same rotation locks and rotation limits are implemented in Blender.
Here is the bend bone of the left shoulder. The Y rotation (twist axis) is locked, the X and Z rotations (primary and secondary bend axes) are limited with a Limit Rotation constraint.And here is the corresponding twist bone. It can only rotate around the Y axis, because the X and Z rotations are locked.
For more about rotation locks and limits, see this.
Custom Shapes
If we import a character with Custom shapes enabled, most bones are represented by circles which make them a little easier to deal with. We can see in the bone context which objects are used as custom shapes.
The custom shapes themselves are meshes. They are not visible because they are not linked into the scene.
If we turn off Custom Shapes in the armature context, the bones themselves are shown instead.
Inverse Kinematics
A separate page will be dedicated to this.
Troubleshooting
There are a few things that can go wrong during import.
This error it means that the .dbz file needed for fitting the mesh is missing. The world-space coordinates for vertices and bones are stored in a .dbz file with the same name as the .duf file that we import. Since we are importing the file aiko.duf, there must exist a file named aiko.dbz in the same directory. To create this file, export to Blender from DAZ Studio as described in the export documentation.
A .duf file saved in DAZ Studio does not contain the actual data in the way that Wavefront object or Collada files do. Instead it contains links to various asset files in the DAZ libraries, and these assets can link to other asset files as well. In order to find the assets, the DAZ importer needs to know where the DAZ libraries are located. To fix this problem, make sure that the DAZ root paths are set up correctly, as explained here.
If you are on a case-sensitive file system such as Mac or Linux, make sure that Case-Sensitive Paths option is turned on. It is found in the General section of the Settings panel. This option should automatically be set to the correct value for a given operating system, but if the importer complains about missing assets this may be the problem.
If the Verbosity setting is sufficiently high, the Daz Importer generates an error for missing assets.


