

- Update Render Settings: Update the render settings to the minimal requirements for rendering a DAZ scene correctly.
- Save Local Textures: Save copies of all used textures in a local textures folder, and change all paths to relative. The blend file must be saved first.
- Resize Textures: Replace selected textures with lower resolution copies to conserve memory. Local copies of the textures must have been saved first. Requires that Python and OpenCV have been installed on the computer.
- Change Resolution: Replace all textures of the selected meshes with lower resolution ones, if such textures have already been created.
- Change Colors: For all selected meshes, change the color of all materials with textures.
- Change Skin Colors: For all selected meshes, change the color of all materials representing skin, but keep the color of other meshes.
- Merge Materials: For all selected meshes, merge materials that are deemed identical (same textures etc.)
- Copy Materials: Copy materials from the active mesh to selected meshes.
- Prune Node Trees: Remove unused nodes in all materials for selected meshes.
- Launch Material Editor: The material editor allows you to make consistent changes over several materials at once.
- Reset Materials: Reset materials to their original states, undoing any changes made by the material editor.
This section changes some material settings. Everything can of course be changed in the compositor (for Cycles materials) or in the material and texture contexts. However, meshes imported from DAZ Studio often have many materials - a Genesis 8 character has sixteen - and updating each of those manually would be tedious.
Update Render Settings
Scenes imported from DAZ Studio will only render correctly with the appropriate values of some render settings. The lights in the scene must also satisfy some conditions. When you import a scene with the Daz Importer those values are normally updated automatically. However, if you append or link a Daz character into an existing scene, the render settings are not updated. And if you add a new light to the scene, it may not have sufficient settings. This tool force an update of all render and light settings to minimal values.
 |
| Left: Light Paths set to Direct Light. Right: After Update Render Settings. |
This shows an example how the render settings are updated.

Save Local Textures
If you have not already done so, now is the time to save the Blender file, because it must be saved for this button to work.
So far all textures are located in their original locations in the DAZ libraries. If you intend to paint on the textures, or resize the textures (next button), or move the Blender file to a computer where DAZ Studio is not installed (or all used assets are not installed), you need local copies of the textures.

Press Save Local Textures to do so. This command creates a folder called "textures" in the same directory as the blend file, and copies all used textures there. The absolute file links to the textures are also replaced by relative ones, so the textures will be found even if the blend file and the textures folder are moved elsewhere.


Once the textures have been saved in a local directory, you need to save the blend file again, because file paths have been changed to local paths. You can now move the blend file and the textures directory to a different location, or even to a new computer where DAZ Studio is not installed, and you will still be able to open the file. You can also modify the local textures without compromising your DAZ Studio installation.
Resize Textures
DAZ characters usually have many large and beautiful textures. This can be a problem if you try to render a scene on an old computer with limited RAM memory, because once the memory is full Blender comes to a halt. However, for many purposes the texture resolution is unnecessarily high. Therefore, I have provided a utility program that downsizes all textures in a given directory, and a button in Blender that replaces the original textures with the downsized ones, see http://diffeomorphic.blogspot.com/2019/04/downsizing-textures.html.
An alternative to resizing textures is to use Blender's built-in Simplification, which is found in the Render Properties context. This has the advantage that you don't need to install Open CV on your computer, which is a requirement of the Resize Textures tool. See https://diffeomorphic.blogspot.com/2021/02/render-simplification.html for more information.

- Steps: The number of rescale steps; one step means that the texture is rescaled by 50% in each direction, two steps that the scale factor is 25%, etc.
- Resize All: Resize all textures used by selected meshes, in all subdirectories.
| Steps | Scale factor | File name |
|---|---|---|
| 1 | 50% | foo-res1.png |
| 2 | 25% | foo-res2.png |
| 3 | 12.5% | foo-res3.png |
| 4 | 6.25% | foo-res4.png |
 To only resize Aiko's bump textures, go to the Aiko8 textures folder and select the bump maps only. Since all of those textures contain the string "B_10", we can use that string as a filter.
Change Resolution
This button only replaces the textures in the Blender materials; the rescaled textures must already exist in the same directory. If you have access to some other program that resizes image files, you can of course use that instead of the standalone script bundled with the DAZ Importer, as long as you follow the naming convention above. When the button is pressed, a popup dialog allows you to specify the number of rescaling steps.
Change Colors
Directly after import, all clothes meshes (including the hair) have the same reddish brown color, provided that the import option Viewport Color was set to Guess. To make Aiko's appearence agree more with the rendered image, we select her top and skirt and press Change Colors.


Change Skin Colors
This button also changes viewport colors, but only for skin materials. Press Change Skin Color and set the color to green. Aiko's skin turns green but her eyes and lips stay the same.
Merge Materials
Sometimes meshes have several materials which are in fact identical; they use the same textures and have the same settings. To save resources, we press Merge Materials to combine identical materials. The top had four materials, but after the merge it only has three because the Lace1-1 and Lace2-1 materials were identical.
Copy Materials
Assume that you have loaded a character and made a lot of edits to it, and then you realize that you should have used another material method (BSDF/Principled) when you loaded the character. Reloading the character and starting from scratch is not a good option, since a lot of work will be wasted. You could reload the character and replace the materials of the old meshes with those of the new meshes, one by one, but that is also a lot of work since Daz meshes typically have many materials.
This tool was more important in previous releases of the Daz
Importer, when materials made with the BSDF method could not be rendered
well in Eevee. Presently materials imported both with the BSDF and the Principled methods look decent both in Cycles and Eevee, and the need to replace materials is less.
The Copy Materials tool replaces all materials of the selected meshes with the materials of the active mesh, in order. Import a second copy of Aiko, and with the new skirt active and the old skirt selected, press Copy Materials. The materials of the old skirt are replaced with the materials of the new skirt.


- Match Names: Use the material names to decide which old material corresponds to which new material. Use this if the material order has been changed. If Match Names is turned off, materials are copied in order, i.e. new material 1 replaces old material 1, etc.
- Error On Mismatch: Raise an error if the two meshes have a different number of materials.
If you have change the number materials of the old mesh, e.g. by merging geografts, you should repeat the steps on the new mesh before copying materials.
Prune Node Trees
Some tools may leave nodes with all outputs disconnected. Such nodes do not contribute to the rendered image and can be safely removed. This tool does this for all materials in all selected meshes.

 The Prune Node Trees tool removes the unused nodes from the tree. This is easy enough to do manually for a single material, but would be tedious for DAZ assets which have dozens of materials.
Launch Material Editor
DAZ figures often have many materials that cover different parts of the body, like face, torso, arms, legs, etc. This makes it difficult to edit the materials in Blender, because we usually want to apply the same changes to all skin materials and it is difficult to miss something. For this reason the DAZ importer has the Mini Material Editor, which allows you to modify multiple materials simultaneously.To start editing a selection of materials, press Launch Material Editor at the bottom of the Material section. The Material Editor appears.

The material selection can either be updated by adding or removing materials one by one, or by pressing the Change Material Selection button. If we do that, a new pop-up dialog appears, where we may select the material type and the active material.


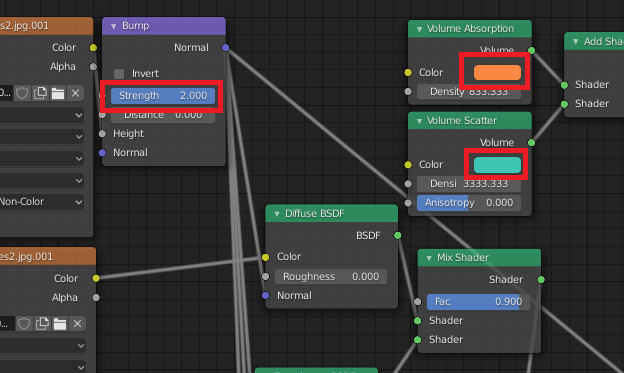 Here is the original node tree. Note how the values of the nodes correspond to the values to the left. Since the diffuse color is white, the diffuse texture is directly conneted to the diffuse node.
Reset Materials
This tool undoes any changes made by the mini material editor, and returns the node tree back to where it was. The extra Multiply node is still there, but it has no effect since it multiplies a color with white.
More tools for handling materials can be found in the Advanced Panel > Materials section.