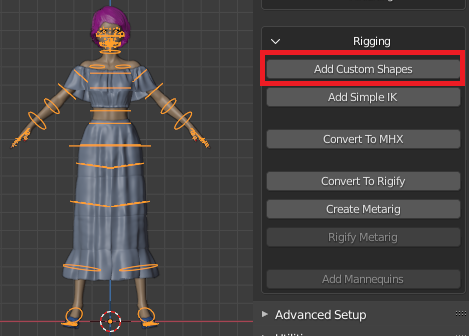
- Add Custom Shapes: Add custom shapes and arrange bones on separate layers
- Add Simple IK: Add a simple IK rig to the active rig.
- Convert To MHX: Convert the active rig to an MHX rig.
- Convert To Rigify: Convert the active rig to Rigify.
- Create MetaRig: Do the first part of Rigify conversion, where a metarig is created from the Daz rig.
- Rigify MetaRig: Do the second part of Rigify conversion, where the previously created metarig is converted to a Rigify rig.
- Add Mannequins: Create a collection of meshes, which are parented to the armature's bones and don't have armature modifiers. For faster posing.
Add Custom Shapes
This button adds custom shapes to the bones, to make them easier to recognize during posing.It also moves the bones to new layers and opens up a new panel called Simple Rig, where named bone layers are displayed.The new bone layers are layers 16 - 30.By only selecting the named bone layers that we are currently working on the rig becomes less cluttered.
Add Simple IK
This tool adds IK (Inverse Kinematics) bones to the existing DAZ rig. This simple IK rig is not as powerful as the more complex MHX and Rigify rigs, but can be an alternative for simple posing. The Add Simple IK button is only enabled for armatures to which custom shapes have been added. An alternative could be to use Auto IK for posing the original FK (Forward Kinematics) bones.
The snap buttons convert an FK pose to IK or vice versa. Here we snapped the FK bones on the left sides to the IK pose, and the IK bones on the right side to the FK pose. The pose is the same as in the previous picture (almost at least), but the IK influences have been reversed.
Convert to MHX
The MHX (MakeHuman eXchange) rigs was developed by myself when I was working on the MakeHuman project. Documentation about the MHX rig. Eventually the documentation should be moved here, for an MHX-converted DAZ character behave slightly differently from a MakeHuman one, but for the time being the MakeHuman documentation will have to do.Press Convert to MHX. Aiko is now controlled by an MHX rig.
Face bones carry over to the new rig, so it is still possible to do facial posing in the Face Units, Expressions and Visemes panels. Expressions can be tweaked with the face bones on the Face layer (armature layer 9).
Three new panels appear when an MHX rig is selected: MHX Layers, MHX FKIK Switch, and MHX Properties. They are described in the MHX documentation.
Convert to Rigify
DAZ characters can also be rerigged with the popular Rigify add-on by Nathan Vegdahl and others. Links to documentation about Rigify in general:Official Rigify documentation
Blenderartist thread
First we must make sure that the Rigify add-on is enabled. It is bundled with Blender and is found in the Rigging category.
Press Convert To Rigify. After a short time the rig is converted to Rigify.
Runtime controls for Rigify are found in the Item tab in the UI panel to the right of the viewport.
Facial bones and rig properties are copied to the Rigify rig, so face units, expressions and visemes continue to work, including the extra layer of tweak bones
The face bones can be found on armature layer 2 in the rigified armature.
The two last buttons in the Finishing section splits the Rigify button into two steps: Create Metarig and Rigify MetaRig. Having access to the metarig can be useful for tweaking it before the rigify step.
Add Mannequins
DAZ characters often have quite a large polygon count, which may affect viewport speed. This is especially true if you try to animate scenes with several characters or you use an old computer. Replacing meshes with low-poly versions helps to some extent, but the viewport can still be painfully slow. It appears that the main obstacle is deforming meshes with an armature modifier and vertex groups.
This is where mannequins come in. A mannequin is a collection of meshes that don't have armature modifiers, but instead are parented directly to bones. Tests indicate that posing with mannequins is much faster than with normal characters. If the meshes and the mannequin belong to different collections, the meshes can be excluded from the scene during posing, which vastly improves viewport performance.
The suggested workflow is thus:
- Exclude the meshes from the scene.
- Animate your scene with mannequins.
- Include the meshes and exclude the mannequin.
- Fine-tune the poses with the proper meshes in place.
- Render.
- Head Type. How to split up the head into chunks. This is most relevant for Genesis 3 and Genesis 8 rigs, where the head has a face rig with many bones.
- Solid. Keep the entire head as one mesh.
- Jaw. Split the head into a head and a jaw mesh. Thus is usually the default.
- Full. Split the head fully. This is usually a bad idea for characters with a face rig.
- Add To Collection. Add the new meshes to a collection (group in Blender 2.7x).
- Collection. Name of the collection/group.


