Sunday, November 29, 2020

Preparing Mesh Hair

Tonight I ran into some trouble when I was trying to convert the hair below to particles, and added some tools to deal with it.

At the top of the Hair section we now find the Print Statitistics button. This tool already existed in the Low-poly section, but it is convenient to duplicate it here because we want to keep track of how heavy the hair is before converting.  This beauty is a real heavy-weight with over half a million vertices.

  Verts: 566945, Edges: 419810, Faces: 139156

We don't want to convert such a heavy mesh to particles, both because conversion times grows fast with the number of particles (at least quadratically), and the resulting particle hair would be very unwieldy. To deal with that problem, there is a new tool called Select Strands By Size, which groups strands according to the number of faces and selects the groups that we want.

When we press the button a dialog appears where we can select the sizes. It takes some time before the dialog appears, because the mesh must first be analyzed and the faces grouped by size. In this case there are four groups, with 0, 40, 44 and 1156 vertices. Select that latter, which is not a strand but the hair cap.
Separate the selected vertices to a new object which we rename to Scalp. We also changed the viewport color of the hair cap material so we can distinguish it from the hair.
Invoke Select Strands By Size once again, and select the groups with 40 and 44 faces. We want to delete the strands with size 0, but for some reason nothing is selected when we select that group. Therefore we select the other two groups and then invert the selection.
Here is the inverted selection which consists of stray verts only, and the hair after the stray verts have been deleted. We can check the size again with the Print Statistics tool:

   Verts: 282860, Edges: 417430, Faces: 138000

Half of the vertices have disappeared, but the number of edges and faces has only decreased a little, probably because the scalp mesh was separated.

The hair mesh is still huge with 138,000 faces, and will take a very long time to convert. A reasonable size is 30,000 faces or less. To reach that number, we now Select Random Strands with a fraction = 0.8. This will select 80% of the remaining faces at random. Note that the semantics of this tool has changed; previously we specified the fraction of vertices that were not selected.

Delete the selected vertices and toggle out of edit mode. Again we check the size of the mesh with the Print Statistics tool:

Verts: 57342, Edges: 84623, Faces: 27976

The mesh now weighs in at almost 28,000 faces, which can be converted in a reasonable time, ca five minutes on my computer. It is a good idea to check the hair from different angles to ensure that there are no large bald spots.

Now the mesh is prepared for conversion to particle hair.

Select the hair and the scalp mesh, and press Make Hair. The meshes must be selected in the right order, with the hair active. For convenience the two meshes are listed below the button, so we can easily tell if they have been selected in the wrong order.

If we use the default options, the result is an unpleasant surprise.

The reason for this behavior is that the strands are oriented bottom-up in UV space. The UV coordinates are used as coordinates along the strands. The default assumption is that the strands are oriented vertically in UV space, with the roots at the top and the tips at the bottom. This has been the case in almost every hair that I have encountered so far, e.g. the Toulouse hair that comes with DAZ Studio. However, in this case the strands are oriented bottom-up, so the roots are close to the bottom of the UV.

To fix this, there is a new option in the pop-up dialog, Strand Orientation, which can take on four different values, depending on the orientation of the strands in UV space.

  • Top-Down: Vertically in UV space, with roots at the top (default).
  • Bottom-Up: Vertically in UV space, with roots at the bottom.
  • Left-Right: Horizontally in UV space, with roots to the left.
  • Right-Left: Horizontally in UV space, with roots to the right.

We select Sheet in the Create section and set Strand Orientation to Bottom-Up. We also resize the hair to a hair length of 40.

And here is the particle hair, in the viewport and rendered.


Monday, November 23, 2020

More Hair Changes

In the previous post, there were two ways to convert polyline and strand-based hair in DAZ Studio into particle hair in Blender: either 1) convert the hair during import time, or 2) import the meshes and convert them with the Make Hair tool afterwards. This is one method too many. The basic philosophy behind the Daz Importer is to import the content of the duf and dbz files as faithfully as possible, and then provide tools that make the content more useful in Blender. Clearly the second hair method agrees better with this philosophy.

For this reason the global hair settings have been removed completely, and hair is always imported as it is in the duf and dbz files: as polyline meshes for polyline hair, and as meshes with narrow tubes for tesselated strand-based hair. Those meshes can then be converted into particle hair if desired. This change has a number of benefits:

  1. Fewer global settings cause less confusion.
  2. Lots of code could be discarded.
  3. No need to postpone hair creation and restore hair after geografts are merged. Instead, we can simply wait to convert mesh hair to particle hair until after geografts are merged.
  4. Faster import. If the mesh hair contains strands of different sizes, multiple hair systems are created, and that takes a lot more time than a single system.
  5. Better control over hair conversion with the options of the Make Hair tool, like hair resizing to fit all strands into the same particle system.
Even if hairs are now always imported as meshes, their materials are hair materials, using the Hair or Principled Hair shader. There is a global setting which chooses between the two methods for hair material creation, just as there is a global setting for the ordinary material method.

Hair materials are created during import because it is when it can be done. When mesh hair is converted to particle hair with Make Hair, the needed information is no longer accessible.

The Make Hair dialog has been improved. Here is how it looks right now, but there may be changes later on. The main change is to the middle column, where we specify the hair material. If Keep Material is selected (the default), we can choose between the existing materials of the mesh hair. This is useful for polyline and tesselated hair, which are equipped with hair materials.

If Keep Material is disabled, the tool creates a new hair material with the specified color, and using the specified method (BSDF/Principled). This is the preferred way if we convert a mesh hair (with the Sheet setting), but can also be used for polyline and strand-based hair.

Sunday, November 22, 2020

Hair Improvements

Update November 23. Mesh hair can no longer be converted into particle hair during import. Use the Make Hair tool to expliticly make the conversion afterwards. See this post for details.

 Here is the Hair section of the Global Settings dialog.


We notice that the Strands As Hair option is gone. It is replaced by the Strand Type option, which can take on three different values: Mesh, Line, and Hair. These control how strand-based and polyline hair are imported.

As mentioned in the previous post, we must turn on Preview PR Hairs in DAZ Studio and set Render Line Tesselation Sides to a number greater than or equal to 2, and then export a dsf file with the hair data. When Strand Type = Mesh, the Daz Importer imports the tesselated meshes directly, without doing anything further. The strands are then narrow tubes. The picture above illustrates a typical strand when Tesselation = 4.

Here we have chosen Strand Type = Line instead. The strands are still meshes, but the faces have now been collapsed into one-dimensional edges. Polyline hair is imported as one-dimensional meshes also when Strand Type = Mesh, because polylines are always one-dimensional.

Finally, when Strand Type = Hair, the strands are converted into particle hair in Blender.

The Advanced Setup > Hair > Make Hair tool also offers new ways to convert mesh hair into particle hair, reusing the code used to import hair. The dialog displayed by the Make Hair button has a new line below Hair Color, which specifies the type of strands in the mesh hair. Depending on the type chosen, different algorithms are applied to create particle hair.

As always, we must delete any hair cap before creating particle hair, or separate it from the hair mesh.

Sheet is the old method for converting hair. It is applicable if the strands are two-dimensional sheets, e.g. the standard Toulouse hair. The sheets must be oriented vertically in UV space. This method does not work if the strands are tubes.

Line is applicable if the hair mesh consists of edges only. An example is the standard Mohawk hair, if it is imported with Strand Type set to Mesh or Line. Importing hair as polylines and then making hair with strand type = Line is essentially the same thing as importing hair as particle hair directly. However, the advantage of the two-stage process is that the hair survives the merging of geografts, something that particle hair does not.
Finally, the Tube option is applicable if the hairs are narrow tubes. The tubes can either be narrow 2D ribbons or 3D meshes, the important thing is that the vertex separation along the tube is much larger than the thickness. There is probably also necessary that vertex numbers increase along the tube.

We could illustrate this with strand-based hair imported with Strand Type = Mesh, but tube-shaped strands can also appear in other assets, such as the hairstyle above. Meshes with many tubes could not be converted to particle hair before.

Here is the corresponding particle hair, in the viewport and rendered.

Wednesday, November 18, 2020

Strand-Based Hair, For Real This Time.

In a previous post I announced that the Daz Importer could import strand-based hair (SBH for short) into Blender. Alas, that turned out to be incorrect. What the importer could import was mesh hair with polylines. Such meshes can be converted into particle hair in Blender, where each polyline corresponds to a hair strand. Proper SBH can not be handled by the Daz Importer, because SBH data is stored in an undocumented binary format in the duf file. For the same reason, the plugin can not import aniblocks, which are also stored in some binary format.

This may not be such a big limitation, because all hairs that I have come across have been of the polyline variety. However, normal users can apparently not convert SBH to polyline hair, so if you create an SBH in Daz Studio the Daz importer can not import it. Until now, but you have to do a special trick.


Create some strand-based hair in Blender.

In the Parameters tab, go to the Line Tesselation section and turn on Preview PR Hairs. Also set Render Line Tesselation Sites = 2. Settings this parameter to 3 will also work, but it increases the size and save time of the dbz file without gaining anything.

Finally Export To Blender to get a dbz file. Since the SBH information in the duf file can not be understood, the necessary information is stored in the dbz file instead. Only up-to-date versions of the export script saves this information.

Import the duf file into Blender, with Mesh Fitting set to DBZ. Particle hair is created.

Here is a render in Blender,

And here is the corresponding DAZ Studio render.

When we turn on Preview PR Hairs, DAZ Studio creates meshes for the strands. When tesselation = 2 the mesh is a long narrow strip, and when tesselation = 3 it is a narrow tube with triangular cross-sections.

The Daz Importer then "untesselates" these meshes, creating one-dimensional polylines instead. But as we mentioned in the beginning, the plugin knows how to convert such polyline meshes into particle hair. So that is how SBH is imported as particle hair in Blender.

Let us finally mention two new global settings in the Hair section: Viewport Children and Render Children control the number of child particles in the generated hair. By default both settings are zero, which gives a good correspondence between DAZ Studio and Blender. Here is a render with Render children set to 0 and 100, respectively.

Saturday, November 7, 2020

Multiple geoshells

A geometry shell in Daz Studio is a kind of virtual mesh. It is a clone of a base mesh, but unlike instances you can change its material settings and some other properties. The most common use is to add color to the base mesh. There is no corresponding data type in Blender. Since in many cases a geoshell is just a container for something that modifies the materials, the Daz Importer converts geoshells into node groups in the corresponding materials. This usually works well if we just add a single geoshell, but if the same character has several geoshells the Daz Importer can be confused. Recently I have therefore added some tools to fix problems with multiple geoshells.

Our character has two types of geografts: nipples (HeadLight) and genitals (Golden Palace), each with an associated shell. There is also a third shell that covers the body in blood.

In Blender we have some problems. The body is covered with blood correctly, but the geografts are white. (Good for avoiding internet censorship, though)

Let us select the genitals and look at the node tree of the torso material, GP_Torso-1. Just before the output nodes, there are three node groups which correspond to the three shells in Daz Studio. The shell nodes are named: Shell name _ Material name, so we easily identify both the shell that it corresponds to and in which material the node appears. The shell nodes are ordered according to Mesh Offset, which lets you control which shell appears on top.

One problem is the HeadLights shell to the left. It should only affect the nipples meshes, but not the genitals. To fix that, we can simply delete the node and reconnected the incoming and outgoing links. This is not difficult but rather tedious, since the genitals mesh has five different materials, and the HeadLights node must be deleted in each.

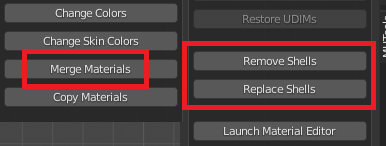
To facilitate this task, there are two new buttons in the Setup > Materials section: Remove Shells and Replace Shells. But first we Merge Materials, which reduces the number of genitals materials from five to three without changing anything else.

When we press Remove Shells a dialog appears with all shell nodes in all materials in the active mesh. We want to delete the three Headlights nodes which shouldn't be present in the genitals materials.

Filter the selection with "head" and select all. The HeadLights nodes are now gone from all genitals materials.

Unfortunately, the genitals are still rendered white. We also have a problem with the Blood node to the right. The Blood geoshell is associated with the body mesh, and gives pure white when extended to geografts. Hence we want to replace the node tree in the geograft node group

SYABME Blood 01 Full Body G8F_GP_Torso-1

with the corresponding body node tree

SYABME Blood 01 Full Body G8F_Torso-4

Again, this is straightforward but tedious to do directly in Blender; just select the desired node tree from the drop-down list. For convenience, there is a tool to do it for all materials at once.


Press Replace Shells. A dialog appears with all shells and the corresponding node trees. We want to replace the three last node trees with the node tree for the body torso.

Like this. Confirm the dialog. The node tree for the blood node is changed; even the label at the banner is changed.

We  must now repeat the procedure for the nipple meshes. This time it is the Golden Palace shells that must be removed. The Blood node tree should all be set to the node tree in the body torso material. After these steps, all white areas are gone and the geografts are covered in blood, too.

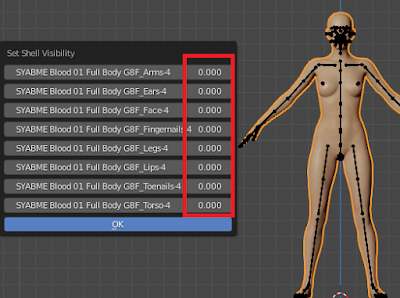
Another new tool is Set Shell Visibility in the Visibility panel. A dialog appears with all shell nodes and the correspond visibilities:

We can turn off all blood by changing the visibility to zero. In this way we can use the same character both before a fight (unbloodied) and after it (bloodied).

Normally visibility is either zero or one, or perhaps a number inbetween, but there is nothing that prevents us to go outside this range to achieve special effects.