Tuesday, January 26, 2021

FACS

 A couple of days ago, DAZ announced the release of DAZ Studio version 4.15, and the updated Genesis 8.1 character (only female so far). It features improved facial expressions; "Genesis 8.1 introduces 63 morphs based on FACS (Facial Action Coding System) to facilitate more natural looking expressions and more diversity in expressions available. FACS is used by professional animators and utilized in research, such as with facial recognition." 

From the point of the DAZ Importer, these FACS morphs are just another set of standard morphs, so adding them to Blender was very little work. All that was needed was to add the relevant file paths to the directories where the FACS morphs are stored.

In the development version of the Daz Importer, there are two new buttons, Import FACS Units (for the FACS morphs themselves) and Import FACS Expression (for a standard set of facial expressions which use the FACS morphs.
The import interface is familiar from other similar buttons. Here we can choose between the FACS units available on our machine.

A new panel called FACS (will probably be changed to FACS Units soon), with the familiar layout. Here Genesis 8.1 Female is blinking.

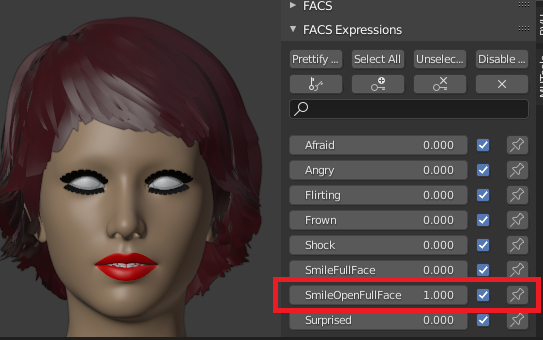
Similarly we can load the FACS Expressions. Here we are in for a surprise. Whereas some of the expressions work quite well, some like SmileOpenFullFace barely changes the face at all.

To understand what is going on we must recall that there are two kinds of morphs: shapekeys and face rig poses. In Genesis and Genesis 2 characters, morphs are implemented as shapekeys, and in Genesis 3 and 8 they are face rig poses. The new thing with the FACS morphs is that they are combinations of both; both shapekeys and face rig poses are equally important.

However, morphs can also be combinations of other morphs, e.g. the EyesBlink morph consists of EyeBlinkLeft and EyeBlinkRight, which in turn move the bones. In Blender such multiple layers of drivers do not work, so instead the EyesBlink morph drives the bones directly, with a combination of the left and right weights. For Genesis 3 and 8 morphs, combining the bone drivers was all that mattered, but for FACS expressions shapekeys must also be combined for the morph to look right. This feature has just been implemented.

There is a global settings which controls whether new shapekeys should be generated when morphs using morphs are loaded. It is off by default, although that may change in the future. The reason is that this settings may affect ordinary morphs as well, which already look good without shapekeys, and shapekeys consume lots of memory.
With the Combine Multiple Shapekeys option enabled, the SmileOpenFullFace morph looks like its name.
The Afraid morph still looks weird, but since this is the only FACS expression that is off, it may be a glitch in the Daz file.
The Angry morph shows a different problem. The face looks angry, but the eyelashes do not follow. This is because the shapekeys only affect the body mesh, unlike face rig poses, which affect both the body and the eyelashes (provided that the rigs have been merged).

To fix this, we need to transfer the shapekeys from the body to the eyelashes, using the Transfer Other Morphs button.
The pop-up dialog shows the available shapekeys. The ones that start with face_bs_ are part of the FACS units, and the ones starting with face_ctrl_ were created when we loaded the FACS expressions.

To limit transfer to the expression shapekeys, we filter with the string ctrl.
And now the eyelashes follow the face when G8.1F becomes angry.
The FACS morphs are supposed to be a new feature which is only supported by Genesis 8.1 characters. However, Genesis 8 and 8.1 are combatible meshes (same number of vertices, edges and faces), and therefore we can load the FACS morphs to Genesis 8 characters as well. The results above for Aiko 8 indicate that this works.

Monday, January 11, 2021

Combine Hairs

Combine Hairs is a new tool which combines several hair particle systems into a single one. This is useful because the Make Hair tool tends to create many different particle systems, and that happens because all strands in a given particle system must have the same number of vertices. The Make Hair tool has a resize option, but it may not be obvious which is the right size to resize to until after the particles have been created.

Here is Toulouse hair with three different materials, before and after particle hair has been made.
Everything looks nice in the viewport, but we see that a lot of different particle systems have been created. To clean things up, we now want to combine the particle systems into a few ones.
At the bottom of the Hair section, press Combine Hairs.
A dialog appears where we can select which particle systems we want to combine. The Hair Length parameter specifies the number of vertices in the strands (the number of segments plus one). The numbers in parantheses is the hair length of the corresponding hair.
Since all hairs have the same length (24), we set the Hair Length parameter to 24. To combine all green hairs, filter the list with "green" and press the All button. The green particle systems are now combined into a single one, called Hair_24_Green. Repeat the procedure to combine the red and blue hairs, too.
Now we only have three particle systems, one for each material. There is no visible change in the viewport.
We use the tool again to combine the three particle systems into a single one. We specify that the strands have ten vertices (nine segments).
And we now have a single, green, particle hair. If we want to change the material, it can be easily done in the particle settings


Sunday, January 3, 2021

Merging Multiple Geografts

An issue that comes up repeatedly is how to merge several geografts to a character. The necessary merge information is stored in the meshes when they are imported. However, the information consists of vertex number, and is thus corrupted if a mesh has been edited, e.g. by merging other geografts to it. Therefore, one must follow a strict procedure when merging several geografts:

  1. Hierarchal geografts, i.e. geografts for geografts, must be merged first.
  2. All geografts on the same level much be merged with the character at the same time.

Let us show how these rules work in practice.

In DAZ Studio, we have Victoria 8 with the Futalicious and HeadLights geografts. Moreover, Futalicious has a geograft itself: Roasty.

Here are the geografts in Blender, after all rigs have been merged with the Victoria's rig.

First we merge Roasty to Futalicious. With Roasty selected and Futalicious active, press Merge Geografts.

Roasty has now been merged with Futalicious and has disappeared as an independent mesh. The remaining geografts are all on the same level, and must be merged with the character mesh at the same time. Select Futalicious, HeadLight_L, and HeadLight_R, and then shift-select Victoria to make her active. Merge Geografts again.
Now all geografts have been merged with the Victoria mesh. The only thing that remains is to join the eyelashes with the head. The eyelashes are not geografts, so they can be joined using Blender's built-in Join Meshes command.

The joined mesh has two different UV layers, which have to be combined using Merge UV Layers tool.

Friday, January 1, 2021

Morph Transfer Artifacts

Update Jan. 2. 

Xin pointed out that Blender has a built-in method that computes the face which is closest to a given point in space. Using this method to match vertices with faces results in a massive speed-up compared to doing the same thing using Numpy. To transfer one shapekey from the body to the top now takes 1.1 seconds, of which 0.3 seconds is spent on matching vertices and faces, compared to 74 seconds yesterday.

Since the Nearest-Face method is more or less equivalent to the old General method, only much faster, the General method has been renamed to Legacy. I will keep it if it turns out that the new method does not work in some cases.


Original Post

Some time ago we reported on Morph Transfer Progress. However, it turns out that the default Nearest-Vertex method has some problems. First, engetudouiti reported that the transfer tool may run out of memory. This happens because in order to find the nearest vertex, a numpy array was allocated with the distances between all vertex pairs. The size of this array is proportional to the product of the number of vertices in the source and target meshes, and if the meshes are sufficiently dense, the available memory may not suffice to allocate that array.

That problem was straight-forward to fix. Instead of allocating one huge numpy array, a python loop computes the nearest source vertex for each target vertex. The time to do this is still quadratic, but the memory needed is only linear, so there should not be any memory errors.

Then I found another problem when transferring some JCMs to the basic wear top. Here the pJCMChestFwd_35 morph has been transferred to the top, using the Nearest Vertex and General methods. There is a strange net-shaped pattern in the former case.


The pattern arises because the target mesh (the top) is denser than the source mesh (the body), and the size of the pattern is roughly the same as the resolution of the body mesh. The artifact is really inherit in the nearest-vertex method, which we can see as follows.

The general method creates data transfer modifiers to transfer the shapekeys to the target mesh. Since that modifier cannot transfer shapekeys directly, the shapekey information is converted into three vertex groups (for the x, y, and z components), which are then transferred, and finally the vertex groups are converted back into shapekeys of the target mesh. The modifier is set to use the Nearest Face Interpolated mapping. If we use Nearest Vertex as the modifier mapping instead, the same kind of net-shaped pattern arises.
In the latest commits, the Nearest Vertex transfer method is replaced by a Nearest Face method, which basically does the same thing as the General method but using Numpy instead: instead of copying the shapekey from the nearest vertex, it copies it from the nearest surface point.

When we transfer the pJCMChestFwd_35 using the Nearest Face method, the result is very similar to the General method.

Unfortunately, the new method is more time-consuming for large meshes; to transfer one shapekey from the body to the top took 8 seconds with the old Nearest Vertex method, but 74 seconds with the Nearest Face method. Almost all the time is spent finding the closest triangle in the source mesh for each vertex in the target mesh. I hope to be able to find some way to reduce this time in the future.