Thursday, April 6, 2023

DAZ HD Morphs and Xin's Addon

The morphs that you can import with DAZ Importer are only half the story. Many morphs also have high-definition (HD) information, which is stored in a dhdm (DAZ High Definition Morph, perhaps) file. The information in a dhdm file is encoded in an undocumented binary format and can not be read by the DAZ Importer. However, Xin has developed an add-on for importing dhdm files, which is colloquially know as Xin's Add-on. This post describes how I use Xin's add-on to generate normal map or displacement map textures, and then assign them to a character.


Installing Xin's Add-on

The source is available in the following repository: https://gitlab.com/x190/daz-hd-morphs . There you can also find compilation details for the .dll under MinGW on windows x64, and documentation.

If you find this addon useful, consider supporting its development and maintenance here: https://xin888.gumroad.com/l/daz_hd_morphs.

The latest version (the main branch) includes documentation in the form of a .pdf in “./blender_addon/documentation/daz_hd_morphs_documentation.pdf”. It includes several step by step examples.

For up-to-date information see further https://bitbucket.org/Diffeomorphic/import_daz/issues/1399/blender-addon-to-generate-rigged-hd-meshes.


Generating Textures

Once the HD morphs add-on has been enabled, a tab called HD Morphs appears. It consists of a number of panels. We must also import the mesh that we want to generate normal or displacement maps for.

 
First we enter the Main Settings.
  • Working directory: All textures will be saved in a subdirectory under this.
  • Unit scale: The scale factor connecting the DAZ scale to the Blender scale. Since DAZ uses centimeters internally, the default value 0.01 corresponds to meters.
  • Base mesh: A drop-down list where we choose the mesh.
If we want to generate normal maps, we enter the Normals/Displacements panel and choose Normals (multires) as the type. There are also other settings that let us specify the generated texture in detail.
In the From morph files panel, press the plus sign to add DAZ HD morph files.
We want to generate normal map files for the standard DAZ expressions, so we navigate to the directory where they are located. We are only interested in the files where the actual shapekeys (at base resolution) are stored, which are .dsf files that being with "eJCM". So we type "ejcm" in the search field and select all files.
After a while the textures have been generated in a subdirectory of the working directory.

Note that separate normal map textures have been generated for seven tiles, 1001 - 1007. In this case this is unnecessary, since only the first tile, which contains the face, is of interest. We can limit the number of generated files if we enable Select UV tiles and only select those tiles that we are interested in.

Import the textures into Blender

Once all textures have been generated, we want ot import them into the Blender materials. However, first need to we import the morphs at base resolution.

 
With the mesh or rig selected, import the expressions as usual.
Next we open the Advanced Setup > HDMesh panel. It contains three buttons for importing textures generated by Xin's add-on: Load Normal Maps, Load Scalar Disp Maps, and Load Vector Disp Maps.
Navigate to the directory where the normal map textures are located and select those that we want to import. The options are:

  • Use Drivers: Drive the strength of the normal maps with the morph strength.
  • Smart Tiles: Only add the textures to materials if other textures have the same tile suffix. E.g., the Torso material typically has other textures ending with "_1002", and therefore only normal maps endin in "_1002" will be added to the Torso material.
  • Compact Layout: Close the nodes used to connect the normal map textures, thus making the layout more readable.
  • Prune Node Tree: Remove unused nodes once the new textures have been added.
  • Add Maps To Materials: The affected materials.
In this case we know that the expression textures only affect the face, which is located on tile 1001. Hence we turn off Smart Tiles and set Tile = 1001. Moreover, we deselect all materials except the Face and Lips materials.

The textures are now imported. To the left of the Face-1 node tree we have new normal map textures that are stringed together with overlay nodes.

Note that the factors in the overlay nodes that connect the normal map textures are driven by the morph properties.

Here is the open face smile, without and with the normal map textures.
Xin's add-on can alternatively generate scalar and vector displacement maps. These are imported into Blender in a completely analogous fashion. Here is the options when we import scalar displacement maps.
Displacement maps are stringed together with add nodes (vector math nodes), and the result is directly connected to the material output displacement strength.

Sunday, April 2, 2023

Stripping Categories

We can acquire packages of morphs from the DAZ store. Sometimes the vendor prefers to put the package name in front of all morphs in the package, as in the example below.

Import these morphs into Blender with Import Custom Morphs.
The morphs appear in the Custom Morphs panel, under the category that we specified when importing the morphs. Unfortunately, we have to make the UI panel very wide to see which morph is which, since most of the available space is taken up by the package name.
There is a way to fix this so we can view only the interesting parts of the morph names. First, we need to choose the name of the category to be the same as the common string that starts the morph names. In this case we have already chosen the category to be "Venus Smile". Second, enable the global option Strip Category.
The beginning of the morph name is now hidden for every morph that begins with the category name, and it is much easier to see what each morph does.

Friday, March 24, 2023

Only Importing Properties

Meet Aivic. She is 70% Aiko and 30% Victoria, but those morphs were baked into the dbz file and are not available in Blender. So how do we make morphs that suit this particular character. It could be done with adjusters, but strength multipliers for the Aiko and Victoria morphs already exist in DAZ, so why not use them.

Here we have imported two expressions to Aivic, Afraid and Angry. But those expressions were made for the basic Genesis 8 Female, and character-specific corrections exist.
With the Import Custom Morphs tool, go to the Aiko folder and import the two eJCM files that contain the Aiko corrections to the Afraid and Angry morphs. Repeat this step to import the corresponding Victoria morphs.
When we now turn on the Angry morph, we see that we have a problem. The corrective shapekeys for both Aiko and Victoria are enabled at 100%, which is not what we want. They should be enabled at 70% and 30%, to match the character blend.
To access the character strength we must import the corresponding character morphs, like CTRLAiko8.dsf. However, we don't want to import the morphs themselves, because they are already baked into our character. We only want access to the properties that govern the character mix. To this end we enable the Only Properties option. We also enable Protect Morphs, which protect the properties from being accidentally disabled.

Now three sliders are added in the Custom Morphs panel. There are some things to notice here.

  1. There are no new shapekeys. Because Only Properties was enabled, neither shapekeys nor bone transforms were imported.
  2. The Aiko 8 slider is not activated (the checkbox to the right of the slider), which means that it is not included if we clear or set morphs, or set keys.
  3. The * Aiko 8 slider starts with an asterisk. This means that Aiko 8 is protected from accidental change. The All button at the top will activate all non-protected morphs but leave protected ones deactivated. There is a new Protected button which does activate protected morphs, but not unprotected ones.
Load the Victoria control morph as a protected morph in the same way, and then import the eJCM morphs for both Aiko and Victoria with the default settings, i.e. with Only Properties and Protect Morphs disabled.

We can now turn on the Angry morph, and set the Aiko and Victoria properties to match the character mix. The character-specific shapekeys now have the right strengths, i.e. 0.7 and 0.3, respectively.
Here is a comparison of the Angry morph for different settings.
There is another, simpler way to control the morph mix. Enable the global option Protect Multipliers. This makes any multiplier, i.e. a property that is multiplied with the morph strength, a protected morph that is displayed in user interface.

This time we only load the eJCM files for Aiko and Victoria, but skip the control files. The plugin finds that FHMAiko8 and FHMVictoria8 (FHM stands for Full Head Morph) are multipliers and therefore should be protected and displayed in the Custom Morphs panel. We can now set those sliders to match the character mix, and the shapekeysget the right values.
Finally a short notice on how protected morphs are implemented. The plugin considers a property to be protected if its description consists of three asterisks, so don't change the description of such properties.

Friday, February 3, 2023

Unsupported Shaders and Unused Textures

The DAZ Importer fully supports three shaders: Iray Uber, 4-Layer Uber PBR MDL, and PBRSkin. Other shaders are only partially supported or not at all. Sometimes the result with an unsupported shader can be improved by applying the Iray Uber shader in DAZ Studio, but there are no guarantees. Normally we have to tweak the nodes in Blender to obtain the effect we want. However, to do so we often need textures that only affect the unsupported channels. In the last version of the DAZ Importer we can import such textures, even if they are not used by any nodes in Blender.

As an example, consider this character with wet and tanned skin. We will focus on the tan lines which depend on a texture.
In the Surfaces tab we see that the materials have a non-standard shader, which is not supported by the DAZ Importer. The Torso mateial has a section called Tan Lines, which contains many channels that the plugin does not recognize. The important point is that some of these channels have textures that are needed to recreate the effect in Blender.
When we import the scene to Blender we get a warning about an unsupported or partially supported shader. There is in fact some support for the DAZ Brick shader, but only for brick layers, which is not what we have here.
And when the scene is imported into Blender, all traces of the tan lines are gone.
To recreate the tan lines, we must first make sure that all relevant textures are imported. Enable the global setting Build Unused Textures and import the scene again.
Now there are new texture nodes at the right side of the node tree, together with an empty node group to indicate which channels the textures are assigned to.
The next step is to make the skin look tanned. To this end we launch the Material Editor so we can edit all skin materials at once.The simplest way is to turn down the value of the base color of the principled node.
The character is now tanned, but over the entire body; still no tan lines.
Next we go into the node editor for the Torso material. The node group to the left will be used as a mask. The other node group, whose only purpose is to display the affected channels, can be deleted to clean up the node tree.
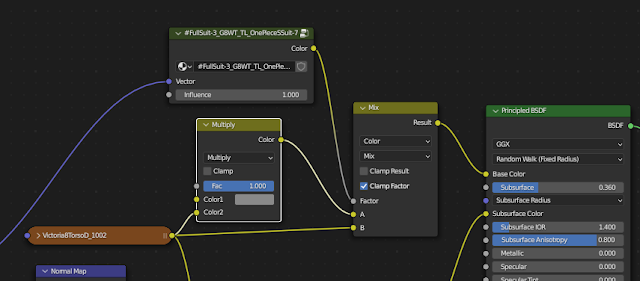
Here are the nodes that affect the base color: the original texture and the multiply node that creates the tan effect.
Add a mix node that mixes the tanned skin and the original skin, using the tan lines texture as the mixing factor.
And here is the skin with tan lines.

The other materials still contain unused textures and node groups. To remove them and keep the node trees tidy we can use Advanced Setup > Materials > Prune Node Trees with Keep Unused Textures disabled.


Saturday, January 14, 2023

USING PRE-BENDED FIGURES (ALSO WORKS FOR G1 G2)

One common issue for daz figures is they require literally hundreds of morphs to get the figure working. Plus jcms don’t work anyway with G1 G2 figures that use triax instead, not supported by blender.

Now to help with this we may use a old trick that’s exporting prebended figures. This way we bake some main deformations from daz, then we may also use a corrective smooth modifier to help preserving the volume and shape of the baked deformations. As a side effect this also works better with ik that likes prebended limbs. And exports better to game engines. As a downside effect this will not work to import daz poses since the rest pose is changed this way. So it’s only good for original blender animation.

Below it's an example with G8F, the deformations are not bad considering no jcms are used at all. This technique works fine with G1 G2 too.


Please note that the prebending may depend both on the figure and the outfit. In general a nude figure can be more prebended than a dressed figure, and a dressed figure may require more or less prebending depending on the outfit.

The general steps are:

  1. In daz studio we prebend the figure as required depending on the figure and the outfit.
  2. If it is a G1 G2 figure then we add the general weight maps: edit > figure > rigging > convert to blended weight.
  3. Export to blender as dbz.
  4. In blender we add the corrective smooth modifier to the figure.
  5. In blender we merge the outfit parts and add a shrinkwrap modifier to the outfit.

Below an example with G1F and the magus outfit. I prebended the elbows and knees and a little shoulder, but left everything else alone to avoid distortions on the magus outfit. Then I converted to general weight and exported the dbz. Back in blender I added the corrective smooth to the figure and shrinkwrapped the outfit.

Please note that I uncheked "preserve volume" in the armature, since G1 doesn't use jcms and the corrective smooth is responsible alone to preserve the volume and prebended shape.

Overall the magus figure works fine enough and doesn't use any corrective morph.


note. important. The corrective smooth tends to preserve the original shape, so it’s good for body deformations and outfits. But not for face expressions since it tends to diminish the expression itself, so we may want to use a face mask for the corrective smooth.

Please see the depository for test files.

https://bitbucket.org/Diffeomorphic/import_daz/issues/994/


update. March 16 2023

Thomas did a great job with the last commit. It is now possible to import daz poses on prebended figures so we can avoid jcms and still be compatible with the daz poses. To do this you have to enable the global option "Daz Orientation" and check "Subtract Rest Pose" in the import pose panel.


Beware that "Daz Orientation" is experimental and actually uses some heuristic to be compatible with the old system. The only risk though is that some poses may not import completely fine, so you can use the option it won't break anything.

The intended workflow is to only use "Daz Orientation" if you work with prebended figures, otherwise the old system works better for now.

https://bitbucket.org/Diffeomorphic/import_daz/issues/1445/


update. May 5 2023

Since "Daz Orientation" doesn't work fine is now removed, together with "subtract rest pose". There is instead a new tool "copy absolute pose" which will copy a pose between two figures having a different rest pose, that we can use for prebended figures too.

runtime > posing > copy absolute pose


update. Apr 10 2025

In version 4.4 of the addon "copy absolute pose" is removed in favor of "copy pose" which works for both posed and non-posed figures.

setup > corrections > copy pose

Sunday, January 8, 2023

Adding an Armature to Mesh Hair

Hair meshes in DAZ Studio often lack bones that allow them to be posed, and even if hair bones exist they can only be posed in very limited ways. To remedy this I have spent some days implementing a tool for automatically adding hair bones that can be used to pose the hair mesh.

Select the hair mesh and press the Add Hair Rig button at the bottom of the Hair section. New hair bones are created for the parent armature, and vertex weights are assigned to the hair vertices. For details see the Add Hair Rig page in the new documentation


Friday, December 23, 2022

Combining Multiple Geografts and Shells

Shells, also know as geometry shells or geoshells, add color and other properties to the materials of a character. A single shell seldom causes problems, but if we mix multiple shells they can interact with each other in undesired ways. This post describes some shell problems and how to fix them.

Here we have a female character with geograft genitals and nipples, together with the corresponding shells that add color to the geografts. The genitals and the outer parts of the nipples are paler than the surrounding skin because the two shells influence more materials than they should.

Select the Headlights Shell and go to the Parameters tab. In the Shell section, select Surfaces. The shell is enabled on the Torso and Nipples materials, which is correct. However, it is also enabled on the genitals materials, which doesn't make sense. Turn off the Headlights Shell on the five Golden Palace materials.

Then select the Golden Palace Shell and turn off the two nipples materials. The shells now only affect the materials that they should, and the pale areas are gone.

Next we add another shell for Tears Makeup. The headlights and genitals turn pale again. To fix this we select the tears shell and turn it off for the nipple and genitals materials.

Finally we add a shell to make the body look as if it is oiled, and the nipples and genitals turn pale yet again. However, this time we cannot disable the shell for the geograft materials, because we want the geografts to look oily as well. If we turn off the shell for those materials, the nipples and genitals would be surrounded by a dry area in an otherwise oiled body, which would look very strange.

I don't know how to solve this problem in DAZ Studio, so we leave it to the Blender side.

Here we have imported the character into Blender. The nipples are surrounded by pale rings that come from the oily shell. The genitals are also pale.

If the nipples are solid white, it means that some other shell is also active. Perhaps you forgot to turn off the tears shell on the nipple materials.

In the shader nodes editor, select the left nipple material (called Nipples-2). To the right of the node tree, just before the material output node, there are node groups that correspond to the material shells in DAZ Studio. The Oiled Full Body node has a node group call Oiled Full Body_GP_Torso-1. Replace this node group with the node group for the torso, i.e. Oiled Full Body_Torso-5.

Repeat the procedure for all genitals and nipples materials.

The pale areas are now gone.
The tears makeup is a bit pale compared to DAZ Studio. We can darken the mascara by increasing the Influence slider. Or if the lady isn't sad all the time, we can turn off the dripping mascara by setting the influence to zero.

We can increase the oilyness in the same way, or make the skin look dry by turning down the oily shell influence to zero. However, this becomes quite cumbersome since there are many materials that have the oily shell group, and the change has to be made to all of them. Fortunately, there is a way to change the influence for all materials at once.

When a mesh with shell groups is selected, there is a new panel called Visibility. The Set Shell Visibility button opens a dialog with a list of all shells and their influence. We see that influence of the Tears makeup shell is three, due to the change that we made above. We can now change the value of the Oiled Full Body slider to increase or decrease the influence of the shell for all materials at once.