UDIM support has recently been added to Blender 2.82 Alpha. This is very useful for the Daz Importer, because the UV coordinates in Daz Studio are arranged in UDIM tiles, at least for the Genesis 3 and 8 characters.

Since there are several skin materials, editing them consistently is tedious and error prone. The
Mini Material Editor addresses this to some extent, but its power is quite limited. With UDIMs we can combine all skin materials into a single one, which we can then edit using the powerful node editor.
Before an UDIM material can be created, the blend file must be saved and the textures saved locally. The reason for this is that UDIM requires that textures follow a certain naming convention. Hence new textures with the appropriate names must be created, and you probably don't want to litter your Daz installation with these extra textures.
Here is the face material for the Genesis 8 Female character. The diffuse texture node has extension = Repeat and source = Single Image.
Once local copies of the textures have been created, the new Make UDIM
Materials button becomes active in the Finishing section. Logically it
belongs to the Materials section, but if the character has separate
anatomy meshes (geografts), they should be merge with the character
before making UDIMs.
A pop-up dialog with a list of all materials appears. The selected ones are going to be replaced by a single material with tiled textures. Which of the materials is specified at the bottom of the dialog. It is the first material with textures in the first tile.
After the script has been executed, all selected material have been removed except for the target material Face-3, and all polygons of the removed materials now use Face-3 instead.
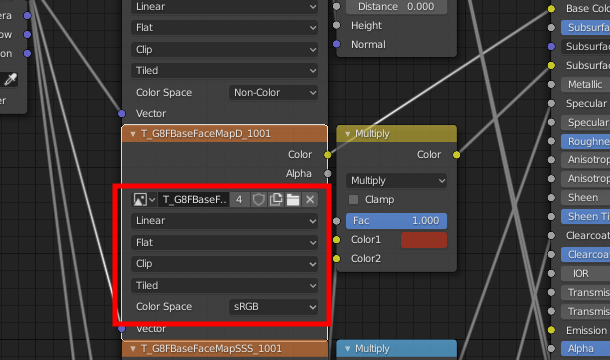
The textures nodes have been changed like this. A "T_" has been added in front of the texture name, extension = Clip, and source = Tiled.
In the UV editor, we can now see the tiles of the tiled texture. Notice that the tile labels equal the old material names.
Now let us turn to the other new button, Set UDIM Tile. It is useful when the character is exported with some geograft, e.g. genitals. Here are the UV coordinates of the New Genitalia for Victoria 8 and the corresponding torso texture.
The problem is that the UVs are located in the first tile, but the torso texture will end up in the second tile; its full name is G8FBaseTorsoMapD_1002.
To move the UV coordinates to a specific tile, we use the Set UDIM Tile button. This must be done before Merge Anatomy, because all UV coordinates are moved to the same tile. Select the geograft and press Set UDIM Tile.
Select the tile we want to move the UVs to, and press OK.
The UVs are now moved to the second tile.
Next we Merge Anatomy and Make UDIM Materials. The genital UV coordinates are now correctly located in the second tile.


