Note. Since the the new morph system uses simple expressions, as suggested by Xin, it is no longer necessary to enable Auto Run Python Scripts.

- Import Units. Import all selected face units morphs.
- Import Expressions. Import all selected expression morphs.
- Import Visemes. Import all selected viseme morphs.
- Import FACS Units. Import all selected FACS units morphs.
- Import FACS Expressions. Import All selected FACS expressions morphs.
- Import Body Morphs. Import all selected body morphs.
- Import JCMs. Import all selected joint corrective morphs (JCM's), which are shapekeys driven by bone rotations.
- Import Flexions. Import all selected flexion morphs.
- Import Standard Morphs. Import all standard morphs of the specified types.
- Import Custom Morphs. Import the selected morph files to the active mesh, or the morphs from
all files in the directory. The morphs must have the same number of
vertices as the active mesh. Optionally, object properties that drive
the morphs can be created, and can be accessed from the Custom Morphs
panel.
- Save Favorite Morphs. Save all file paths to the morphs used by the active character to an external file.
- Load Favorite Morphs. Load all morphs in the selected file.
- Transfer Shapekeys. Transfer all shapekeys from the active mesh to all selected meshes.
- Apply All Shapekeys. Apply all shapekeys to selected meshes. Moved to Advanced Morphs panel in version 1.6.2.
- Mix Shapekeys: Combine two shapekeys into a single one. Moved to Advanced Morphs panel in version 1.6.2.
Import Units
When we press Import Units, a pop-up dialog appears with all available
face units.The list depends on which morphs for this character that was
found on your computer.
The All and None buttons select and deselect all morphs in the list, and the magnifying glass is a search field.
Search for all morphs involving the eyes. Press None to deselect all
morphs, and then select the three EyesClosed morphs. Press OK to load
the morphs.
If you started Blender from a terminal window, you can follow the
progress while the morphs are loading. The character in front to the
morph name has the following meaning:
* The morph (driven by sliders) was successfully loaded.
! The morph (driven by bone rotations) was successfully loaded.
- The morph failed to load.
= An alternative name (an alias) for the morph was found.
. The morph already exists and does not need to be rebuilt.
+ A new sum driver is created for this bone.
The new Face Units panel appears at the bottom of the DAZ tab. At the top there are some buttons:
- Adjust Units: An overall factor for all morphs of this type. This is mainly useful for mixing custom morphs for different characters.
- Prettify Panels: Change sliders to checkboxes. If boolean options appear as sliders, use this button to refresh them.
- Select All: Select all morphs in the Face Units panel. When selected, the checkbox to the right of the slider is checked.
- Unselect All: Unselect all morphs in the Face Units panel.
- Disable Drivers:
Temporarily disable all bone drivers to improve posing performance. All
morph panels remain locked until drivers are enabled again.
- Keys: Add category morphs to the active custom keying set, or make a new one (?).
- Key plus: Insert keys for all selected face units at the current frame (checkboxes enabled).
- Crossed key: Remove keys from all selected expressions at the current frame (checkboxes enabled).
- X: Clear all selected expressions (checkboxes enabled).
- Magnifying glass: Only display morphs matching the search field.
Then there are sliders for the newly loaded morphs. For each loaded
expression, we have a slider, an select checkbox, and a
pin button, which sets the slider to 1.0 while also resetting all other
sliders in the Face Units panel to 0.0.
We can now close the eyes by setting the slider values, either the combined Eyes Closed slider or the left and right sliders. The final pose for the left eye is given by the sum of the combined and left sliders. The sliders are the "raw" morph values. To see the "final" morph values, which correspond to slider values in DAZ Studio, we turn on the global settings Show Final Morph Values, which was done in the picture to the right. More information can be found in the blog post
On Raw and Final Slider Values.
It may be noted that this button imports the standard face unit morphs,
which were originally made for the base character, Genesis 8 Female in
this case. Since Aiko is a quite stylized character the morphs do not
fit her perfectly. If custom made morphs for your character are
available, you may consider loading them with the Import Custom Morphs
button instead.
Import Expressions
Expressions work in the same way as Face Units.There are two files for each expression. Afraid_HD contains the face rig pose, whereas Afraid_HD_div2 contains a shapekey. It also contains a pointer to a dhdm file with the high definition data, which can be extracted with an add-on by Xin. We import both Afraid and Angry morphs.
The sliders control both the face rig pose and the shapekey values.
Import Visemes
Visemes work in the same way as Face Units.
Here we have show the AA and F morphs.
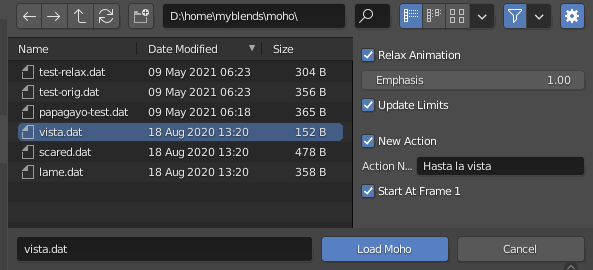
At the top of the Visemes panel there is an extra button: Load Moho.
With it you can import lipsync files in the Moho (.dat) files, which can
be created with the program Papagayo from
lostmarble.com. Press the button and select a .dat file in the file selector.
- Relax Animation: Relax the Moho animation to make it more natural.
- Emphasis: Speech strength,
- Update Limits: Update limits of open vowels to account for emphasis.
- New Action: Create a new action.
- Action Name: Name of the new action.
- Start At Frame 1: Start the imported animation at frame 1, otherwise start at the current frame.
And now Aiko says "Hasta la vista, baby".

Import FACS Units
An interesting new feature in
DAZ Studio version 4.15
is the introduction of the FACS (Facial Action Coding System) morphs,
which facilitates more natural looking
expressions and more diversity in expressions available. FACS is used by
professional animators and utilized in research, such as with facial
recognition. From the point of view of the DAZ Importer, the FACS units
are just another set of standard morphs. They are available for the
updated Genesis 8.1 characters (only female so far), but seem to work
for Genesis 8 characters as well. For more information, see
the blog post on FACS.
The dialog lists the available FACS units.
Once the FACS morphs have been loaded, a new panel opens up. There are two new buttons at the top:
- Import FaceCap File: Import a facial mocap animation made with FaceCap (iOS facial capture app for devices with Face ID).
- Import Live Link File: Import a facial mocap animation made with Unreal Live Link.
For an example of a FaceCap animation loaded to a DAZ character, see
this blog post.
Import FACS Expressions
FACS expressions are morphs that are built on top of the FACS units.
So far only a few FACS expressions are available.
Here
are the Afraid and Smile Open Full Face morphs. Notice that these
morphs work for Aiko, despite the fact that she is a Genesis 8 Female
and does not belong to the 8.1 generation. The morphs are not perfectly
adapted to her, but that is because Aiko is a cartoonish character and
it is not a matter of generation.
The
Angry morphs show some problems with the eyelashes. To fix that, we
need to transfer the FACS shapekeys from the body to the eyelashes using
the Transfer Other Morphs tool, see below. This problem does not arise
for ordinary face units, which are implemented as bone rotations. In
contrast, the FACS units are a combination of bone rotations and
shapekeys, and the shapekeys must be transferred to the eyelashes.
Import Body Morphs
Body morphs are morphs which involve the body rather than face. Note the
difference between a body morph (bones driven by rig properties) and a
pose (bone rotations loaded from a file). The interface works in the
same way as Face Units.
Here we select all pose morphs for the left hand.
In the Pose Morphs panel which appears we can pose the hand by moving sliders.
A drawback of loading pose morphs is that we can no longer pose the
affected bones by hand, because the bones are now driven by rig
properties; the bone rotations turn purple.
However, we can pose the finger bones on top of the pose morph, using the Make All Bones Posable tool in the
Finishing section.
The
rotation channel ceases to be purple, so the finger bones are no longer
driven and can be freely posed. Additional bones have been created on a
hidden layer, and the finger bones are now parented to the those driven
bones. Therefore, the local rotation is zero. We can now pose the
finger bones, but we may need to mute Limit Rotation constraints.
Import JCMs
The deformation of DAZ characters is improved with corrective
shapekeys, known as Joint Corrective Morphs (JCM's) in DAZ Studio. The load interface for JCM's is identical to facial
expressions. Here we select and import all JCMs for the two abdomen
bones.
When the AbdomenLower and AbdomenUpper bones are both rotated 30
degrees around the X axis, we see that some of the corrective shapekeys
are active.
We can also see that Aiko's tummy intersects with her skirt. So far the
JCM's only affect Aiko's body. We will transfer them to the clothes
later.
Import Flexions
Flexions are bone-driven morphs that simulate the flexing of muscles. They are a new additions to Genesis 8.
When Import Flexions is pressed, a selector of the available flexions is
displayed. Select all and press OK to import the morphs.
When
Aiko now bends her forearm, her biceps muscle contracts. This is
admittedly a very subtle effect, since the Genesis 8 Female is not very
muscular, but it is there.
Import Standard Morphs
This is an alternative way to import all standard morphs of specified types. When this button is pressed, a list of morph types appears and we can select which morph types to import.
This tool is invoked by Easy Import DAZ, which is probably where it is most useful.
Import Custom Morphs
The tools above only import standard morphs that were made by DAZ for genesis characters and located at standard locations. However, they can not be used to import morphs for clothes, hair or geografts, nor to import morphs made by other vendors. To import such morphs we use the Import Custom Morphs tool.
A file selector opens, with the file path set to a directory where morphs for this mesh should be located. The options are:
- Use Rig Property Drivers: Create drivers for the loaded morphs.
- Category: Name of the category to which this morph(s) belongs.
- Body part: Part of the character that the morphs affect.
- Face: Transferred to lashes by Easy Import DAZ.
- Body: Transferred to clothes and geografts by Easy Import DAZ.
- Custom: Not transferred by Easy Import DAZ.
- Treat HD Meshes: How to deal with vertex count mismatch for HD meshes:
- Error: Raise errors.
- Create Shapekey: Create empty shapekeys.
- Active Shapekey: Drive active shapekey.
Navigate
to the directory where the full body morphs are located. Select
FBMPearFigure and FBMThin, and
choose Category to be Shapes. We can select either the .dsf or the .png
file, the .dsf file will be loaded in either case. Finally we press
Import Custom Morphs to load the
morphs.
A new panel called Custom Morphs opens up. At
the bottom the category Shapes contains the two loaded morphs,
corresponding to the twodriven shapekeys. Each categories contain
sliders for the morphs that belong to it, and a pin button to set this
slider to 1.0 and all others to 0.0. The sliders in each category can be
hidden by unselecting the corresponding checkbox.
The new options at the top are
- Open All Categories: Show the sliders of all categories.
- Close All Categories: Hide the sliders of all categories.
At
the top of the Shapes box we again have buttons selecting and keying
properties. However, these buttons only affect the properties in this
category, whereas the buttons at the top affect all custom morphs,
independent of category.
Turn up to PearFigure to 1.0. Aiko grows fat, but she has not bought bigger sized clothes to match. We will fix that later.
In a previous version of the DAZ Importer, there was a separate button to import custom JCMs. This is no longer necessary, because the Import Custom Morphs tool will recognize JCMs automatically and create bone drivers for the shapekeys.
Navigate to the Aiko directory and import all JCMs. We can easily select them by filtering with the string pJCM. Set the category to JCMs and the body part to Body.
The corrective shapekeys are driven by bone rotations when Aiko is posed.
The JCMs section in the Custom Morphs panel is empty, except for a slider that adjusts the overall strength for all morphs we just loaded. This slider can be used to mix JCMs from different characters. Say that we create a character which is 30% Aiko and 70% Victoria. Then we can import custom JCMs for both characters, and set Adjust Aiko to 0.30 and Adjust Victoria to 0.70.
Save Favorite Morphs
You can save a file with favorite morphs that you load often to different characters, and then import all morphs listed in the file. This is particularly useful in connection with
Easy Import, which imports a character and performs all the common operations, including loading morphs, in one click. For more information about this, see
Favorite Morphs and Easy Import.
First we must save the file with favorite morphs. Load the morphs that you want to include in the list of favorite morphs. If you want morphs for geografts, make sure that the character has them and they are not merged. Favorite morphs can also be added to clothes, all meshes that are children to the character armature are considered. Then press Save Favorite Morphs and choose the file name in the file selector.
Load Favorite Morphs
Now select a different character of the same Genesis generation and the same geografts and clothes. Press Load Favorite Morphs and select the file that we just saved. All the saved morphs are loaded to the new character.
The fingerprint is a string which describes the mesh topology reasonably uniquely. Morphs are ignored unless the fingerprint matches that in the one specified in the json file. However, some morphs are pure bone poses and can work even if the topology of the mesh has been changed. For such morphs it may make sense to enable the Ignore Fingerprint option. Note however that this may mess up loaded shapekeys.
Transfer Shapekeys
So far we have added morphs to the character but not to her clothes. The Transfer Shapekeys tool transfers the body morphs to the
clothes meshes.
First there is a warning, however. If you intend to create low-poly
versions of the clothes, as described in the Low-poly Meshes section,
you need to do so before transferring morphs to the clothes. The reason
is that the Quick Low-poly tool only works on meshes without shapekeys.
Select the clothes which you want to transfer the morphs to, and make Aiko's body the active mesh. Press Transfer Shapekeys.
A
pop-up dialog appear which let you select the morphs to transfer.At the top of the pop-up dialog there
is an option which
determines the transfer method. It can take on four different values:
- Nearest
Face: Transfer shapekeys from the nearest face on the source mesh.
This usually works well to transfer shapekeys to clothes and is the
default.
- Body: Only
transfer between the first vertices, until a vertex with changed
location is encountered. This works for shapekeys on the body that do
not involve the geograft, because the merged vertices have higher vertex
number than the original ones. This method is very fast when it works.
- Geograft:
Transfer shapekeys to the nearest vertex of the target mesh. Note the
difference to the Nearest Vertex method. There each target vertex is
paired with a source vertex, here each source vertex is paired with a
target vertex, and nothing is transferred to unpaired target vertices.
Use this to transfer shapekeys from the geograft to the merged mesh.
Performance is the same as for the Nearest Vertex Method.
- Legacy:
This transfer method uses the data transfer modifier, and was the only method before version 1.5.1. It is
very slow but works well in general.
More information about which method to use in different circumstances can be found in the blog post Morph Transfer Progress. See also Morph Transfer Artifacts.
- Transfer Drivers: Transfer both shapekeys and drivers.
- Use Vendor Morphs: Use custom morphs provided by vendors if available, otherwise auto-transfer shapekeys.
- Overwrite Existing Shapekeys:
- Strength Multiplier: Add a strength multiplier to the drivers.
- Selected Verts Only: Only transfer shapekeys of selected vertices.
- Ignore Rigidity Groups: See https://diffeomorphic.blogspot.com/2019/02/loading-morphs-after-anatomy-has-been.html.
- Body part: Only transfer morphs which affect specified body part.
- All: Transfer all morphs.
- Face: Transfer face morphs.
- Body: Transfer body morphs.
- Custom: Transfer custom morphs.
The picture above illustrates how the body part affects which morphs are transferred. The body part can be specified by the Import Custom Morphs tool
In the terminal window we can follow how the morphs are transferred. The character in front of the shapekey name means:
+ The morph was auto-transferred and non-trivial
- The morph was auto-transferred but found to be trivial, and therefore discarded.
* The morph was imported from a .dsf file.
0 The morph was skipped because only vertices outside the clothing's bounding box are affected.
After
the JCM's have been transferred to the top and skirt, the clothes no
longer intersect with the body when Aiko bends forward.
Finally we use the Transfer Shapekeys tool to transfer the custom morphs that we imported above.
When the morphs have been transferred, the clothes fit Aiko even as she has gained weight.
The
Nearest Vertex and Geograft transfer methods compute a Numpy array with
the distances between all vertex pairs, to determine which is the
shortest. If both meshes are large, this array can be huge, and your
computer may not have enough memory to allocate it. If this happens, you
can revert to the old General method, which should always work.
However, transfer to smaller meshes can still work, so only after the
tool has tried to transfer the morphs to all selected meshes an error
message appears with a list of failed meshes.
Mix Shapekeys
Update in version 1.6.2. With
the new morph system suggested by Engetuduoiti it is no longer necessary to mix shapekeys. The web of drivers automatically drive both the body and geograft morphs correctly. Since this tool is quite complex to use and not necessary for normal use, it has been moved to the
Advanced Morphs section.
Sometimes two shapekeys in a merged mesh are
really supposed to be a single one. Consider e.g. the New Genitalia for
Victoria 8. Both the genitals and the body have morphs for opening the
anus.

Transfer
the PBMG8FAnusOpen shapekey to the genitals using the Transfer Other
Shapekey button in the Morphs section. The genitals now has two separate
shapekeys, but they don't make any sense separately, as the following
picture illustrates.
We
therefore want to combine them into a single shapekey which is driven
by a single rig property. Press Mix Shapekeys. A pop-up menu appears
where we can select the shapekeys that we want to merge.
- Overwrite First:
Replace the first shapekey with the mixed one, otherwise create a new
shapekey. In this case an extra field appears where you can specify its
name.
- Delete Merged: Delete the original shapekeys.
Then there are two columns, one for each shapekey.
- Magnifying glass: Use this to filter.
- Factor: Multiply the offset with this factor.
- Shapekey:
In
our case we want to replace the PGMAnusOpen shapekey with the sum of
both shapekeys, and remove the transferred G8F shapekey, so we use the
settings in the picture above.
The two
shapekeys have been combined into a single one.
This tool can be
used in other ways, too. Say that we have a character which is 30% Aiko 8
and 70% Victoria 8. Then we can import custom morphs for both
characters, and then mix them with this tool, settings the first factor
to 0.3 and the second to 0.7.