Saturday, March 21, 2020

Mesh Fitting Without Spurious Smoothing

Update April 20, 2020: 

The latest versions of the export script automatically turns off High Resolution before exporting the vertex data, and then turns it back on. The procedure described below is thus unnecessary.

Original post:


As explained in http://diffeomorphic.blogspot.com/p/export-from-daz-studio.html, the Daz importer needs a json file exported from Daz Studio in order to do mesh fitting correctly. The json file contains the vertex coordinates with all morphs applied. The final world space coordinates depend on a combination of shapekeys, poses, and morph transfer to clothes, and it simply turned out to be too difficult to extract this information from the duf files themselves. In contrast, finding the coordinates with a Daz Studio script was quite easy, since the Daz scripting API has a function that accesses the cached geometry directly.

However, Alessandro Padovani discovered a problem with this: the cached geometry depends not only on the morphs but on mesh smoothing as well, see https://bitbucket.org/Diffeomorphic/import-daz/issues/30/major-subdivision-bug. This leads to some issues, e.g. in the teeth and eyes areas. To avoid this issue all characters must be at base resolution when exported from Daz Studio, even if the duf file is saved at high resolution.

The problem can be explained with a subdivided plane consisting of four square faces. In Daz Studio, the mesh looks like this:
Plane in Daz Studio, at subd level = 2
If we now save the duf file, export the json file with the vertex coordinates (Export Basic Data), and import the file into Blender, the plane is much rounder than in Daz Studio. This is the case even if the subsurf modifier is disabled.
Plane in Blender, without and with subsurf modifier
The reason is that the mesh at high resolution is smoothed even if the subdivision level is set to zero.
Plane in Daz Studio, at Subd level = 0


To fix this we must set the Resolution Level to Base before exporting the json file. We now have the plane without the undesired smoothing.
Plane in Daz Studio, at base resolution. The subd level is irrelevant.
The mesh now comes in correctly into Blender, with the same subdivision levels as in Daz Studio.
Plane in Blender, without and with subsurf modifier


To summarize: to make meshes look the same in Blender and Daz Studio, save the scene at high resolution but export the json file at base resolution.


A scene often consists of several characters with clothes and hair. To quickly change the resolution of all meshes:
  1. Select all objects in the Scene tab.
  2. Select all objects in the Parameters tab.
  3. Search for resolution in the search box. 
  4. Change the Resolution Level to Base.


Friday, February 28, 2020

DAZ Importer - Stable Version 1.4.1

Many bugs have been fixed since the stable version 1.4 of the DAZ importer was released, and it is time to release a new stable version to replace it. The new stable version 1.4.1 can be downloaded from https://www.dropbox.com/s/so16so43sxqng83/import-daz-v1.4.1-20200227.zip.

The documentation has not been updated this time. The user interface has not changed much, except that options have moved from the panel to pop-up menus. This makes it clearer which options belong to each button.

Apart from bugfixes, a few new features have been added since version 1.4, which have been described in the following blog posts.

Saturday, February 1, 2020

Posing performance

The Merge Rigs button changed slightly in the latest version. Now all meshes are put in a separate sub-collection under the armature's collection, like this:
This makes it easy to temporarily exclude all meshes from the scene. This is useful e.g. when importing many poses to an action, because after loading each frame the scene is updated, and most of the time is spent updating heavy meshes.

As a test, I imported a directory with 78 pose files. It took 32 seconds with the meshes in the scene, but only 2 seconds with the meshes excluded, i.e. a speed-up with a factor of 16. Not bad!

To get that speed-up, the meshes must belong to a collection which is excluded from the scene. Just hiding meshes in the viewport does not improve loading speed. Apparently hidden meshes are still updated.


Wednesday, December 18, 2019

UDIM Support

UDIM support has recently been added to Blender 2.82 Alpha. This is very useful for the Daz Importer, because the UV coordinates in Daz Studio are arranged in UDIM tiles, at least for the Genesis 3 and 8 characters.

Since there are several skin materials, editing them consistently is tedious and error prone. The Mini Material Editor addresses this to some extent, but its power is quite limited. With UDIMs we can combine all skin materials into a single one, which we can then edit using the powerful node editor.
Before an UDIM material can be created, the blend file must be saved and the textures saved locally. The reason for this is that UDIM requires that textures follow a certain naming convention. Hence new textures with the appropriate names must be created, and you probably don't want to litter your Daz installation with these extra textures.
Here is the face material for the Genesis 8 Female character. The diffuse texture node has extension = Repeat and source = Single Image.
Once local copies of the textures have been created, the new Make UDIM Materials button becomes active in the Finishing section. Logically it belongs to the Materials section, but if the character has separate anatomy meshes (geografts), they should be merge with the character before making UDIMs.
A pop-up dialog with a list of all materials appears. The selected ones are going to be replaced by a single material with tiled textures. Which of the materials is specified at the bottom of the dialog. It is the first material with textures in the first tile.
After the script has been executed, all selected material have been removed except for the target material Face-3, and all polygons of the removed materials now use Face-3 instead.

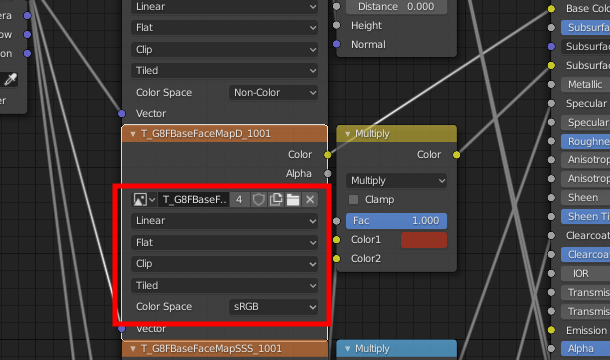
The textures nodes have been changed like this. A "T_" has been added in front of the texture name, extension = Clip, and source = Tiled.

In the UV editor, we can now see the tiles of the tiled texture. Notice that the tile labels equal the old material names.
Now let us turn to the other new button, Set UDIM Tile. It is useful when the character is exported with some geograft, e.g. genitals. Here are the UV coordinates of the New Genitalia for Victoria 8 and the corresponding torso texture.
The problem is that the UVs are located in the first tile, but the torso texture will end up in the second tile; its full name is G8FBaseTorsoMapD_1002.
To move the UV coordinates to a specific tile, we use the Set UDIM Tile button. This must be done before Merge Anatomy, because all UV coordinates are moved to the same tile. Select the geograft and press Set UDIM Tile.
Select the tile we want to move the UVs to, and press OK.
The UVs are now moved to the second tile.
Next we Merge Anatomy and Make UDIM Materials. The genital UV coordinates are now correctly located in the second tile.

Sunday, December 15, 2019

Brighter Eyes

A common problem with Genesis 8 characters is that the eyes tend to be too dark in Blender.
The reason for this is that the eye textures are quite dark.
Somehow Daz Studio manages to avoid this problem, but it is not so easy to emulate this in Blender. Therefore the Daz importer now has an option to brighten the eye textures. This option appears at the bottom of the import menu, and is set to a value which is reasonable for Genesis 8.
If Brighten Eyes is set to something else than 1.0, an extra multiply node is generated for the iris and sclera diffuse channels. It multiplies the eye texture with a more than white color, whose HSV value equals the Brighten Eyes factor.

And now the eyes render much better.
The eyes still look a little strange. It looks like the sclera rests like a disc on top of the eye, and is clearly distinguishable from the rest. But if you look carefully the same effect is visible already in the dark eyes on the top.

Monday, December 2, 2019

Moving to Git


Bitbucket has decided to remove Mercurial support from Bitbucket Cloud and its API. Mercurial features and repositories will be officially removed from Bitbucket and its API on June 1, 2020. This affects the DAZ Importer.

The Mercurial repo, including all history, has been renamed to DAZ Importer Archive, and the DAZ Importer has been changed to a brand new git repo. Actually, I think it can be a good thing to clean out ancient stuff from the repo and make it more lightweight.

The old Mercurial repo is here.

The old issue tracker is here.

The new git repo is here.

The new issue tracker is here.

The current version can be downloaded as a zip file from here. Actually, that should be the same as before.


Wednesday, October 30, 2019

Mini Material Editor

In version 1.4 of the Daz Importer, there were a few buttons at the bottom of the Materials section that allowed you to change the bump strength and distance. The original purpose of these buttons was to fix problems with 3Delight materials. Modern versions Daz Studio converts 3Delight materials to Iray before saving, and some information about the bump settings are lost in this process; in particular, AFAIU the bump distance is always 0.5 mm in Iray. The bump editing buttons could fix that problem in Blender.

However, these buttons could be used in another way: to edit the materials in Blender, either because the Daz Importer does not convert materials to Blender perfectly, or because you want to change the look and feel. For a single material, the simplest and most versatile way to do that is of course directly in the shader editor. However, Daz meshes often have many materials, and to apply the same change across multiple materials can be quite tedious and error prone.

To solver this problem, the bump buttons have been expanded into a Mini Material Editor. A few buttons allows you to quickly apply changes across multiple materials for the same mesh. The Material Editor is located at the bottom of the Materials section:

  • Active Channel: The channel affected by the change. The following channels are currently supported:
  • Factor/Value: Multiply the value of the active channel by this value, or set the value to this value. For scalar channels. For vector channels, e.g. Subsurface Radius, all components are multiplied with the same factor.
  • Color Factor/Value: Multiply the value of the active channel by this value, or set the value to this value. For color channels.
  • Absolute Values: Determines whether the channel should be multiplied with the factor or set to the value.
  • Material Type: Only change materials of the given type:
The Skin and Skin-Lips-Nails types depend on the material names, so if you rename the materials, the wrong materials may be affected. In contrast, the Opaque and Refractive types depend on the properties of the node tree.
Here is what happens to the bump node of the Face material if
  • Active Channel = Bump Strength
  • Factor/Value = 0.5
  • Absolute Values = False
  • Material Type = Skin
when we press the Change Channel button. The original bump strength is decreased from 3.0 to 1.5, i.e. multiplied by a factor 0.5.