Version 1.7.1 of the DAZ Importer and MHX Runtime system has been released. It can be downloaded from https://www.dropbox.com/s/7mj32wh3bnn4rwe/import_daz_mhx_rts_v1_7_1.zip.
This is primarily a bugfix release. A number of serious bugs were discovered right after the 1.7.0 release. Those have now been eliminated, so I recommend everybody to update to the new version. Safely Installing a New Version.
There are also a few new features. The most obvious one is that the user interface has been rearranged. The DAZ Importer now takes up two tabs in the User Interface (N-panel), DAZ Setup and DAZ Runtime. One or both of these tabs can be hidden.
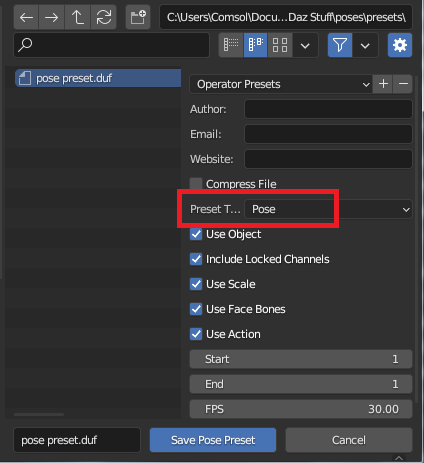
Support for making pose presets has been improved.
The internal working of the MHX rig has been changed. However, there is a conversion tool for old MHX rigs, so they can still be used with the latest release.

Friday, July 21, 2023
Version 1.7.1 Released
Thursday, July 13, 2023
MHX Properties are now ID Properties
If you open an old MHX rig in the latest MHX version, all panels contain only a single button named "Update MHX Drivers". What is going on?


To fix the file, we have to enable the MHX add-on again. The mesh now jumps into place because the RNA properties are defined again, but this is not a permanent solution.

Now save the blend file, disable the MHX add-on, restart Blender and open the file. The IK pose is still there, even though the MHX tab is absent.

Wednesday, July 5, 2023
Hierarchical Pose Presets
For a while the DAZ Importer has been able to export pose presets back to DAZ Studio, see the post Save pose preset. However, this was limited to ordinary pose presets, which only work on a single figure in DAZ Studio. Following a request by Rakete, the functionality of this tool has now been expanded to also generate hierarchical pose presets,


Note that this tool does not distinguish between shaping and posing morphs; in Blender, all morphs are treated in the same way.


Hierarchical pose presets are quite sensitive to the bone hierarchy.
Therefore it is not possible to use the MHX or Rigify rigs to generate
hierarchical presets, because those rigs have a completely different
bone hierarchy. However, it is possible to use the Simple IK rig.


Once we have exported the preset, the Unmute Control Rig button returns control to the control rig.


Saturday, June 3, 2023
New User Interface
A recent request suggested that it should be possible to animate an imported DAZ character with the DAZ Importer disabled. Thus the add-on should only be necessary to generate the figure, not to animate it. Apparently Rigify and other popular rigs does this; once the rig is generated the add-on itself is not needed. There is still a user interface, but it stored inside the rig and Rigify itself is not needed.
This could perhaps be done for the DAZ Importer as well, but I don't know how and it would be a major job for little gain. But the latest commit does something towards that end. The user interface is split into a setup and a runtime tab, labelled DAZ Setup and DAZ Runtime, respectively, and the tab not used can be hidden.
The DAZ Setup tab looks like this:
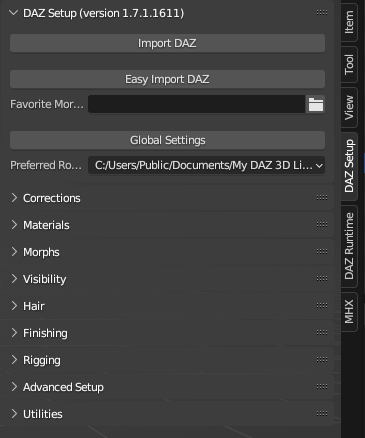
The Setup panel has been removed, and its subpanels have been moved to the top level. Moreover, the Visibility and Hair panels have been moved from the Advanced Setup panel. The reason is that I use both Visibility and Hair frequently. On the other hand, the tools that are left in the Advanced Setup panel are those that I personally rarely use.


Thursday, April 27, 2023
Version 1.7.0 Released
Finally, version 1.7.0 of the DAZ Importer and MHX Runtime system has been released. It can be downloaded from https://www.dropbox.com/s/vpku2n8dhqmua37/import_daz_mhx_rts_v1_7_0.zip.
The plugins have been tested with Blender 2.83 and Blender 3.5 under Windows 7 and Windows 10, but should work with intermediate versions as well.
The most signicant new features in this release are:
- Support for Genesis 9 characters.
- Support for Blender 3.5, in particular the new mixing nodes.
There are also some other improvements and many bugfixes.
The documentation has moved to the Bitbucket wiki. It is not quite up-to-date, but I didn't want to postpone the release further. Here are links to the wikis:
Saturday, April 22, 2023
Finger IK and Tongue IK
The MHX rig can generate IK controls for the fingers and the tongue, but those controls were very difficult to work with and next to useless. Moreover, they caused dependency loops if the character has morphs that affect the fingers and tongue. Recently Alessandro suggested a better way to implement IK for the tongue, using stretch-to constraints, and then I implemented the same mechanism for the fingers. This is not strictly speaking IK since no IK constraints are involved, but it allows the user to place the joints precisely, and we will still refer to it as finger IK and tongue IK.


As with IK for the arms and legs, finger IK is primarily useful when the character interacts with some other object, and we need to place the finger joints precisely relative to that object. E.g., assume that we want to grab a ball. We could proceed as follows:
- Place the IK hand in position.
- Pose the long finger bones so they grab the ball.
- Snap the IK finger joints to the location of the finger bones.
- Tweak the joints so the fingers grab the ball perfectly.
- Optionally snap the FK finger bones, e.g. if we want to export a pose preset back to DAZ Studio.


Thursday, April 6, 2023
DAZ HD Morphs and Xin's Addon
The morphs that you can import with DAZ Importer are only half the story. Many morphs also have high-definition (HD) information, which is stored in a dhdm (DAZ High Definition Morph, perhaps) file. The information in a dhdm file is encoded in an undocumented binary format and can not be read by the DAZ Importer. However, Xin has developed an add-on for importing dhdm files, which is colloquially know as Xin's Add-on. This post describes how I use Xin's add-on to generate normal map or displacement map textures, and then assign them to a character.
Installing Xin's Add-on
The source is available in the following repository: https://gitlab.com/x190/daz-hd-morphs . There you can also find compilation details for the .dll under MinGW on windows x64, and documentation.
If you find this addon useful, consider supporting its development and maintenance here: https://xin888.gumroad.com/l/daz_hd_morphs.
The latest version (the main branch) includes documentation in the form of a .pdf in “./blender_addon/documentation/daz_hd_morphs_documentation.pdf”. It includes several step by step examples.
For up-to-date information see further https://bitbucket.org/Diffeomorphic/import_daz/issues/1399/blender-addon-to-generate-rigged-hd-meshes.

Generating Textures
Once the HD morphs add-on has been enabled, a tab called HD Morphs appears. It consists of a number of panels. We must also import the mesh that we want to generate normal or displacement maps for.
- Working directory: All textures will be saved in a subdirectory under this.
- Unit scale: The scale factor connecting the DAZ scale to the Blender scale. Since DAZ uses centimeters internally, the default value 0.01 corresponds to meters.
- Base mesh: A drop-down list where we choose the mesh.


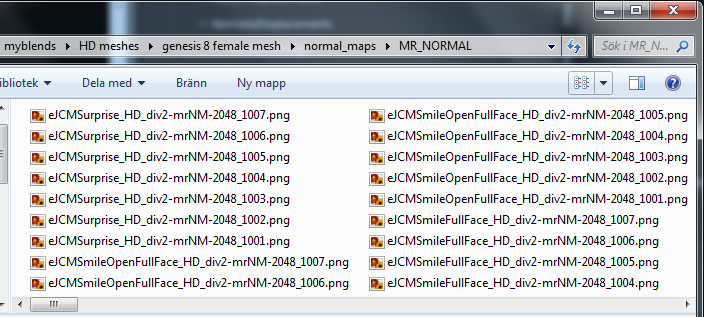
Note that separate normal map textures have been generated for seven tiles, 1001 - 1007. In this case this is unnecessary, since only the first tile, which contains the face, is of interest. We can limit the number of generated files if we enable Select UV tiles and only select those tiles that we are interested in.

Import the textures into Blender
Once all textures have been generated, we want ot import them into the Blender materials. However, first need to we import the morphs at base resolution.


- Use Drivers: Drive the strength of the normal maps with the morph strength.
- Smart Tiles: Only add the textures to materials if other textures have the same tile suffix. E.g., the Torso material typically has other textures ending with "_1002", and therefore only normal maps endin in "_1002" will be added to the Torso material.
- Compact Layout: Close the nodes used to connect the normal map textures, thus making the layout more readable.
- Prune Node Tree: Remove unused nodes once the new textures have been added.
- Add Maps To Materials: The affected materials.


