The DAZ Importer (development version) can now create Cycles materials using the Principled BSDF, also known as the PBR shader. Here the same car has been imported with Cycles with PBR, Cycles without PBR, and Blender Internal.
(Actually, lightning was made differently in BI. The Cycles renders were lit by an environment map, the BI render was lit by two lamps and composited upon the background.)
The PBR shader makes a huge difference for materials like metals and glass. For characters the improvement is not so clear compared to standard Cycles. Here is the default Genesis 3 Female imported in three ways.
And here is a Genesis 8 character. The PBR variant developed some nasty white spots, e.g. on the neck, which is clearly visible even after denoising. In both Cycles renders the shadow on her cheek is also very jagged. Probably it comes from the hair mesh.
To enable the PBR shader, select the Principled Shader option in the Materials And Textures section of the Settings panel. This is still quite unstable and the option may move in the near future, e.g. to the import options.
Saturday, December 2, 2017
Monday, November 27, 2017
Hair deformation with surface modifier
In the previous post hair was animated with bones. This works well if the hair only has few degrees of freedom, like a pony-tail. However, for long, loose hair it becomes very tedious to animate the hair by hand. It would be much simpler to do a cloth simulation, but we all know that this becomes extremely slow for high-poly meshes.
In version 2.79, Blender has a new Surface Deform modifier, which can be used to speed up hair simulation. I created a low-poly hair guide and made a cloth simulation for it. The simulation is fast because the guide is a low-poly mesh. The animation was then transferred to the high-poly hair mesh using the surface deform modifier. The modifier is a bit picky; it does not work if the guide mesh contains concave faces, and the hair tends to develop spikes unless the guide is very smooth. By splitting the faces to triangles and smoothing the mesh I managed to get rid of the most glaring problems.
Here is a video that shows my take on it.
Saturday, November 25, 2017
Winders
This blog has been in a dormant state for a while. There are several reasons for this, one of these was that I started to get tired of the DAZ Importer and on CG in general. However, for the last month or so I started to take up Blender again, learning about the many of the awesome new features, e.g. denoising, HDRI images, shadow planes, and the surface deform modifier. It is also time to actually do something with the DAZ Importer and not just implementing it.
The topic of today's post is something I call winders. Long and flexible objects, such as chains, ropes, whips, or ponytails, often have armatures consisting of many small bones, one for each link. Posing each individual link is tedious, and it is often difficult to get a smooth curve.
Enter winders. A winder is a single bone that stretches along the entire chain, and by rotating the winder you can easily pose all links in the chain in a smooth fashion. Under the hood, a winder is implemented by Copy Rotation constraints with offset enabled. This means that once you have posed the winder, the individual links can be posed on top of that. In fact, there are two examples of winders in the MHX rig: the long fingers that pose the three finger links, and the back bone that poses the entire spine.
To illustrate the feature, here is a model of Lara Croft (I think). The rig has been converted to MHX and we see the hair bones on the Clothes layer. The ponytail and the hair strands at her forehead are suitable examples of chains to which we can add a winder.
With the first bone in the ponytail selected, press Add Winder in the Rigging section of the Advanced Setup panel.
A winder bone is created, and the bones in the ponytail chain gets some constraints. The entire ponytail can now be easily posed with the winder bone.
And here is a short video where the ponytail and hair strands have been animated with winders.
Thursday, September 14, 2017
Finally, version 1.2 released
There have been some bug fixes since the latest release candidate. Most importantly, the DAZ Importer has been much better at handling older DAZ files that do not follow the conventions in more modern ones. Stable version 1.2 of the DAZ Importer can be downloaded from:
https://www.dropbox.com/s/jx15t3inlvtd98x/import-daz-v1.2-20170913.zip.
There will be no further bugfixes in version 1.2, because in the next few days I plan to make some major revisions in the code base which may introduce new bugs. In particular, the code that builds Blender objects can be simplified. The complexity was necessary to handle the automatic mesh fitting in version 1.1, but since that feature has now been removed (it never really worked), the code can be made simpler.
Friday, August 18, 2017
New release candidate
A new release candidate for version 1.2 of the DAZ importer can be downloaded from https://www.dropbox.com/s/x1tkb0khjycq251/import-daz-v1.2-20170818.zip. There are two improvements compared to the previous RC:
Select File > Import
and navigate to the Poser file (.cr2, .pz2, ...). Repeat this step to add clothes, hair, etc.
Apparently the clothes fitting is not perfect.
We could save the character as a DAZ file now, but then we would not be able to pose her in Blender, because Poser figures are skinned with envelopes whereas the DAZ importer only handles vertex groups. Fortunately, we can convert to vertex groups in DAZ Studio.
Select Figure > Rigging > Convert Figure to Weight Mapping.
We get to choose between TriAx and General Weight Mapping. This choice is not terribly important, because TriAx will be converted to general weights in Blender anyway, but General is probably the best choice. here.
This step has to be repeated for every figure in the scene, i.e. for each piece of clothing.
Finally we export the final world-space coordinates to a .json file using the basic data exporter that comes with the DAZ importer. See the blog post on JSON fitting for details.
Now we can import the Poser character just as any other DAZ file. In my example there were a lot of extra nodes that correspond to empties in Blender, but it is easy to get rid of those. Just select the empties by type and delete them.
The meta-rigs are clearly different.
So are the rigified versions of the same DAZ Rig.
The new Rigify has a face rig, but the DAZ importer ignores that. DAZ characters already have a great way to do facial posing, with carefully crafted facial morphs or a carefully weighted face rig, and there is no simple way to map that to the Rigify face rig. The face bones in the rigified character appear on the otherwise unused bone layer 2.
- I learned that you can import Poser files into DAZ studio and save them as DAZ files, which can then be imported into Blender. However, these files are slightly different from the native DAZ files, and they caused some errors in the import scripts. These bugs should now be ironed out.
- The Rigify add-on was changed in Blender 2.79, which caused Rigify conversion of DAZ armatures to stop working. The new RC should work with both old and new Rigify.
Poser import
Here is how to get a Poser file into Blender. Start by importing the file into DAZ Studio.Select File > Import
and navigate to the Poser file (.cr2, .pz2, ...). Repeat this step to add clothes, hair, etc.
Apparently the clothes fitting is not perfect.
We could save the character as a DAZ file now, but then we would not be able to pose her in Blender, because Poser figures are skinned with envelopes whereas the DAZ importer only handles vertex groups. Fortunately, we can convert to vertex groups in DAZ Studio.
Select Figure > Rigging > Convert Figure to Weight Mapping.
We get to choose between TriAx and General Weight Mapping. This choice is not terribly important, because TriAx will be converted to general weights in Blender anyway, but General is probably the best choice. here.
This step has to be repeated for every figure in the scene, i.e. for each piece of clothing.
Finally we export the final world-space coordinates to a .json file using the basic data exporter that comes with the DAZ importer. See the blog post on JSON fitting for details.
Now we can import the Poser character just as any other DAZ file. In my example there were a lot of extra nodes that correspond to empties in Blender, but it is easy to get rid of those. Just select the empties by type and delete them.
Rigify
The Rigify add-on was changed in Blender 2.79. I am sure that this is a great improvement, but the update had the side-effect that Convert To Rigify button in the DAZ importer was broken. Should be fixed now.The meta-rigs are clearly different.
So are the rigified versions of the same DAZ Rig.
The new Rigify has a face rig, but the DAZ importer ignores that. DAZ characters already have a great way to do facial posing, with carefully crafted facial morphs or a carefully weighted face rig, and there is no simple way to map that to the Rigify face rig. The face bones in the rigified character appear on the otherwise unused bone layer 2.
Sunday, August 6, 2017
DAZ Importer version 1.2
The DAZ importer is a tool for importing native DAZ Studio files (DAZ User File *.duf, DAZ System File *.dsf) into Blender. It also contains some tools to make the assets more animation friendly.
Release candidate 2: https://www.dropbox.com/s/x1tkb0khjycq251/import-daz-v1.2-20170818.zip
Main documentation page: http://diffeomorphic.blogspot.se/p/daz-importer-version-12.html
Since the previous stable version was released half a year ago there has been several improvements and additions.
The script has mainly been tested with DAZ Studio 4.9 and Blender 2.78c on Windows 7.
Release candidate 2: https://www.dropbox.com/s/x1tkb0khjycq251/import-daz-v1.2-20170818.zip
Main documentation page: http://diffeomorphic.blogspot.se/p/daz-importer-version-12.html
Since the previous stable version was released half a year ago there has been several improvements and additions.
- A DAZ Studio plug-in for exporting the final world space coordinates for vertices and bones.
- Limits on the number of facial expressions overcome, using handlers for bone drivers.
- Material improvements, in particular for Cycles.
- Posing improvements.
- Many small bugfixes and additional features.
The script has mainly been tested with DAZ Studio 4.9 and Blender 2.78c on Windows 7.
Windows 10 and non-ascii characters
The Daz importer has mainly been developed on my home computer,
although I have occasionally tested the code at work. Both computers are
very similar: both run Windows 7 and my user name on both is Thomas,
which is a standard Christian name without any strange characters.
However, I also own a laptop running Windows 10, which I have never used
very much, but I thought that it would be a good idea to test the code
on it.
So I created a new user on the laptop, whose user name Åke Öst contains non-ascii characters, and downloaded Blender, Daz Studio, and the Daz importer. Saving the .duf file in Åke's user directory worked fine, and I could also export a json file to the same folder. However, when I tried to import the .duf file, the error below was encountered.
In Python the current user's home directory is represented by the string ~, which in this case should evaluate to
C:\Users\Åke Öst,
but instead Python thinks that it is
C:\WINDOWS\system32\config\systemprofile.
Since no directory with that name exists, the importer can not find the paths to the Daz directories, and the error is issued to alert the users about this fact.
We can inspect the paths at the top of the Settings panel. Both the first Path to DAZ library and the Path to output errors start with the flawed directory and will not be found. Fortunately, this problem is easy to fix. Simply replace the incorrect beginnings with the right one (the paths really contain the substrings "Åke Öst", even if Blender uses a font that makes it indistinguishable from "Åke Ost". Finally press Save Default Settings to avoid having to do this correction every time Blender starts up.
Behind the scenes another problem has been solved. The settings are stored in a file in the current user's home directory, but as we just saw Python failed to find that. If the home directory is not found, the script instead tries to put the settings file in the same directory that the script is stored in. Since this is usually located somewhere under the home directory, the user should have both write and read permissions. At least it worked for me.
The non-ascii characters turned out to cause one more headache. The import script is stored in a single location, and then I have made symbolic links (hard links or junctions in Windows lingo) from Blender's addons folder. This means that I don't have to update the script when a new Blender version comes out, only the links. However, I make the links by running the mklink /j command at a DOS prompt, and that mangles the non-ascii characters. The string "Åke Öst" becomes "+ke Íst", and no link is created.
There is probably some way to make a terminal window understand non-ascii characters, but instead I downloaded the Link Shell Extension, which is a graphical tool for making links. Worked like a dream. Just be sure to download the appropriate prerequisite package before the tool itself — both are linked to on the tool’s download page.
While non-ascii characters caused some headache, they are still within the UTF-8 character set. The code has not been tested with systems that use Unicode, and I am completely sure that new problems will show up in such settings.
Thursday, July 13, 2017
JSON fitting
It turned out that the FBX fitting method had flaws as well. However, since then I have come up with yet another way to extract the information about mesh and bone locations, and this time it seems to work, at least for all files that I have tried.
The idea is simply to write an export script for Daz Studio, that exports exactly the necessary information to a custom file. There were some initial hurdles, because I have not written scripts for Daz Studio before. The scripting language is not Python but something similar to Java or QT, which is not terribly difficult although something I have little experience with. What was tricky was that the API is poorly documented, but I managed to find some examples on the Internet that were sufficient for my simple script.
The script is located in the folder to_daz_studio and is called export_basic_data.dsa. Before we can use it, we need to tell Daz Studio about it. This is done as follows.
In Daz Studio, select Window > Workspace > Customize.
In the customize windows that opens, right-click on Custom and select Create New Custom Action.
Change the Menu Text to Export Basic Data (or whatever you want to scripts name to be). Make sure that DAZ Script File is selected and press the ... button to the right.
A file selector opens. Navigate to the .dsa file and Open it.
The file name now appears in File field. Press Accept to close the dialog window.
The script now appears as a subitem under Custom. In the pane to the right, choose the Menus tab, and drag the script to the place you want it to appear. Since it is an export script, I find it natural to group it with the Import and Export menu items. Press Apply to make the changes take place, and then press Accept to close the dialog.
The new export script now appears in the File menu. Select it to export the basic data for the current scene.
Export the scene with the same name as the .duf file, but with the extension .json instead. My scene was unimaginably called test.duf, so the file name must be test.json. The script actually ignores the extension, so if you just call the file test it will still get the right extension automatically.
A dialog informs when the file has been exported. I don't know what happens if the script fails for some reason, because it has actually never happened so far.
Finally in Blender, select Json File for Mesh Fitting. The scene should now be imported, and the meshes and bones should look as they do in Daz Studio.
Here is the same character that we imported with Obj, Collada, and Fbx fitting in the previous post. There are, as far as I can tell, no obvious glitches. In particular, the feet fit correctly into the high-heeled boots, something that always required manual tweaking with the other fitting methods.
With this addition, I think that the Daz Importer is ready for the next stable release. I have not spent much time improving the code recently, but I have actually used the importer quite a bit myself, and to me the tool set feels rather finished.
Saturday, July 1, 2017
FBX fitting
During the last few months I felt rather fed up with 3D, but very recently I started to play with the Daz Importer again, and there are a few new things to report.
First, Daz has released a new character base, Genesis 8, which is available if you update Daz Studio to the most recent version. I must have been doing something right, because adding this character to the Daz Importer was surprisingly painless, even if there probably are some glitches left. The main problems had to do with the rest pose; Genesis 3 is in T-pose but Genesis 8 is in A-pose.
The other news is that character fitting can now be done with fbx files. In some cases this works better than obj or Collada (but in other cases it is worse). In particular, there has been a problem with the skeleton when some body parts are scaled. The Daz Importer uses the preview field in the duf file to determine the bone locations, and whereas this field takes most of the transformations into account, some scale transformations are ignored. However, they are included in the skeleton exported to fbx, so the importer can use this information to deduce the correct bone locations.
Here is a character in Daz Studio. The chest, hands and feet have been scaled, transformations that are not stored in the preview field in the duf file. In addition, the leg length and breast size have been increased.
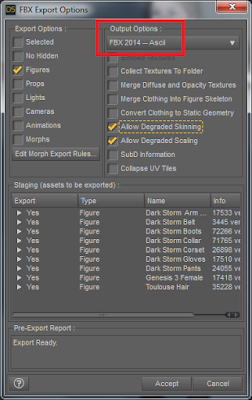
Export the character as an fbx file. It is important that you export it as an ascii fbx file; the importer can not read binary fbx and will generate an error if you try. The fbx format seems to change for every year, but it does not seem to matter which fbx version you select, as long as it is ascii. The other settings do not seem to be important, except that Allow Degraded Skinning and Scaling should be selected, because otherwise the exporter complains.
Here is the character imported with Mesh Fitting set to Obj File (blue clothes). The mesh contains all morphs, but the skeleton does not fit the mesh: the arms and head are to low, because chest scaling is ignored, and the hands and the feet are too small.
If we instead import the character with Mesh Fitting set to Dae file (red clothes), the armature fits the character mesh, but this is only because the scale transformations are ignored for the mesh as well. They are weirdly present in the clothes meshes, however.
The red Collada character compared to the blue obj character.
There are also a problem with the boots. This must be a bug in Daz Studio's Collada exporter, because the boots look equally ugly when the dae file is imported directly with the Collada importer.
Finally, here is the character imported with Mesh Fitting set to Fbx File (green clothes).
The mesh is the same as the blue obj mesh, and the skeleton fits the mesh.
When writing this post, I realize that there still is a problem with the bones. The duf file specifies both the bone head (center_point) and tail (end_point), but the fbx format only contains formation about the bone's head and orientation. For simplicity, I chose to translate the tail the same distance as the head, but for the posed foot this gave the rather strange result show here.
This is probably not such a huge problem, and it goes away if you choose to Merge Toes.
However, there are other where fbx fitting produces worse results than obj or dae. In some cases the solution might be to import several versions of the character, with different types of Mesh Fitting, and only keep the meshes and rigs that are most faithful to the original.
Tuesday, March 21, 2017
Low-poly versions
Assets from Daz Studio are usually awesome, but they often have a high polygon count. This can give problems with performance, especially if you like me use an old Win 7 box from 2009 with only six gigs of ram. Often it is possible to reduce the polygon count with little effect on the final renders.
This is where the Low-poly Versions section at the bottom of the Setup panel comes in. In the unstable version it looks like this
Here is the original character, weighting in
Verts: 21556, Edges: 42599, Faces: 21098
The Make Quick Low-poly button reduces her footprint to
Verts: 7554, Edges: 17800, Faces: 10311
i.e. the number of vertices is almost reduced to a third.
However, there are a number of problems, e.g. the black spots in the should areas. The quick low-poly uses Blender's Decimate modifier, which does not respect UV seams. A decimated face can contain vertices in different UV islands, making the middle of the face stretch over random parts of the texture.
Moreover, since the quick low-poly applies a modifier, the mesh must not have any shapekeys. This is not such a big problem for Genesis 3, where facial expressions are implemented with bones, but for Genesis and Genesis 2 this means no face expressions. The Apply Morphs button is duplicated in this section to get rid of any shapekeys before making a quick low-poly.
To deal with these problems, a second algorithm has been implemented, the faithful low-poly. It is faithful in the sense that UV seams are respected, so there are no faces stretching over unknown parts of the texture.
The footprint of the faithful low-poly is
Verts: 11885, Edges: 21136, Faces: 9306
This is slightly higher than the quick low-poly, but still a nice reduction.
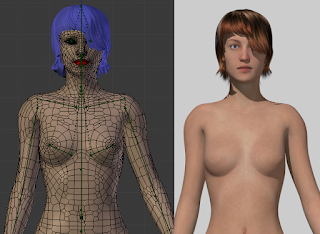
There are still some problems. In the illustration the shoulders become very jagged when posed. This can be fixed by adding a Subdivision Surface modifier. If the number of view subdivisions is set to zero, the viewport performance should not suffer too much.
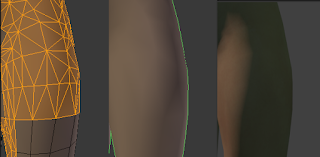
After triangulating n-gons the character weighs
Verts: 11885, Edges: 31111, Faces: 19281
The number of edges and faces has gone up considerably, but I'm not sure that this affects performance, since complicated n-gons have been replaced by simple triangles. The number of vertices stays the same, which is what I think is most important for performance.
Hair can be particularly problematic for performance. The Aldora hair, which came with some earlier version of Daz Studio, has the impressive footprint
Verts: 123506, Edges: 240687, Faces: 117264
Reducing the weight of a 21,000 verts character makes little sense if we leave her with 123,000 verts worth of hair.
Making a faithful low-poly of the hair reduces the footprint to
Verts: 32574, Edges: 61862, Faces: 29370
without any notable reduction of quality.
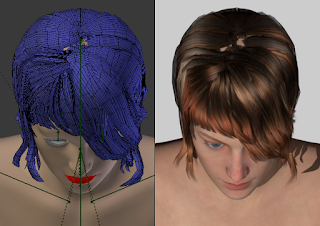
A second iteration of the Faithful Low-poly button reduces the hair further
Verts: 9281, Edges: 16743, Faces: 7544
Compared to the original 123,000 verts, the footprint has gone down with more than a factor of ten!
We now start to see some bald spots on the head, but it should not be too difficult to fix them in edit mode.
If we instead made a quick low-poly in the last step, the footprint became
Verts: 10081, Edges: 20047, Faces: 10048
The baldness problem is perhaps a little less pronounced, but some manual editing is still needed.
Another way to reduce the poly-count for some hair types is provided by the Select Random Strands button. Here is another hair with an impressive footprint:
Verts: 114074, Edges: 167685, Faces: 55553
Not all of the strands are really needed, but it would difficult to select a suitable set manually.
We don't want the skull cap to be selected, so we hide it (select one vertex on the skull, use ctrl-L to select connected vertices, and H to hide).
Select Random Strands to make the selection, and then press X to delete the verts. The Keep Fraction slider was set to the default 50% in this case. There is some tendency to baldness in edit mode, but that is because the skull cap is still hidden. The render looks quite ok but the footprint has been reduced to
Verts: 56116, Edges: 82748, Faces: 27574
Subscribe to:
Posts (Atom)