Since the latest changes to the add-on names were made to allow scripting, it is time to present a little script that uses both the Daz importer and the BVH retargeter. The script imports a Daz character from a .duf file, merges the rigs, and retargets the first 200 frames of a BVH animation to the armature, all in one go. For performance reasons, the script also excludes all meshes from the scene before retargeting the BVH file, and finally puts them back again. This example shows why the Daz importer's addon mechanism is insufficient: a sub-addon can only access the Daz importer but not other add-ons like the BVH retargeter.
To run this script you need version 1.4.2 of the Daz importer and the development version (2.0.1) of the BVH retargeter. Not surprisingly, I encountered some problems when I first tried the script, which are fixed with the latest commit.
Here are lists of the operators defined by the add-ons:
https://diffeomorphic.blogspot.com/p/daz-operators.html
https://diffeomorphic.blogspot.com/p/mcp-operators.html
The add-ons also define some functions, but they have not yet been documented.
And here is the script:
import bpy
import os
import import_daz
import retarget_bvh
def check_import_error():
# The error message is the empty string if everything ok
msg = import_daz.getErrorMessage()
if msg:
print("Import error: \"%s\"" % msg)
def check_retarget_error():
# The error message is the empty string if everything ok
msg = retarget_bvh.getErrorMessage()
if msg:
print("Retarget error: \"%s\"" % msg)
def exclude_meshes_collection(flag, lcoll):
if lcoll.name.endswith("Meshes"):
lcoll.exclude = flag
for lchild in lcoll.children:
exclude_meshes_collection(flag, lchild)
def main():
# Daz importer in silent mode
import_daz.setSilentMode(True)
# Import the file
filepath = "~/Documents/DAZ 3D/Docs/anna.duf"
filepath = os.path.expanduser(filepath)
bpy.ops.daz.import_daz(
filepath=filepath,
fitMeshes='UNIQUE')
check_import_error()
rig = bpy.context.object
# Merge rigs
bpy.ops.object.select_all(action='SELECT')
bpy.ops.daz.merge_rigs()
check_import_error()
# Exclude meshes from scene for performance
lcoll = bpy.context.view_layer.layer_collection
exclude_meshes_collection(True, lcoll)
# Restore Daz importer non-silent mode
import_daz.setSilentMode(False)
# BVH retargeter in silent mode
retarget_bvh.setSilentMode(False)
# Ensure that the BVH retargeter is initialized
bpy.context.view_layer.objects.active = rig
retarget_bvh.ensureInited(bpy.context.scene)
# Retarget BVH file to the active rig
filepath = "C:/home/bvh/accad/Female/Female1_B03_Walk1.bvh"
bpy.ops.mcp.load_and_retarget(
filepath=filepath,
startFrame=1,
endFrame=200
)
check_retarget_error()
# Restore BVH retargeter non-silent mode
retarget_bvh.setSilentMode(False)
# Include meshes in scene again
exclude_meshes_collection(False, lcoll)
main()

Tuesday, June 30, 2020
Friday, June 26, 2020
Repo move now completed

The move is now complete. Here are the new locations:
Daz Importer:
Repository: https://bitbucket.org/Diffeomorphic/import_daz/Development version as a zip file: https://bitbucket.org/Diffeomorphic/import_daz/downloads/
Bug tracker: https://bitbucket.org/Diffeomorphic/import_daz/issues?status=new&status=open
BVH Retargeter:
Repository: https://bitbucket.org/Diffeomorphic/retarget_bvh/Development version as a zip file: https://bitbucket.org/Diffeomorphic/retarget_bvh/downloads/
Bug tracker: https://bitbucket.org/Diffeomorphic/retarget_bvh/issues?status=new&status=open

Thursday, June 25, 2020
Daz importer versions 1.4.2 and 1.5
Stable version 1.4.2
Stable version 1.4.2 can now be downloaded from https://www.dropbox.com/s/dwsxtaf9r7fmays/import-daz-v1.4.2-20200623.zip. This is simply the development version from a few days ago. There have been many bugfixes and other improvements since the previous stable version 1.4.1, and there is really no reason to use that version.The documentation is not updated for this version. However, it will differ very little from the upcoming version 1.5, which will have updated documentation once I get around to write it.
Important change in version 1.5
So why not release version 1.5 directly? The reason is that there will be an important change in that version: the add-on will be renamed, to import_daz instead of import-daz. This makes it possible to invoke the add-on from python code, by adding the lineimport import_daz
With the old name, with a hyphen instead of an underscore, this is not possible, because
import import-daz
is not legal python syntax. Operators can still be called even with the old add-on name, but the Daz importer also defines some useful functions. A listing of operators that the add-on defines can be found here.
In a previous post, I described how to import a character using the Daz importer's own add-on mechanism. However, using the Daz importer from a different Blender add-on is more useful. Here is a python snippet that imports the heroine of the upcoming version 1.5 documentation
import os
import import_daz
# Turn off error popups
import_daz.setSilentMode(True)
filepath = os.path.expanduser("~/Documents/DAZ 3D/Docs/anna.duf")
bpy.ops.daz.import_daz(filepath=filepath, fitMeshes='UNIQUE')
print("Script finished")
# The error message is the empty string if everything ok
msg = import_daz.getErrorMessage()
print("Error message: \"%s\"" % msg)
# Turn error popups on again
import_daz.setSilentMode(False)
Monday, June 15, 2020
Problem with resizing normal textures
Since Daz textures are often unnecessarily detailed and large, the Daz Importer includes a tool to lower the resolution and size of the textures, see http://diffeomorphic.blogspot.com/2019/10/resizing-textures.html. However, I recently noted a problem when it comes to resizing normal textures in TIF format: the resized normal textures react very differently with light than the original ones.
 Here is an example with Victoria 8. The left image has the original textures (4096x4096 or 2048x2048). In the middle image, the diffuse, bump, specularity and translucency textures, which are JPEG or PNG files, have been downsized one step (to 2048x2048 or 1024x1024). In the right image, the normal maps, which are TIF files, have also been downsized one step (from 4096x4096 to 2048x2048). Clearly there is a problem at the texture seams after we downsized the normal maps.
It is not yet clear to me if this problem is specific to TIF files, or if similar problem would arise if the normal maps were stored in a different file format. However, in practice TIF files are rarely used except as normal textures. The latest commit has a workaround for this problem: we can now choose which file types are downsized.
 Downsizing all file types except TIF (the defaults) avoids this problem, at least for many characters. And since all other textures are downsized, the memory requirements are still reduced significantly, although not quite as much as before.
It is not yet clear to me if this problem is specific to TIF files, or if similar problem would arise if the normal maps were stored in a different file format. However, in practice TIF files are rarely used except as normal textures. The latest commit has a workaround for this problem: we can now choose which file types are downsized.

Thursday, June 11, 2020
Two new buttons (and a renamed one)
Eliminate Empties
Some assets create empties that are not really useful in Blender but mostly in the way. A typical example is this jacket with buttons, where each button consists of a mesh that is parented to an empty that is parented to a bone.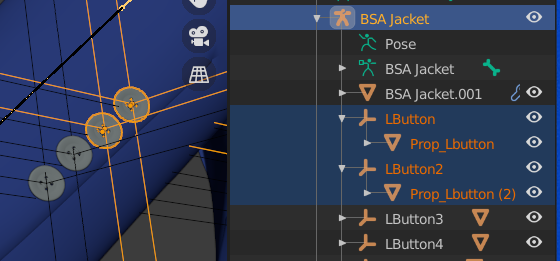
The new tool removes this extra layer of empties.


Other vendors implement jacket buttons as empties that are instanced to a mesh. Instanced empties are important because they show up in renders, and therefore the Eliminate Empties button does not remove them.
Import Custom JCMs
The Import Correctives button imports Joint Corrective Morphs (JCM) for the active character. The Daz Importer has a build-in list of locations where it looks for such morphs, depending on the character type. This means that it will only find the standard JCMs provided by DAZ. However, some vendors provide custom JCMs for their character. This is especially the case for monsters that deviate significantly from the standard character that they are based upon.
You can also load JCMs with Import Custom Morphs. That is not really useful, however, because then the shapekeys are driven by rig properties rather than bone rotations.
Transfer correctives should work for both standard and custom JCMs, since it transfers shapekeys driven by bone rotations irrespective of their origin.
Thursday, May 21, 2020
Invoking the DAZ Importer from a script
The DAZ Importer is normally used from the UI panel, but it also possible to invoke it from a python script. To illustrate this, and to figure out how it could be done, I wrote a simple add-on which loads a duf file into Blender with specific settings, without the need for any user interaction. Add-ons for the DAZ Importer were described in an earlier blog post, but this is the first time that I actually used the add-on mechanism for something useful.
Press Refresh in the Add-Ons panel to read in a list of all available add-ons, and then enable the Sample addon for DAZ importer.
 When the sample add-on is enabled, a new tab named Sample appears in the UI panel. It contains a single button named Import DAZ File, which invokes the DAZ Importer with specific arguments.
 The add-on is located in the file sample-addon.py. Let us have a look at that file. The button is defined by the following code:
class SAMPLE_OT_ImportDazFile(bpy.types.Operator):
bl_idname = "sample.import_daz_file"
bl_label = "Import DAZ File"
bl_description = "Import a specific duf file."
bl_options = {'UNDO'}
def execute(self, context):
from ..error import getErrorMessage, setSilentMode
# Turn off error popups
setSilentMode(True)
bpy.ops.daz.import_daz(
filepath = "/home/thomas/Dokument/DAZ 3D/Scenes/base8.duf",
unitScale = 1/2.54, # inches
skinColor = (1, 1, 0, 1), # yellow skin
clothesColor = (0, 0, 1, 1), # blue clothes
brightenEyes = 1.5, # brighter eyes
fitMeshes = 'UNIQUE', # Don't fit meshes.
useAutoMaterials = False, # Don't use auto shaders handleOpaque = 'PRINCIPLED', # Use principled node
handleRefractive = 'PRINCIPLED',# Use principled node
handleVolumetric = 'SSS', # Subsurface scattering
useEnvironment = False, # Don't Load environment
)
print("Script finished")
# The error message is the empty string if everything ok
msg = getErrorMessage()
print("Error message: \"%s\"" % msg)
# Turn error popups on again
setSilentMode(False)
return {'FINISHED'}
The work is done by the operator bpy.ops.daz.import_daz, which invokes the DAZ Importer. The arguments are the same that appear to the right of the file selector when you press the Import DAZ File button.
 This script loads a yellow Genesis 8 Female with blue basic wear and Tolouse hair, who is 70 inches = 5'10" tall.
 If the operator encounters an error when executed the DAZ Importer displays a pop-up dialog. This is usually not desirable when it is invoked from a script, because the pop-up requires user interaction. Pop-up dialogs can be disabled by entering silent mode. In silent mode errors are only reported in the terminal window, but execution in not interrupted. The calls setSilentMode(True) and setSilentMode(False) enter and exit silent mode.
Silent mode can also be toggled on and off in the Settings panel, although it should always be off during interactive use.
 You can check if the import operator encounters an error by retrieving the error message with getErrorMessage(). This function returns the empty string ("") if the operator succeeded completely, and a string starting with "ERROR" or "WARNING" otherwise.
Both setSilentMode and getErrorMessage are located in the file error.py, so you need to import them with the line
from ..error import getErrorMessage, setSilentMode
Press Refresh in the Add-Ons panel to read in a list of all available add-ons, and then enable the Sample addon for DAZ importer.
class SAMPLE_OT_ImportDazFile(bpy.types.Operator):
bl_idname = "sample.import_daz_file"
bl_label = "Import DAZ File"
bl_description = "Import a specific duf file."
bl_options = {'UNDO'}
def execute(self, context):
from ..error import getErrorMessage, setSilentMode
# Turn off error popups
setSilentMode(True)
bpy.ops.daz.import_daz(
filepath = "/home/thomas/Dokument/DAZ 3D/Scenes/base8.duf",
unitScale = 1/2.54, # inches
skinColor = (1, 1, 0, 1), # yellow skin
clothesColor = (0, 0, 1, 1), # blue clothes
brightenEyes = 1.5, # brighter eyes
fitMeshes = 'UNIQUE', # Don't fit meshes.
useAutoMaterials = False, # Don't use auto shaders handleOpaque = 'PRINCIPLED', # Use principled node
handleRefractive = 'PRINCIPLED',# Use principled node
handleVolumetric = 'SSS', # Subsurface scattering
useEnvironment = False, # Don't Load environment
)
print("Script finished")
# The error message is the empty string if everything ok
msg = getErrorMessage()
print("Error message: \"%s\"" % msg)
# Turn error popups on again
setSilentMode(False)
return {'FINISHED'}
The work is done by the operator bpy.ops.daz.import_daz, which invokes the DAZ Importer. The arguments are the same that appear to the right of the file selector when you press the Import DAZ File button.

Silent mode can also be toggled on and off in the Settings panel, although it should always be off during interactive use.

Both setSilentMode and getErrorMessage are located in the file error.py, so you need to import them with the line
from ..error import getErrorMessage, setSilentMode
Monday, April 27, 2020
Mini Material Editor Revisited
DAZ figures often have many materials that cover different parts of the body, like face, torso, arms, legs, etc. This makes it difficult to edit the materials in Blender, because we usually want to apply the same changes to all skin materials and it is difficult to miss something. For this reason the DAZ importer has the Mini Material Editor, which allows you to modify multiple materials simultaneously. The Mini Material Editor has just undergone a major overhaul to make it more intuitive and compresensive.
 To start editing a selection of materials, press Launch Material Editor at the bottom of the Material section. The Material Editor appears.
 The active object is a Genesis 8 Male. At the top we see the current material selection, which is set to Skin in this case. Below that follows a list of the materials which are affected by the edit.
 The material selections are the same as in DAZ Studio. Then follows a button to Change Material Selection, and then the material settings, conveniently grouped.
 Here we have opened up some groups of settings. To the left we see the original settings when the mesh has just been imported into Blender, and to the right we have made some modifications.
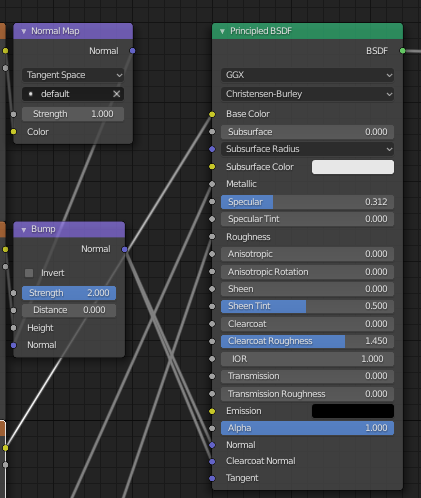
 Here is the original node tree. Note how the values of the nodes correspond to the values to the left.
 And here is the node tree with the changes applied. When a white color has been changed to something else, and there is a texture, a multiply node with the new color has been inserted. Similarly, if a texture is linked to a scalar socket with value 1.0, and the value is changed to something else, there is a new node which multiplies the texture with the appropriate value.
 After pressing Reset Material, the node tree changes back. The extra Multiply nodes are still there, but they have no effect since they multiply a color with white.
 The Change Material Selection button opens up an addition pop-up window, which allows you to choose a different material selection.
 After changing the selection to Skin-Lips-Nails, we see that more materials will be affected by the editing.
 If no material selection sets were specified in DAZ Studio for the active object, there are some default selections, based on the material properties. The default Skin and Skin-Lips-Nails selections are based on the material names, in the same way that the viewport color is.
 In this case the material node tree is dominated by a principled node, presumably because the first material in the list is metallic.


Subscribe to:
Posts (Atom)