DAZ figures often have many materials that cover different parts of the body, like face, torso, arms, legs, etc. This makes it difficult to edit the materials in Blender, because we usually want to apply the same changes to all skin materials and it is difficult to miss something. For this reason the DAZ importer has the Mini Material Editor, which allows you to modify multiple materials simultaneously. The Mini Material Editor has just undergone a major overhaul to make it more intuitive and compresensive.
To start editing a selection of materials, press Launch Material Editor at the bottom of the Material section. The Material Editor appears.
The active object is a Genesis 8 Male. At the top we see the current material selection, which is set to Skin in this case. Below that follows a list of the materials which are affected by the edit.
The material selections are the same as in DAZ Studio. Then follows a button to Change Material Selection, and then the material settings, conveniently grouped.
Here we have opened up some groups of settings. To the left we see the original settings when the mesh has just been imported into Blender, and to the right we have made some modifications.
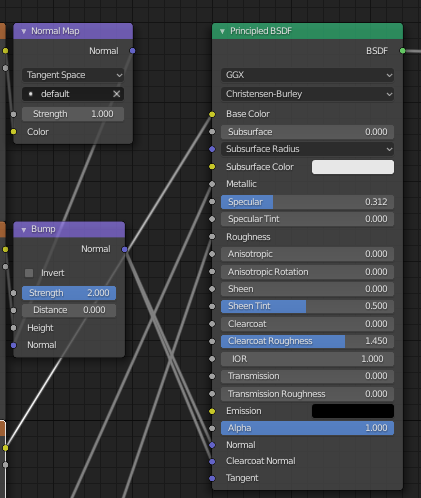
Here is the original node tree. Note how the values of the nodes correspond to the values to the left.
And here is the node tree with the changes applied. When a white color has been changed to something else, and there is a texture, a multiply node with the new color has been inserted. Similarly, if a texture is linked to a scalar socket with value 1.0, and the value is changed to something else, there is a new node which multiplies the texture with the appropriate value.
After pressing Reset Material, the node tree changes back. The extra Multiply nodes are still there, but they have no effect since they multiply a color with white.
The Change Material Selection button opens up an addition pop-up window, which allows you to choose a different material selection.
After changing the selection to Skin-Lips-Nails, we see that more materials will be affected by the editing.
If no material selection sets were specified in DAZ Studio for the active object, there are some default selections, based on the material properties. The default Skin and Skin-Lips-Nails selections are based on the material names, in the same way that the viewport color is.
In this case the material node tree is dominated by a principled node, presumably because the first material in the list is metallic.
Monday, April 27, 2020
Saturday, April 25, 2020
Render Settings
Rendering in Blender does not only depend on the materials and lighting, but also on the render settings. This is especially important for DAZ characters, which may render completely wrong if the render settings are too conservative.
The picture above is a close-up of Olympia 8 with make-up, rendered in DAZ Studio. The eyebrows and the make-up are given in a separate texture, which is laid over the face texture (diffuse overlay). Moreover, the translucency color has been changed to green for clarity.
When we render the same character in Blender, the result may look like this, which is clearly unacceptable. However, this does not mean that there is something wrong with the materials. The image above was rendered with the Cycles integrator preset to Direct Light, i.e. with the settings for the Light Paths shown above.
If we change the settings as in the picture above, we get something which resembles the DAZ render much better. In order to see the green tint, the number of volume bounces is set to two. To make the eye transparent, the number of diffuse bounces is set to four, and reflective and refractive caustics are both turned on.
In the latest version of the DAZ Importer, the add-on automatically updates the render settings for Cycles if they are too low to render the scene correctly. You will then see the following warning message when the scene has been imported.
This behavior can be changed with the Render Settings option in the Materials section of the Settings panel.
The picture above is a close-up of Olympia 8 with make-up, rendered in DAZ Studio. The eyebrows and the make-up are given in a separate texture, which is laid over the face texture (diffuse overlay). Moreover, the translucency color has been changed to green for clarity.
When we render the same character in Blender, the result may look like this, which is clearly unacceptable. However, this does not mean that there is something wrong with the materials. The image above was rendered with the Cycles integrator preset to Direct Light, i.e. with the settings for the Light Paths shown above.
If we change the settings as in the picture above, we get something which resembles the DAZ render much better. In order to see the green tint, the number of volume bounces is set to two. To make the eye transparent, the number of diffuse bounces is set to four, and reflective and refractive caustics are both turned on.
In the latest version of the DAZ Importer, the add-on automatically updates the render settings for Cycles if they are too low to render the scene correctly. You will then see the following warning message when the scene has been imported.
This behavior can be changed with the Render Settings option in the Materials section of the Settings panel.
- Ignore: Ignore insufficient render settings.
- Warn: Warn about insufficient render settings.
- Update: Update insufficient render settings (default).
Monday, April 20, 2020
New Export Script
An important part of the DAZ-to-Blender pipeline is exporting the final world-space coordinates of all vertices and bones. This step is necessary because it turned out to be too difficult to extract this information directly from the native DAZ files. Until now, the script that does this is called export_basic_data.dsa, and it exports a text file with the subscript .json.
The export script has now been replaced with the more appropriately named script export_to_blender.dsa. Like DAZ Studio itself, it compresses the exported file using gzip, which reduces the file size to one third. Compression has two advantages:
1. The expored files takes up less storage space, which is particularly important if you use an SSD disk.
2. They load faster, at least if they are stored on a mechanical hard disk, because less time is needed for disk access.
The new script exports files with the file extension .dbz (DAZ-Blender-Zipped). The Blender import add-on can read both .bdz files as well as the old .json file for backward compatibility.
To install the new export script, follow the same procedure as with the old script.
1. Choose Window > Workspace > Customize, or just hit F3.
2. Right click on Custom, and select Create New Custom Action.
3. Change both Menu Text and Description to Export To Blender.
4. Select export_to_blender.dsa in the to_daz_studio folder.
5. Drag the new action to the appropriate menu.
6. The export script appears in the File menu.
The export script has now been replaced with the more appropriately named script export_to_blender.dsa. Like DAZ Studio itself, it compresses the exported file using gzip, which reduces the file size to one third. Compression has two advantages:
1. The expored files takes up less storage space, which is particularly important if you use an SSD disk.
2. They load faster, at least if they are stored on a mechanical hard disk, because less time is needed for disk access.
The new script exports files with the file extension .dbz (DAZ-Blender-Zipped). The Blender import add-on can read both .bdz files as well as the old .json file for backward compatibility.
To install the new export script, follow the same procedure as with the old script.
1. Choose Window > Workspace > Customize, or just hit F3.
2. Right click on Custom, and select Create New Custom Action.
3. Change both Menu Text and Description to Export To Blender.
4. Select export_to_blender.dsa in the to_daz_studio folder.
5. Drag the new action to the appropriate menu.
6. The export script appears in the File menu.
Monday, March 30, 2020
BVH Retargeter
The BVH Retargeter is an add-on for Blender 2.80 and later. Its purpose is loading animations from BVH files to a given armature, and editing these animations in various useful ways. It is an updated and improved version of the MakeWalk add-on which I developed as part of the MakeHuman team.
The BVH Retargeter can be downloaded from the following locations:
Stable version 2.0: https://www.dropbox.com/s/gmkwymwu7obrh8q/retarget-bvh-v2.0-20200329.zip
Git repository: https://bitbucket.org/Diffeomorphic/retarget-bvh/src/master/
Documentation: http://diffeomorphic.blogspot.com/p/bvh-retargeter.html
Retargeting a BVH animation to an existing character consists of three easy steps:
The BVH Retargeter can be downloaded from the following locations:
Stable version 2.0: https://www.dropbox.com/s/gmkwymwu7obrh8q/retarget-bvh-v2.0-20200329.zip
Git repository: https://bitbucket.org/Diffeomorphic/retarget-bvh/src/master/
Documentation: http://diffeomorphic.blogspot.com/p/bvh-retargeter.html
Retargeting a BVH animation to an existing character consists of three easy steps:
- With the armature selected, press Load And Retarget.
- Select the BVH file in the file selector.
- The animation is loaded.
![]() |
| 1. With the armature selected, press Load And Retarget. |
![]() |
| 2. Select the BVH file in the file selector. |
![]() |
| 3. The animation is loaded. |
Saturday, March 21, 2020
Mesh Fitting Without Spurious Smoothing
Update April 20, 2020:
The latest versions of the export script automatically turns off High Resolution before exporting the vertex data, and then turns it back on. The procedure described below is thus unnecessary.Original post:
As explained in http://diffeomorphic.blogspot.com/p/export-from-daz-studio.html, the Daz importer needs a json file exported from Daz Studio in order to do mesh fitting correctly. The json file contains the vertex coordinates with all morphs applied. The final world space coordinates depend on a combination of shapekeys, poses, and morph transfer to clothes, and it simply turned out to be too difficult to extract this information from the duf files themselves. In contrast, finding the coordinates with a Daz Studio script was quite easy, since the Daz scripting API has a function that accesses the cached geometry directly.
However, Alessandro Padovani discovered a problem with this: the cached geometry depends not only on the morphs but on mesh smoothing as well, see https://bitbucket.org/Diffeomorphic/import-daz/issues/30/major-subdivision-bug. This leads to some issues, e.g. in the teeth and eyes areas. To avoid this issue all characters must be at base resolution when exported from Daz Studio, even if the duf file is saved at high resolution.
The problem can be explained with a subdivided plane consisting of four square faces. In Daz Studio, the mesh looks like this:
![]() |
| Plane in Daz Studio, at subd level = 2 |
![]() |
| Plane in Blender, without and with subsurf modifier |
![]() |
| Plane in Daz Studio, at Subd level = 0 |
To fix this we must set the Resolution Level to Base before exporting the json file. We now have the plane without the undesired smoothing.
![]() |
| Plane in Daz Studio, at base resolution. The subd level is irrelevant. |
![]() |
| Plane in Blender, without and with subsurf modifier |
To summarize: to make meshes look the same in Blender and Daz Studio, save the scene at high resolution but export the json file at base resolution.
A scene often consists of several characters with clothes and hair. To quickly change the resolution of all meshes:
- Select all objects in the Scene tab.
- Select all objects in the Parameters tab.
- Search for resolution in the search box.
- Change the Resolution Level to Base.
Friday, February 28, 2020
DAZ Importer - Stable Version 1.4.1
Many bugs have been fixed since the stable version 1.4 of the DAZ importer was released, and it is time to release a new stable version to replace it. The new stable version 1.4.1 can be downloaded from https://www.dropbox.com/s/so16so43sxqng83/import-daz-v1.4.1-20200227.zip.
The documentation has not been updated this time. The user interface has not changed much, except that options have moved from the panel to pop-up menus. This makes it clearer which options belong to each button.
Apart from bugfixes, a few new features have been added since version 1.4, which have been described in the following blog posts.
The documentation has not been updated this time. The user interface has not changed much, except that options have moved from the panel to pop-up menus. This makes it clearer which options belong to each button.
Apart from bugfixes, a few new features have been added since version 1.4, which have been described in the following blog posts.
Saturday, February 1, 2020
Posing performance
The Merge Rigs button changed slightly in the latest version. Now all meshes are put in a separate sub-collection under the armature's collection, like this:
This makes it easy to temporarily exclude all meshes from the scene. This is useful e.g. when importing many poses to an action, because after loading each frame the scene is updated, and most of the time is spent updating heavy meshes.
As a test, I imported a directory with 78 pose files. It took 32 seconds with the meshes in the scene, but only 2 seconds with the meshes excluded, i.e. a speed-up with a factor of 16. Not bad!
To get that speed-up, the meshes must belong to a collection which is excluded from the scene. Just hiding meshes in the viewport does not improve loading speed. Apparently hidden meshes are still updated.
This makes it easy to temporarily exclude all meshes from the scene. This is useful e.g. when importing many poses to an action, because after loading each frame the scene is updated, and most of the time is spent updating heavy meshes.
As a test, I imported a directory with 78 pose files. It took 32 seconds with the meshes in the scene, but only 2 seconds with the meshes excluded, i.e. a speed-up with a factor of 16. Not bad!
To get that speed-up, the meshes must belong to a collection which is excluded from the scene. Just hiding meshes in the viewport does not improve loading speed. Apparently hidden meshes are still updated.
Subscribe to:
Posts (Atom)